Your furniture works hard every day, collecting dust, spills, and the occasional mystery stain. But a deep clean doesn't have to mean harsh chemicals or expensive services. With the right approach, you can bring back that just-bought look without the hassle.
These 23 ideas cover every material and room in your house, from the living room sofa to the dining table. Each tip is practical, tested, and designed to deliver visible results.
Whether you're dealing with pet odors, ink marks, or just everyday grime, there's a solution here that fits your schedule and budget. Let's get started.
1. Vacuum Upholstery with a Brush Attachment

Your sofa and armchairs trap dust, crumbs, and pet hair like a magnet. A quick pass with a vacuum's soft brush attachment lifts surface debris before it works its way into the fibers. This simple step keeps upholstery looking fresh and reduces allergens without any chemicals.
Start by checking your vacuum's brush attachment—it should be soft-bristled to avoid scratching fabric. Run it over cushions, armrests, and the back of the furniture in overlapping strokes. For crevices where crumbs hide, use the crevice tool.
Do this weekly to maintain a clean surface and extend the time between deep cleans.
Why The Brush Attachment Matters
A bare vacuum nozzle can push dirt deeper into fabric or damage delicate threads. The brush agitates fibers gently, loosening embedded particles so the suction can pull them out. It's especially effective on microfiber, velvet, and cotton blends.
Best Practices For Different Fabrics
For delicate fabrics like silk or linen, use the lowest suction setting and a gentle brushing motion. On sturdy materials like polyester or wool, you can apply slightly more pressure. Always test on an inconspicuous area first to ensure the brush doesn't cause pilling.
How Often Should You Vacuum?
Aim for once a week in high-traffic areas and every two weeks for less-used pieces. If you have pets, increase frequency to every few days to prevent hair from bonding with the fabric. Regular vacuuming also helps prevent odors from settling in.
2. Spot Clean Fabric Sofas with Dish Soap and Water
Fabric sofas are magnets for spills, pet accidents, and everyday grime. Before you reach for a harsh chemical cleaner, try this gentle method that uses ingredients you already have under your sink. A simple dish soap and water solution can lift fresh stains without damaging the fabric.
Mix a few drops of mild dish soap with warm water, dab gently on stains, and blot dry. This method works best on water-safe fabrics like cotton, linen, or polyester blends. Always test a hidden area first to ensure the color doesn't bleed or the fabric doesn't water stain.
Choosing The Right Soap
Not all dish soaps are created equal. Opt for a mild, dye-free, and fragrance-free formula. Harsh degreasers or antibacterial soaps may strip the fabric's protective coating or leave a sticky residue.
A drop or two is plenty—too much suds means more rinsing and longer drying time.
The Right Dabbing Technique
Blot, don't rub. Rubbing pushes the stain deeper into the fibers and can cause the fabric to pill or fray. Use a clean white cloth or paper towel, dip it in the soapy water, and gently dab the stain from the outer edges toward the center.
Work in small sections to avoid spreading.
Drying And Finishing Touches
After dabbing, use a dry cloth to blot away excess moisture. Then let the sofa air dry completely—open windows or turn on a fan to speed things up. Once dry, fluff the cushion fibers with your fingers or a soft brush to restore the texture.
If a ring remains, lightly mist the area with plain water and blot again.
3. Deodorize Upholstery with Baking Soda
Fabric sofas and chairs can trap odors from pets, cooking, and daily use. Instead of masking smells with sprays, baking soda naturally absorbs them without leaving residue. This simple method works on couches, armchairs, and even fabric headboards.
Sprinkle a generous layer of baking soda over the entire surface of your upholstery. Focus on areas where odors are strongest, like armrests and seat cushions. Let it sit for at least 15 minutes—or longer for stubborn smells.
Then vacuum thoroughly using an upholstery attachment to remove every trace. For extra freshness, add a few drops of essential oil to the baking soda before sprinkling. This trick works best on dry fabric, so avoid using it on wet stains.
Why Baking Soda Works
Baking soda is a natural deodorizer that neutralizes acidic and alkaline odor molecules. It doesn't just cover smells—it chemically removes them. Plus, it's gentle on fabrics and safe for pets and kids.
Best Fabrics For This Method
This technique works on cotton, linen, polyester, and most synthetic blends. Avoid using baking soda on delicate fabrics like silk or velvet, as the powder can get trapped in fibers. Always test on a hidden area first.
When To Deodorize
Aim to deodorize upholstery every few months, or more often if you have pets or smokers. It's also a good practice after hosting gatherings or when you notice a musty smell.
4. Remove Pet Hair with a Damp Rubber Glove
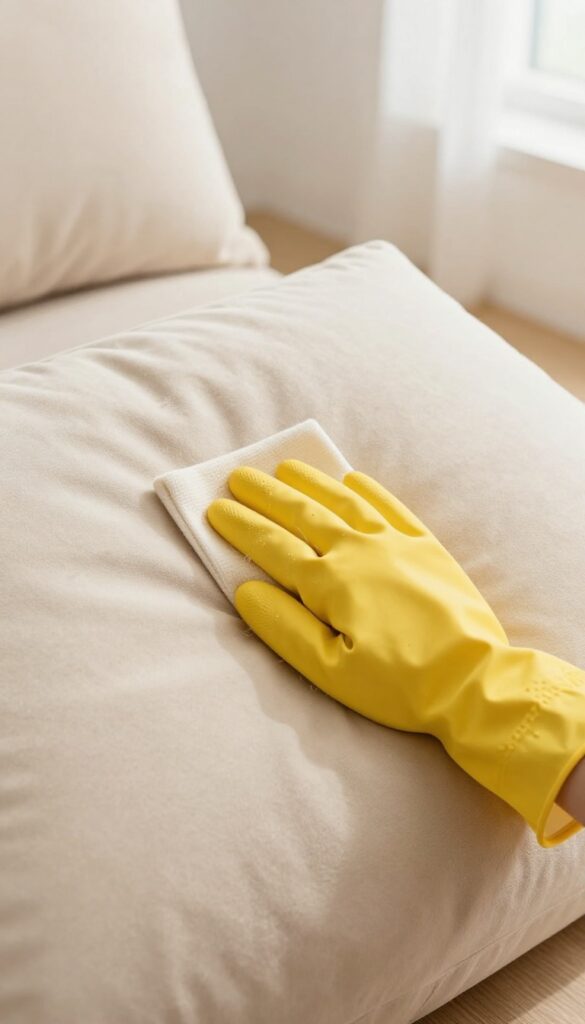
Pet hair on furniture can feel like a losing battle, especially if you have a shedding dog or cat. But there's a simple trick that costs almost nothing and works surprisingly well: a damp rubber glove. Run your hand over the upholstery and watch the hair ball up into clumps that you can easily pick up or vacuum away.
Why It Works
Rubber creates static electricity when it moves across fabric, which attracts pet hair. A little moisture increases the grip, making it even more effective. The hair rolls into tidy clumps instead of flying around or sticking to your clothes.
Step-by-step
Put on a clean rubber glove and dampen it slightly—just enough to feel cool, not dripping. Start at the top of the cushion and wipe in one direction. The hair will gather into a ball.
Pick it off and continue. For stubborn spots, rub in small circles.
Best Fabrics To Use This On
This works great on microfiber, cotton, polyester blends, and wool. Avoid using it on delicate silk or velvet, as moisture can cause water spots. Always test a hidden area first if you're unsure.
Pro Tip For Maintenance
Keep a dedicated rubber glove near your cleaning supplies. A quick once-over every few days prevents hair from embedding deep into the fabric. You can also use this method on car seats and pet beds.
5. Clean Leather Furniture with a Vinegar and Olive Oil Mix
Leather sofas and chairs develop a beautiful patina over time, but they also attract dust, body oils, and the occasional stain. Commercial leather cleaners can be pricey and full of chemicals you might not want near your family. A simple mix of white vinegar and olive oil cleans and conditions in one step, leaving your leather soft and naturally shiny.
This DIY cleaner is surprisingly effective. The vinegar cuts through grime and disinfects, while the olive oil replenishes moisture and prevents cracking. It works on most finished leather furniture, but always test on a hidden spot first.
For best results, dust or vacuum the leather before applying the mixture.
What You'll Need
Grab a spray bottle or small bowl, white vinegar, olive oil, and a couple of soft microfiber cloths. That's it. No special equipment required.
How To Mix And Apply
Combine equal parts white vinegar and olive oil in your container. Shake or stir well. Dampen a soft cloth with the mixture—don't soak it—and wipe the leather in gentle, circular motions.
Work in small sections so the solution doesn't dry before you buff it.
Buffing For A Natural Shine
After applying, use a dry microfiber cloth to buff the leather. This removes any excess oil and brings out a soft, even sheen. Let the furniture air dry for an hour before sitting on it.
Your leather will feel supple and look refreshed.
6. Condition Leather with Coconut Oil
Leather furniture adds warmth and style to any room, but it needs a little TLC to stay looking its best. Over time, leather can dry out, crack, or lose its softness—especially in homes with heating or air conditioning. Coconut oil is a natural, affordable way to nourish the material and keep it supple without resorting to commercial conditioners that may contain synthetic additives.
Coconut oil penetrates leather fibers, restoring moisture and flexibility. It also creates a protective barrier that repels dust and minor spills. Best of all, it's non-toxic and leaves a subtle, pleasant scent.
Here's how to use it effectively.
Choose The Right Oil
Use virgin coconut oil—it's pure and free of additives. Avoid fractionated or refined oils, as they may not absorb as well. A small jar goes a long way, so you don't need much.
Test First
Before applying to the whole piece, dab a tiny amount on an inconspicuous area, like the back or underside. Wait 24 hours to check for discoloration or residue. Most leathers take it well, but it's always smart to test.
Apply Sparingly
Scoop a pea-sized amount and rub it between your palms to warm it up. Then massage it into the leather using circular motions. Focus on dry or creased areas.
Less is more—too much oil can leave a greasy film.
Buff And Let Absorb
After applying, let the oil sit for 10–15 minutes. Then buff the surface with a clean, dry cloth to remove any excess. Your leather should feel soft and look slightly richer.
Repeat every 3–6 months, depending on use and climate.
7. Dust Wood Furniture with a Microfiber Cloth
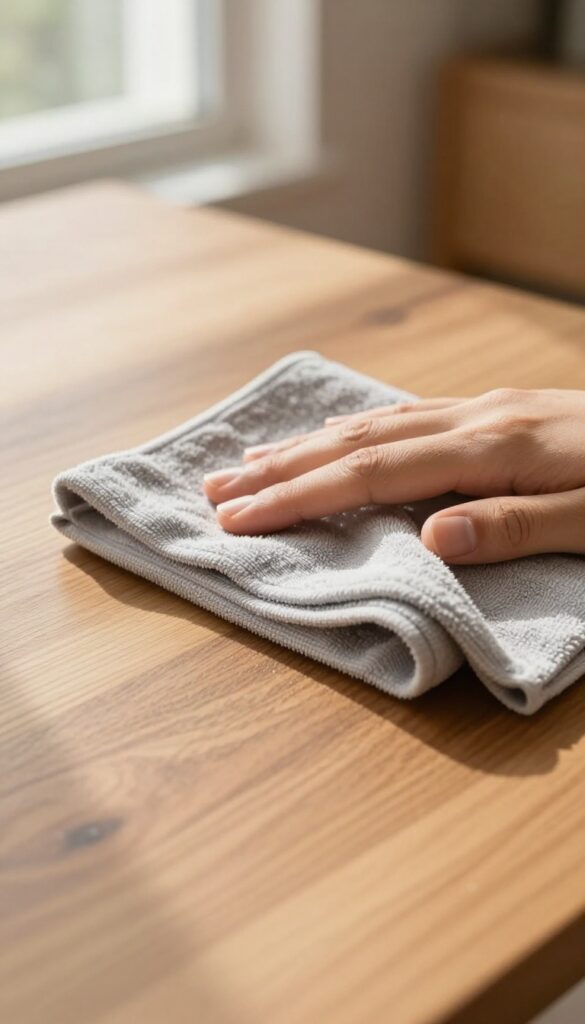
Wood furniture adds warmth and character to any room, but it also attracts a fine layer of dust that can dull its natural beauty. The wrong cleaning tool can leave scratches or push dust around instead of lifting it away. A microfiber cloth offers a simple, effective solution that protects your investment while keeping surfaces spotless.
Dusting wood furniture seems straightforward, but using the wrong cloth can do more harm than good. Microfiber cloths are designed with ultra-fine fibers that trap dust particles rather than pushing them into the air or across the surface. This makes them ideal for wood, which can scratch easily if you use a rough rag or one that's too abrasive.
For best results, use a dry microfiber cloth and wipe in the direction of the wood grain. This technique lifts dust without disturbing the finish. Avoid using furniture polish every time you dust—overuse can build up and attract more grime.
Instead, reserve polish for occasional deep cleaning. Microfiber cloths are reusable and machine washable, making them an eco-friendly choice that saves money over disposable dusters.
Why Microfiber Works Best
Microfiber cloths have split fibers that create a static charge, attracting dust like a magnet. Unlike cotton or feather dusters, they don't just move dust around—they trap it deep in the fabric. This prevents scratching and keeps the air cleaner, which is especially helpful if you have allergies.
How To Dust Properly
Start at the top of the furniture and work your way down to avoid redistributing dust. Use gentle, even strokes following the wood grain. For carved details or crevices, fold the cloth into a smaller shape to reach tight spots.
Don't press too hard—let the microfiber do the work.
When To Wash Your Cloth
A dirty microfiber cloth can scratch surfaces, so wash it after each use. Use mild detergent without fabric softener, which clogs the fibers. Air dry or tumble dry on low heat.
A clean cloth ensures you're not just spreading dust around.
8. Polish Wood with a DIY Lemon and Olive Oil Spray
Commercial wood polishes often contain silicones and solvents that build up over time. A simple homemade spray with lemon and olive oil cleans, nourishes, and adds a natural shine without the residue. It's gentle enough for weekly use and costs pennies per batch.
To make this polish, combine 1/4 cup olive oil, 2 tablespoons lemon juice, and a few drops of water in a spray bottle. Shake well before each use. Apply sparingly to a soft cloth, then wipe onto the wood in the direction of the grain.
Buff lightly with a dry section of the cloth for a streak-free finish.
Why This Mix Works
Olive oil moisturizes the wood, preventing cracks and dryness. Lemon juice cuts through grease and grime while leaving a fresh, clean scent. The small amount of water helps distribute the oil evenly without soaking into the wood.
Application Tips For Best Results
Always test on an inconspicuous area first. Use a microfiber cloth to avoid lint. Apply the spray to the cloth, not directly onto the furniture, to control the amount.
Buff in circular motions, then finish with straight strokes along the grain.
When To Skip This Method
Avoid this polish on unfinished, raw, or waxed wood, as the oil can darken or stain it. Also skip it on surfaces that get heavy moisture, like kitchen tabletops near the sink, because the oil can trap water and cause cloudiness.
9. Remove Water Rings from Wood with Mayonnaise
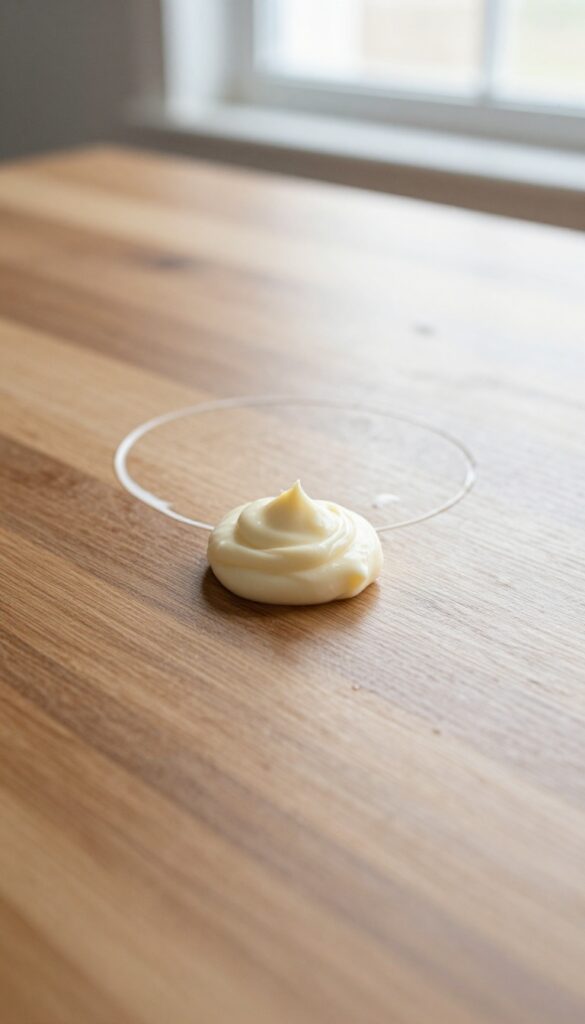
White water rings on a wooden table can make even the nicest furniture look neglected. But you don't need a professional refinisher to fix them. A common kitchen ingredient—mayonnaise—can lift those cloudy marks without sanding or stripping.
The science is simple: the oils in mayonnaise penetrate the wood's finish and displace the trapped moisture that causes the white ring. This works best on fresh or light rings; deep, dark stains may need more aggressive treatment. For best results, use full-fat mayonnaise (low-fat versions have less oil).
How To Apply Mayonnaise To Water Rings
Start by dabbing a small amount of mayonnaise onto a soft, lint-free cloth. Rub it gently over the water ring, covering the entire mark with a thin, even layer. Don't scrub—just spread it on like you're buttering bread.
Let it sit for at least an hour, or overnight for stubborn rings. The longer it sits, the more time the oils have to work.
Wiping Clean And Checking Results
After the waiting period, wipe off the mayonnaise with a clean, dry cloth. Use a circular motion to buff the area lightly. The white ring should be noticeably faded or completely gone.
If traces remain, repeat the process. Once satisfied, wipe the spot with a damp cloth to remove any oily residue, then dry immediately.
When Mayonnaise Won't Work
This trick works best on sealed wood finishes like polyurethane or lacquer. If the ring has penetrated the stain or the wood is raw, mayonnaise may not help. In those cases, try a mixture of equal parts baking soda and toothpaste (non-gel) rubbed gently with a damp cloth, or consider a wood touch-up marker.
Always test any method on an inconspicuous area first.
10. Clean Wicker Furniture with a Soft Brush and Salt Water
Wicker furniture adds a natural, airy feel to patios, sunrooms, and porches, but those woven crevices are master dust collectors. A simple salt water scrub can lift grime without damaging the fibers, and it costs pennies. The key is using a soft brush and drying the piece in the shade to prevent warping or discoloration.
Mix one tablespoon of salt per cup of warm water until dissolved. Dip a soft-bristled brush (like a vegetable brush) into the solution and gently scrub along the weave, working in sections. Rinse with a damp cloth or spray bottle filled with fresh water, then blot excess moisture with a towel.
Place the furniture in a shaded, well-ventilated area to dry completely—direct sunlight can cause the rattan or reed to become brittle. For stubborn mildew spots, add a splash of white vinegar to the salt water.
Why Salt Water Works
Salt is a mild abrasive that helps dislodge dirt without scratching the delicate fibers. It also has natural antimicrobial properties that can inhibit mold and mildew growth, which is common in outdoor wicker. Unlike harsh chemical cleaners, salt water won't dry out or weaken the material.
Choosing The Right Brush
A soft-bristled brush is essential—too stiff and you risk fraying or breaking the woven strands. An old toothbrush works great for tight corners and intricate weaves. For larger flat surfaces, a microfiber cloth wrapped around a sponge can be a gentler alternative.
Drying Without Damage
After rinsing, use a clean towel to press out as much water as possible. Never use heat or direct sun to speed up drying; that can cause the fibers to crack. Instead, let the piece air dry in a shady spot with good airflow.
If the furniture has cushions, remove them and clean separately.
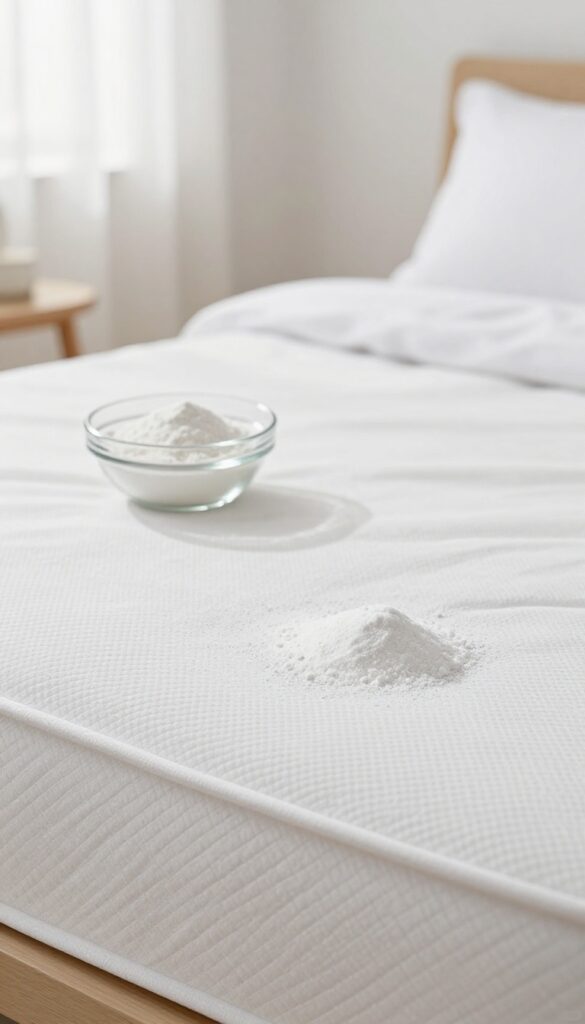
11. Refresh Mattress Stains with Hydrogen Peroxide and Baking Soda
Mattress stains happen—sweat, spills, or the occasional accident. But you don't need a steam cleaner or harsh chemicals to get them out. A simple mix of hydrogen peroxide, baking soda, and dish soap works wonders on organic stains like blood, urine, or sweat.
It's cheap, non-toxic, and surprisingly effective.
Start by blotting up any fresh moisture with a clean cloth. Then mix 1 cup of hydrogen peroxide (3%) with 3 tablespoons of baking soda and a drop of dish soap. Stir until the baking soda mostly dissolves—it's okay if a little remains.
Pour or spray the mixture onto the stain, making sure to saturate it well. Let it sit for 2-3 hours or until completely dry. The baking soda will pull moisture and odor out, while the peroxide breaks down stain molecules.
Once dry, just vacuum up the residue. For stubborn stains, repeat the process or let it sit overnight. Always test on an inconspicuous area first to check for colorfastness.
Why This Combo Works
Hydrogen peroxide is a mild bleach that oxidizes stains without damaging most mattress fabrics. Baking soda absorbs odors and moisture, and dish soap helps lift greasy residues. Together, they create a gentle but powerful cleaning reaction that's safe for most mattresses.
Best Stain Types To Tackle
This method is ideal for organic stains: blood, sweat, urine, vomit, and general yellowing. It's less effective on ink, dye, or oil-based stains. For those, you might need a different approach.
But for everyday mattress maintenance, this is your go-to.
Drying And Aftercare
After vacuuming, let the mattress air out completely before remaking the bed. Open windows or use a fan to speed up drying. If the stain is old or set-in, you may need to repeat the process.
Once dry, sprinkle a thin layer of baking soda over the entire mattress, let it sit for an hour, then vacuum to freshen it up.
12. Deodorize Mattresses with Baking Soda and Essential Oils
Mattresses absorb sweat, skin oils, and odors over time, even with a mattress protector. A simple baking soda treatment can neutralize those smells and leave your bed feeling fresh without any harsh chemicals.
Why Baking Soda Works
Baking soda is a natural odor absorber. It pulls moisture and smells out of the fabric fibers, leaving the mattress drier and fresher. Adding a few drops of lavender oil not only boosts the deodorizing power but also leaves a calming scent that can help you sleep better.
How To Apply The Treatment
First, strip all bedding and vacuum the mattress surface to remove loose dust and debris. In a small bowl, mix one cup of baking soda with 10–15 drops of lavender essential oil. Stir well to distribute the oil evenly.
Sprinkle the mixture generously over the entire mattress, focusing on any stained or smelly areas. Let it sit for at least 30 minutes—longer if the mattress is heavily used.
Vacuuming And Finishing Touches
After the wait, use the upholstery attachment on your vacuum to thoroughly remove all the baking soda. Go over the mattress in slow, overlapping passes to ensure no residue remains. For extra freshness, you can repeat this process once a month.
Finally, make the bed with clean sheets and enjoy the crisp, clean scent.
13. Clean Glass Tabletops with Rubbing Alcohol
Glass tabletops look sleek, but they show every fingerprint, smudge, and dust particle. Commercial glass cleaners work, but they often leave a hazy residue or contain ammonia that can damage nearby surfaces. Rubbing alcohol is a simple, streak-free alternative that dries quickly and cuts through grease and grime.
To clean, mix equal parts rubbing alcohol and water in a spray bottle, or spray alcohol directly onto a microfiber cloth. Wipe the glass in a circular motion, then buff dry with a clean section of the cloth. Avoid spraying directly on the glass to prevent drips on the frame or base.
This method works on coffee tables, dining tables, and glass shelves.
Why Rubbing Alcohol Works
Rubbing alcohol evaporates faster than water, so it leaves no streaks. It also dissolves oils from fingerprints and food residues without harsh chemicals. Unlike vinegar, it doesn't leave a smell, and unlike ammonia, it won't damage tinted glass or nearby finishes.
Best Practices For A Flawless Finish
Use a lint-free microfiber cloth—paper towels can leave fibers and scratches. Wipe in one direction, then switch to a dry cloth for buffing. For stubborn spots like dried-on juice or sticky residue, let the alcohol sit for a few seconds before wiping.
Clean on a cloudy day or in indirect light to avoid streaking from rapid evaporation.
When To Avoid This Method
Don't use rubbing alcohol on glass with painted or etched designs, as it can strip the paint. Also avoid it on tempered glass that has a protective coating—check the manufacturer's instructions. For antique glass or mirrors with silver backing, stick to a gentle soap-and-water solution.
14. Remove Crayon Marks from Wood with Baking Soda Paste
Kids and crayons are a creative combo, but when that creativity lands on your wood furniture, it can feel like a permanent mark. Before you panic, know that a simple pantry staple can fix it. Baking soda is gentle enough to not damage the finish but effective enough to lift those waxy stains.
Crayon marks on wood are basically wax and pigment stuck to the surface. The key is to use a mild abrasive that breaks down the wax without scratching the wood. Baking soda fits the bill perfectly.
It's non-toxic, cheap, and already in your kitchen cabinet. The paste method works on finished wood, like tables, chairs, and cabinets, but test on an inconspicuous area first if you're unsure about the finish.
Make The Paste
Mix equal parts baking soda and water in a small bowl. Stir until it forms a thick, spreadable paste. You want it to be like toothpaste—not too runny and not too dry.
If it's too thin, add more baking soda; if too thick, add a drop of water.
Gently Rub The Marks
Dip a soft cloth or sponge into the paste and gently rub the crayon marks in a circular motion. Don't press hard—let the baking soda do the work. You should see the color start to transfer to the cloth.
For stubborn marks, let the paste sit on the area for a minute or two before rubbing.
Wipe Clean And Dry
Once the crayon is gone, dampen a clean cloth with water and wipe away any baking soda residue. Then dry the area with a soft towel. Your wood should look clean and mark-free.
If any faint trace remains, repeat the process.
15. Clean Fabric Headboards with a Lint Roller
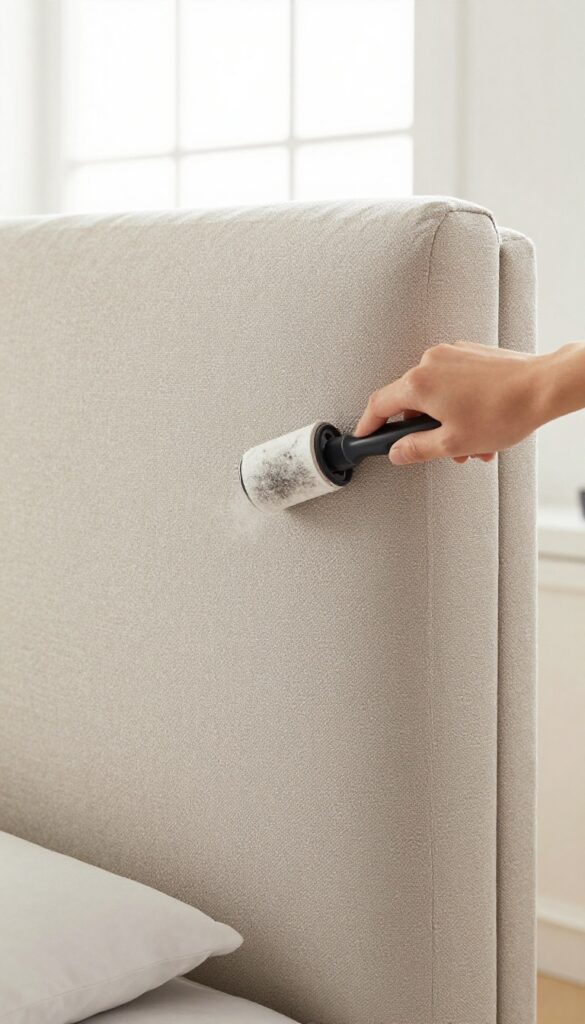
Fabric headboards look cozy but trap dust, hair, and dead skin cells. You don't need a vacuum or upholstery attachment for a quick refresh. A simple lint roller does the job in seconds.
Lint rollers aren't just for clothes. They're perfect for fabric headboards because the adhesive sheets grab particles that settle into the weave. This method is gentle on the fabric and won't disturb the padding or backing.
Keep one in your nightstand for a weekly once-over.
Why Lint Rollers Work Best
The sticky surface lifts dust and pet hair without pushing them deeper into the fabric. Vacuuming can sometimes embed particles, but a lint roller removes them cleanly. It's also quieter and less disruptive if you're cleaning while someone is sleeping.
How To Do It Right
Start at the top of the headboard and roll downward in overlapping strokes. Use firm, even pressure. When the sheet loses stickiness, peel it off and continue with a fresh one.
For stubborn spots, go over the area a few times.
When To Deep Clean Instead
A lint roller handles surface debris, but for stains or odors, you'll need a deeper approach. Spot-clean with a mild upholstery cleaner or baking soda paste. If the headboard is removable, consider machine-washing the cover if the care label allows.
Bonus Tip For Pet Owners
If your pet sleeps on the bed, the headboard collects extra fur. Use a rubber glove to loosen embedded hair first, then follow up with the lint roller. This combo removes even the most stubborn pet hair.
16. Remove Ink Stains from Leather with Hairspray
An ink leak in your pocket can leave a stubborn mark on your leather sofa or chair. Before you panic, grab a can of hairspray from the bathroom—it's surprisingly effective at breaking down ink without damaging the leather. The alcohol in the spray helps dissolve the ink, making it easy to lift away.
Spray the hairspray directly onto the ink stain, making sure it's thoroughly wet. Let it sit for a few seconds, then blot gently with a clean, dry cloth. Repeat the process until the stain fades, then wipe the area with a damp cloth to remove any residue.
Finally, condition the leather to keep it soft and supple.
Why Hairspray Works On Ink
Hairspray contains alcohol, which acts as a solvent for many types of ink. The alcohol helps break down the pigments, allowing them to be lifted from the leather's surface. This method is gentle enough for most finished leathers but avoid using it on untreated or aniline leather, as it may cause discoloration.
Step-by-step Application
First, test the hairspray on a hidden area of the leather to ensure it doesn't cause damage. Then, spray the ink stain directly, covering it completely. Use a soft, lint-free cloth to blot—don't rub, as that can spread the ink.
Keep blotting and respraying until no more ink transfers to the cloth. Finish by wiping with a damp cloth and applying leather conditioner.
When To Call A Professional
If the stain is old or very large, or if your leather is delicate (like aniline or suede), it's best to call a professional. Repeated attempts with hairspray could dry out or discolor the leather. For valuable pieces, a specialist can use commercial cleaners that are safer for the material.
17. Clean Dining Chairs with a DIY All-Purpose Spray
Dining chairs see a lot of action—spilled wine, sticky fingers, and crumbs from countless meals. Before you reach for a commercial cleaner full of mystery ingredients, try a simple homemade spray that works on most finishes. It’s cheap, non-toxic, and surprisingly effective at cutting through grease and grime.
Mix equal parts water and white vinegar in a spray bottle, then add a few drops of liquid dish soap. Shake gently to combine. Always spray the solution onto a microfiber cloth first, not directly onto the furniture.
This prevents excess moisture from seeping into cracks or padding. Wipe down the chair frame, seat, and backrest, then buff dry with a clean cloth. For fabric seats, test on an inconspicuous area first.
Why This Diy Spray Works
Vinegar is a mild acid that breaks down dirt and disinfects, while dish soap lifts grease. Together they create a gentle but powerful cleaner that’s safe for most sealed wood, metal, and plastic chairs. It’s also cheap and uses ingredients you likely already have.
When To Avoid This Method
Skip this spray on unsealed wood, antique finishes, or delicate upholstery. The vinegar can strip wax or damage porous surfaces. For those, stick to a dedicated wood cleaner or a dry upholstery brush.
Tips For Best Results
Wipe chairs weekly to prevent buildup. For stubborn spots, let the spray sit for 30 seconds before wiping. Always dry the chair thoroughly to avoid water rings or mildew.
And remember—spray the cloth, not the chair.
18. Remove Gum from Furniture with Ice
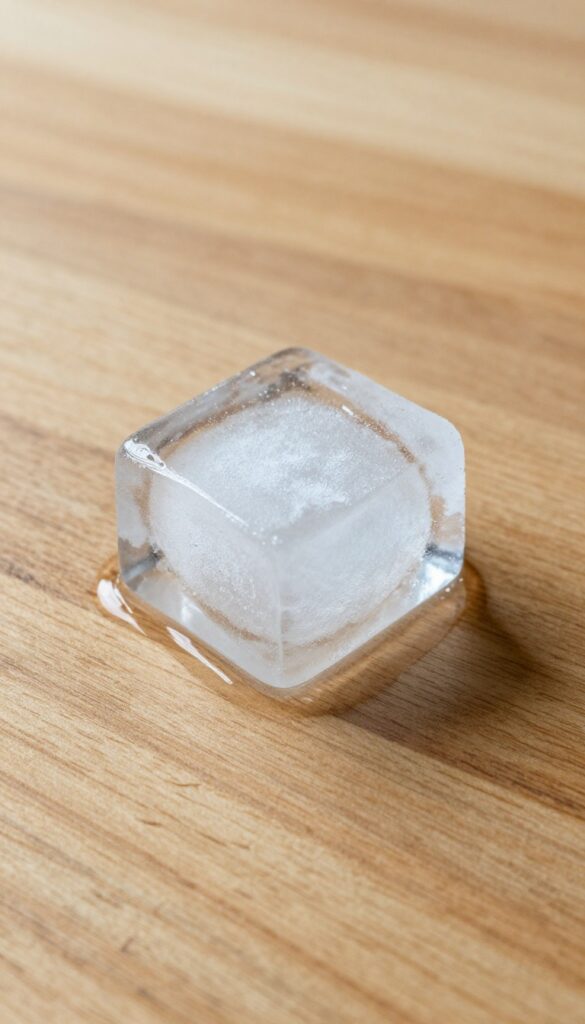
Chewing gum stuck to furniture is one of those annoyances that seems impossible to fix without damaging the surface. But the solution is surprisingly simple and uses something you already have in your freezer. Ice hardens the gum, making it brittle enough to pop off cleanly without leaving sticky residue behind.
This method works on most hard surfaces like wood, metal, and plastic, and even on some fabrics. The key is patience and the right tools. Here's how to do it right.
Why Ice Works Best
Gum is a soft, sticky polymer that becomes hard and brittle when cold. By freezing it, you eliminate the stickiness and turn the gum into a solid chunk that can be lifted or scraped away. No chemicals, no scrubbing, and no risk of spreading the mess.
Step-by-step Removal
Grab a few ice cubes and hold them directly on the gum for about 30 seconds to a minute. You'll feel the gum stiffen. Once it's hard, use a plastic knife or a credit card to gently pry it off.
Work from the edges inward. If any bits remain, repeat the process. For fabric, place a bag of ice on the gum and let it sit for 5 minutes before scraping.
Aftercare For The Surface
Once the gum is gone, wipe the area with a damp cloth to remove any residue. For wood furniture, follow up with a furniture polish to restore the finish. For fabric, blot with a mild detergent solution and let it air dry.
Your furniture will look good as new.
19. Clean Outdoor Furniture with a Baking Soda Scrub
Outdoor furniture takes a beating from sun, rain, and pollen. A simple baking soda scrub can lift grime without damaging plastic or metal surfaces. It's cheap, non-toxic, and surprisingly effective.
Mix baking soda with just enough water to form a thick paste. Apply it to the furniture with a soft sponge or cloth, focusing on areas with built-up dirt or mildew. Let it sit for 10–15 minutes, then scrub gently with a brush.
Rinse thoroughly with a garden hose and let air dry.
Why Baking Soda Works
Baking soda is a mild abrasive that breaks down dirt and grease without scratching. It also neutralizes odors and helps remove mildew stains. Unlike bleach, it won't harm plants or grass nearby.
Best For Plastic And Metal
This method works great on resin, plastic, aluminum, and powder-coated steel. Avoid using it on unfinished wood or wicker, as the moisture can cause damage. For those materials, stick to a dry brush or specialized cleaner.
Rinse Thoroughly
Leftover baking soda residue can leave white streaks or attract more dirt. Always rinse well with a hose, and wipe down with a clean cloth if needed. Let the furniture dry completely before using cushions or covers.
20. Polish Chrome or Metal Furniture with Baby Oil
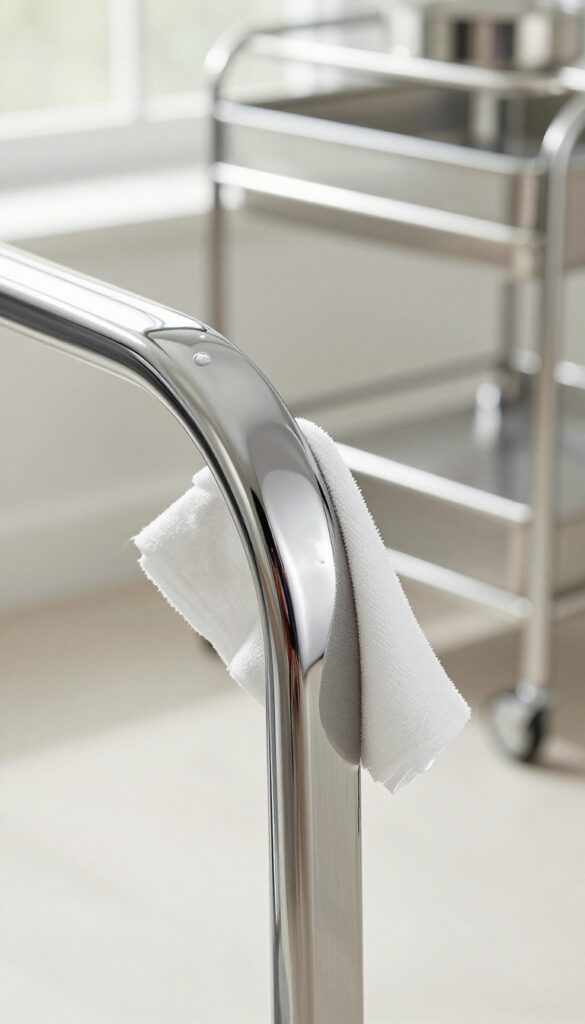
Metal furniture adds a sleek, modern touch to any room, but it also shows every fingerprint, water spot, and smudge. Before you reach for a commercial metal polish, check your nursery cabinet. Baby oil is surprisingly effective at restoring shine to chrome, stainless steel, and other metal surfaces without leaving harsh chemical residue.
Why Baby Oil Works
Baby oil is a lightweight mineral oil that fills microscopic scratches and creates a protective barrier against moisture and fingerprints. Unlike abrasive polishes, it won't scratch or dull the finish. It also leaves a subtle, pleasant scent that lingers lightly.
How To Apply It
Dab a few drops of baby oil onto a soft, lint-free cloth—microfiber works great. Wipe the metal surface in the direction of the grain or in circular motions for an even coat. Let it sit for about 30 seconds, then buff with a clean, dry cloth until the surface gleams.
For intricate details or crevices, use a cotton swab dipped in oil.
Where to Use It
This trick works wonders on chrome chair legs, stainless steel kitchen carts, metal bed frames, and even aluminum patio furniture. Avoid using it on painted or lacquered metal, as the oil may degrade the finish over time. Test on a small hidden area first.
Pro Tips For Best Results
For extra shine, apply a second thin layer after the first buffing. To prevent future smudges, wipe down the metal with a dry microfiber cloth weekly. If the surface feels greasy, you used too much oil—simply buff again with a fresh cloth until the excess is gone.
21. Clean Bookshelves with a Paintbrush
Bookshelves are dust magnets, especially the tops of books and those hard-to-reach corners. A feather duster just pushes dust around, and a cloth can snag on delicate spines. Grab a clean, dry paintbrush instead—it's the perfect tool for gentle, precise dusting without causing any damage.
A standard 2-inch flat paintbrush works best for most bookshelves. The soft bristles glide over book spines and into crevices, lifting dust without scratching finishes or tearing paper. This method is especially great for antique books, leather-bound sets, or any collection you want to keep pristine.
Why A Paintbrush Works Better
Unlike dusters that just redistribute particles, a paintbrush traps dust in its bristles. You can easily tap it out or rinse it between shelves. Plus, the flat shape lets you dust the top edges of books and the shelf surface in one smooth stroke.
How To Do It Right
Start from the top shelf and work your way down. Use short, gentle strokes along the spine and top edge of each book. For deeper crevices, use the tip of the brush.
After each shelf, tap the brush against a trash can or wipe it on a microfiber cloth. Finish by wiping the shelf with a slightly damp cloth if needed.
Bonus Tip For Stubborn Dust
If your books have accumulated a layer of grime, lightly dampen the paintbrush with a tiny bit of water or wood cleaner (for finished shelves only). Wring it out well so it's barely damp, then dust as usual. This picks up sticky dust without soaking the books.
22. Remove Sticky Residue from Furniture with Cooking Oil
Sticky spots from old stickers, tape, or spilled syrup can make a beautiful piece of furniture look neglected. You don't need a special solvent—a common kitchen ingredient works just as well. Vegetable oil breaks down the adhesive without harming the finish, making cleanup quick and easy.
Rub a small amount of vegetable oil on sticky spots, let it sit for a minute, then wipe away. The oil dissolves the sticky residue, and a gentle wipe with a clean cloth lifts it off. For stubborn patches, repeat the process or let the oil sit a bit longer.
Finish by wiping the area with a damp cloth to remove any oily film.
Why Oil Works
Cooking oil is a mild solvent that breaks down the polymers in adhesives. Unlike harsh chemicals, it won't strip paint or damage wood finishes. It's safe for most surfaces, including wood, laminate, and metal.
Best Oils To Use
Vegetable, canola, or olive oil all work well. Avoid strong-smelling oils like coconut or sesame, which may leave a lingering scent. A little goes a long way—just a few drops on a soft cloth is plenty.
Aftercare Tips
Once the residue is gone, clean the area with mild soap and water to remove any oil. Dry thoroughly with a clean cloth. If the surface feels greasy, a quick wipe with rubbing alcohol on a cotton ball will cut the oil.
23. Freshen Up Drawers with Dryer Sheets
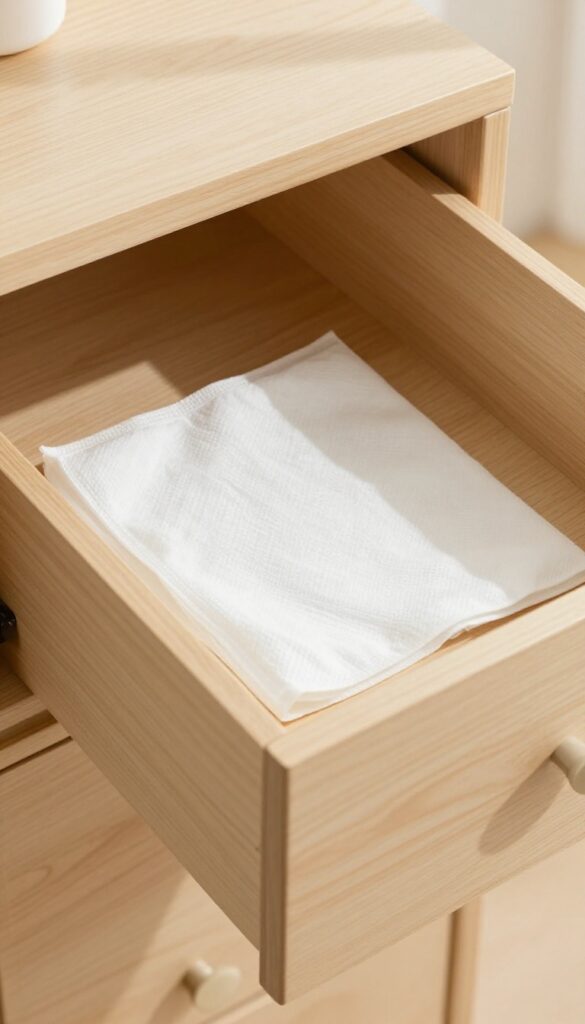
Drawers can trap odors from stored clothes, linens, or even just stale air. A simple dryer sheet does more than soften laundry—it can keep your furniture smelling clean and repel dust at the same time. This trick works best on empty drawers, so it's a perfect step after you've cleared out clutter or swapped seasonal items.
Place a fresh dryer sheet in each empty drawer before refilling. The scent lasts for weeks, and the anti-static properties help reduce dust buildup. Replace the sheet every month or when the fragrance fades.
Avoid scented sheets if you have allergies—unscented options work just as well for dust control.
Where To Use This Trick
Bedroom dressers, nightstands, and linen cabinets are obvious choices. But don't stop there—try it in kitchen junk drawers, desk drawers, or bathroom vanity drawers. Any enclosed space that holds fabric or paper goods benefits from a light, fresh scent.
Bonus: Repel Pests Naturally
The strong fragrance of dryer sheets can deter small insects like ants, silverfish, and even mice. Tuck a sheet behind the drawer or under the lining for extra protection. Just keep them away from food storage areas if you're using heavily scented brands.
When To Skip This Idea
Avoid using dryer sheets in antique wooden drawers or pieces with unfinished interiors. The chemicals may react with the wood or leave a residue. Stick to natural alternatives like cedar blocks or lavender sachets for delicate surfaces.
FAQ
Can I use vinegar on all wood furniture?
No, vinegar can damage the finish on some wood types. Test on a hidden area first, and avoid using it on waxed or oiled wood.
How often should I clean my upholstered sofa?
Vacuum weekly and deep clean every 6 to 12 months, depending on usage and pets.
What's the best way to remove pet stains from a mattress?
Blot up excess moisture, then apply a mixture of hydrogen peroxide, baking soda, and dish soap. Let dry and vacuum.
Can I use olive oil on all leather furniture?
Olive oil is safe for most finished leather, but avoid it on suede or nubuck. Always test in an inconspicuous spot.
How do I prevent water rings on wood tables?
Use coasters and placemats. If a ring appears, try the mayonnaise method described in idea #9.
Conclusion
Your furniture doesn't need a full day of scrubbing to look its best. A few targeted cleaning habits—using the right method for each material—keep every room feeling fresh without the overwhelm.
Start with the one tip that solves your biggest frustration today. Small, consistent efforts add up to a home that feels cared for and inviting, room by room.