
A plain collar and a scrap of yarn can turn your dog into the star of every holiday photo. Crochet bandanas work because they're quick, cheap, and easy to size for a Chihuahua or a Great Dane. Most patterns take an afternoon, and you don't need advanced skills to pull one off.
The trick is matching the bandana to your dog's build and the weather. A floppy triangle suits a calm lap dog, while a snug cowl keeps a short-haired pup warm on cold walks.
Holiday colors help, but comfort keeps the bandana on past the first photo. Below you'll find eleven ideas that range from ten-minute stash-busters to slightly fancier gift-worthy pieces.
1. Classic Triangle Bandana in Candy Cane Stripes

Candy cane stripes do a lot of heavy lifting for very little effort. This is the bandana you make when the holiday party is Saturday and it's already Thursday night. A plain double-crochet triangle, worked in alternating red and white rows, gives you that peppermint look without a single color-change trick.
It ties at the neck with a simple slip knot, so you can loosen it fast if your dog decides the whole thing is a chew toy. The shape sits flat across the chest and photographs well from any angle. If you've never crocheted a bandana before, start here.
The whole project is a triangle that grows one stitch at each end of every row. You begin at the top point, add two stitches per row as you go, and stop when the long edge reaches around your dog's neck plus a couple of inches for the tie. That's it.
No shaping curves, no seaming, no fussy borders unless you want one. Red and white rows make the stripes pop, but the real reason this works as a first project is that you never have to count much. You just keep the edges even and let the triangle build itself.
Most people finish the main body in thirty to forty minutes once they find their rhythm.
Yarn And Hook Choices
Worsted-weight cotton holds the triangle flat and keeps the stripes crisp. Acrylic works too, but it can curl at the corners, so give it a quick steam block at the end. A 5.
0 mm hook (H) gives a nice dense fabric that won't stretch out of shape after one wear. For the stripes, grab one skein of bright red and one of white. You'll use well under half of each for a medium dog, which means this is a genuine stash-buster.
If you want a softer look, a cotton-acrylic blend drapes a little nicer around the neck.
Working The Stripes Without The Mess
Change colors at the end of a row, not mid-row, so the stripes stay clean. Carry the unused color up the side edge instead of cutting it every time. The carried strand hides under the tie, and you save yourself a pile of ends to weave in.
Two rows of red, two rows of white is the classic candy cane rhythm. One row each gives a thinner, busier stripe that suits small dogs better. Either way, keep the tension loose on the color changes so the edge doesn't pucker.
Tying It On And Keeping It On
Finish the top corners with a short chain loop or a simple slip knot so the bandana ties snug but not tight. You should be able to slide two fingers under the tie. A slip knot lets you adjust in seconds, which matters with a wiggly dog.
If your pup shakes it off, a tiny stitch of matching thread at the back of the neck holds the tie in place without any bulk. Skip the long tails, since dangling yarn is basically an invitation to chew.
2. Granny Square Bandana With a Festive Border

Granny squares aren't just for big blankets. A handful of small squares can become a charming bandana that looks like a family heirloom. The best part?
You can use up all those leftover bits of holiday yarn. The result is a vintage-inspired piece that's surprisingly easy to customize for any dog.
Start by making a few small granny squares in your chosen colors. You'll need three to five squares, depending on your dog's size. Arrange them into a triangle shape, then join them with a simple stitch.
A single crochet join works well and keeps the bandana sturdy. Once joined, add a scalloped border in gold or green to frame the edges. This border not only adds a festive touch but also helps the bandana hold its shape.
The whole project takes just a couple of hours, and you can adjust the size by adding or removing squares.
Choosing Your Squares
Pick a worsted weight yarn in holiday colors like red, green, and white. Make each square about three inches across. Use a hook size that gives you a dense fabric so the bandana doesn't stretch out.
If you're short on time, you can even use pre-made squares from a thrift store find.
Joining And Shaping
Lay your squares out in a triangle: one at the top, two below, and so on. Join them with a slip stitch or single crochet. For a neater look, use the same color as your border for the join.
Then, work a round of single crochet around the entire triangle to create a clean edge before adding the scallops.
Adding The Scalloped Border
Switch to gold or green yarn. Work a scallop pattern by making a chain of three, then double crochet into the same stitch, and slip stitch into the next stitch. Repeat around the edge.
Keep the scallops small so they don't overwhelm the bandana. This border adds a polished finish and a bit of sparkle.
3. Cozy Cowl-Style Bandana for Cold Walks
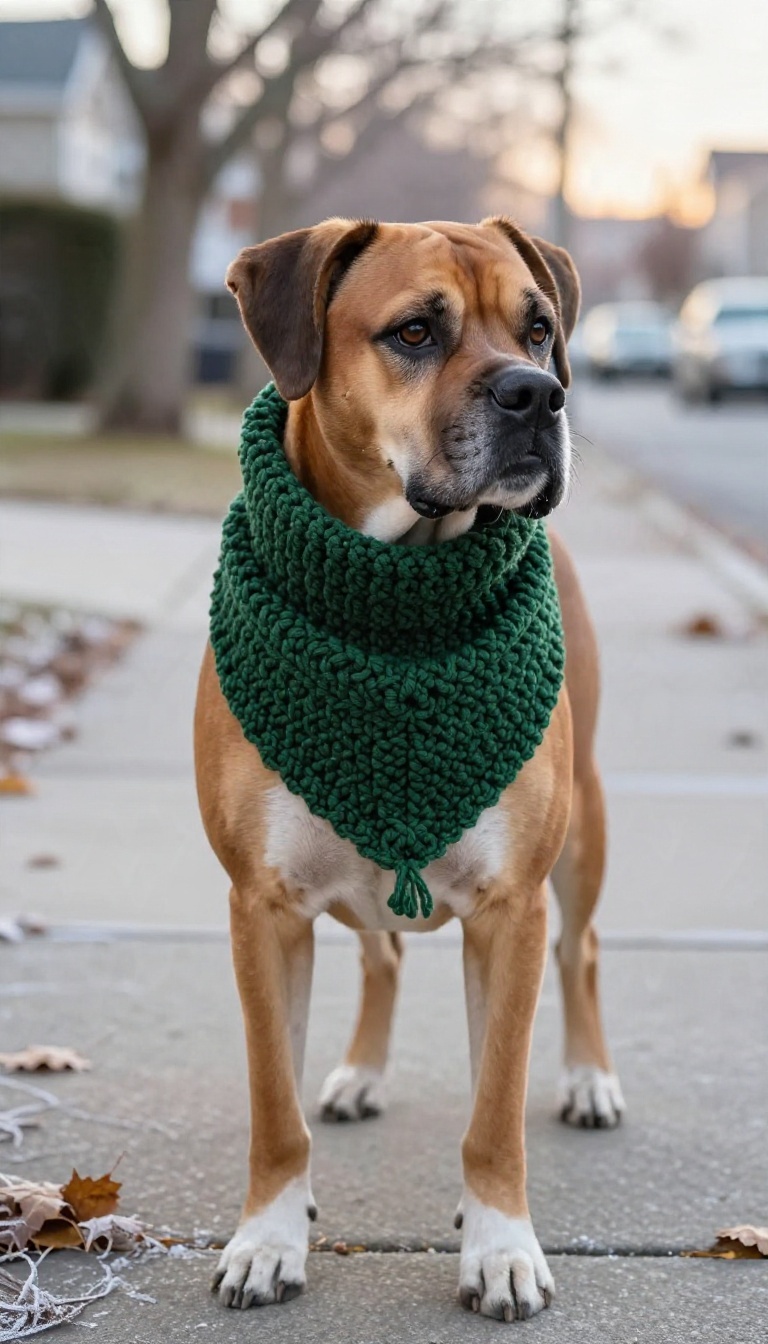
Some dogs treat a tied bandana like a personal insult. They shake, they paw, they back out of it before you've even grabbed the leash. A cowl-style bandana sidesteps the whole drama because there's nothing to knot—it's a closed tube that slides straight over the head and settles around the neck.
It also earns its place on chilly morning walks. Half-double crochet builds a denser, warmer fabric than the open stitches you'd use for a summer triangle, so it holds heat against thin-coated breeds. Short-haired pups like Boxers, Greyhounds, and Chihuahuas get the most out of it, but any dog that hates fuss will appreciate the slip-on fit.
The shape is simple: a short cylinder, wide enough to clear the ears and snug enough to stay put. You work it flat as a rectangle, then seam the short ends or join in the round from the start. Either way, you end up with a tube that pulls on like a turtleneck and sits over the collar area.
Because there are no ties, sizing matters more than usual. Too loose and it slides down the shoulders; too tight and your dog will let you know immediately. Measure the neck and add a little breathing room, then check the fit before you weave in the final end.
Getting The Fit Right
Wrap a soft tape around the widest part of your dog's neck, right where the collar sits, and jot down the number. Add about an inch for ease so it slips over the head without a fight. For very fluffy or big-headed dogs, add two.
Width is the other half of the equation. A cowl that's three to four inches deep covers the neck without swallowing the chin. Short-nosed breeds do better with a shallower band so it doesn't ride up into their face on walks.
Stitches That Hold Warmth
Half-double crochet is the sweet spot here—dense enough to block wind, but still soft and flexible. Work it in the back loop only and you get a stretchy, ribbed texture that hugs the neck instead of gaping. Pair it with a worsted or bulky yarn in a holiday color and you'll have a warm bandana in an evening or two.
Skip open lace or big shell stitches for this one; they look pretty but let the cold straight through.
Finishing Touches That Stay Put
Seam the ends with a flat stitch so the join lies smooth against the fur. A small faux button or a crocheted flower on the seam hides any wobble and adds a festive touch without adding weight. If your dog is a dedicated escape artist, thread a thin elastic through the top edge or add a couple of slip stitches to cinch it slightly.
Test the finished cowl on a short walk before the big holiday outing so you can adjust while the yarn is still easy to work with.
4. Snowflake Motif Bandana With Appliqué
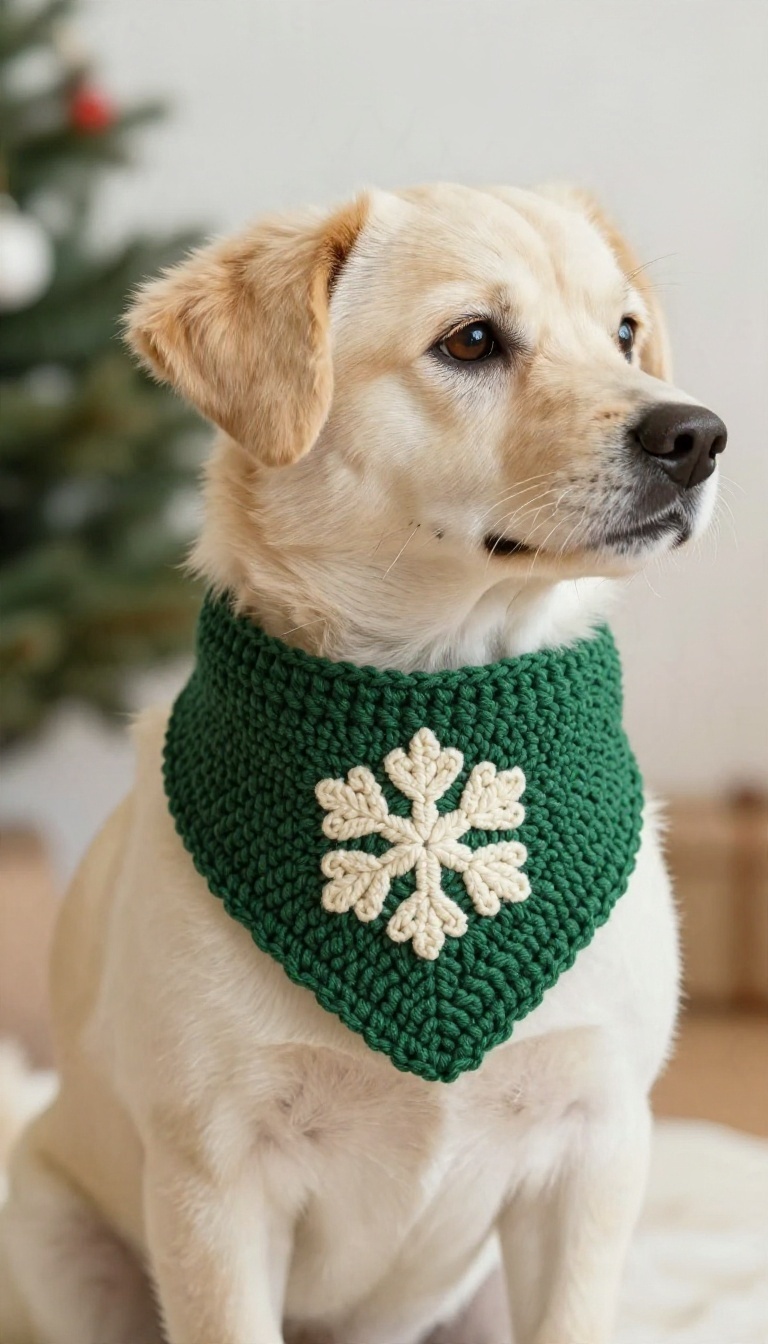
A solid triangle gives you a clean canvas, and one snowflake does the rest. This bandana keeps the front smooth and flat, so it sits nicely against your dog's chest instead of bunching up. The motif also pulls double duty as a cover-up for any little gaps or uneven stitches along the way.
You can crochet the snowflake separately and stitch it on, or embroider it straight onto the finished triangle. Either route works, and both let you pick a contrast color that pops against the base.
Start with a simple triangle in a single color. Worsted weight yarn in deep red, forest green, or cream reads as holiday without shouting. Work it in half double crochet for a bit of drape, or single crochet if you want a firmer shape that holds its point.
Once the triangle is done, block it flat. A quick steam or a spritz of water and a few pins smooths the edges and makes the appliqué sit better. This step matters more than it seems, because a lumpy base will show through even a tidy snowflake.
Making The Snowflake
A six-point snowflake is the easiest shape to crochet small. Chain a short center ring, then work each point with a mix of chains and slip stitches to get that spiky look. Cotton thread or fine yarn keeps it delicate, but worsted works fine if you size the flake to match.
If crocheting something that tiny sounds like a headache, embroider instead. A simple star of straight stitches with a few branching lines gives the same effect and takes minutes. Either way, keep the flake smaller than you think, since it grows once it's attached.
Attaching It Cleanly
Pin the snowflake in place before you sew. Center it a couple of inches below the top edge so it stays visible when the bandana is tied. Use matching thread and small stitches around the outer points, catching just the surface of the base so nothing pulls.
Skip the fabric glue. It stiffens the yarn and tends to peel after a wash. A whip stitch around the edges holds up to wear and keeps the motif flat against the triangle.
Sizing And Color Choices
Scale the snowflake to your dog. A tiny flake suits a small pup, while a bigger one balances a broad-chested breed. One motif usually looks best, though a trio of small flakes along the bottom edge works for a dressier version.
For color, go light on dark or dark on light. A white flake on red or green is the classic holiday look, but silver-gray on cream feels softer and less costume-like. Just make sure the contrast is strong enough to read from across the room.
5. Reindeer Antler Headband and Matching Bandana Set
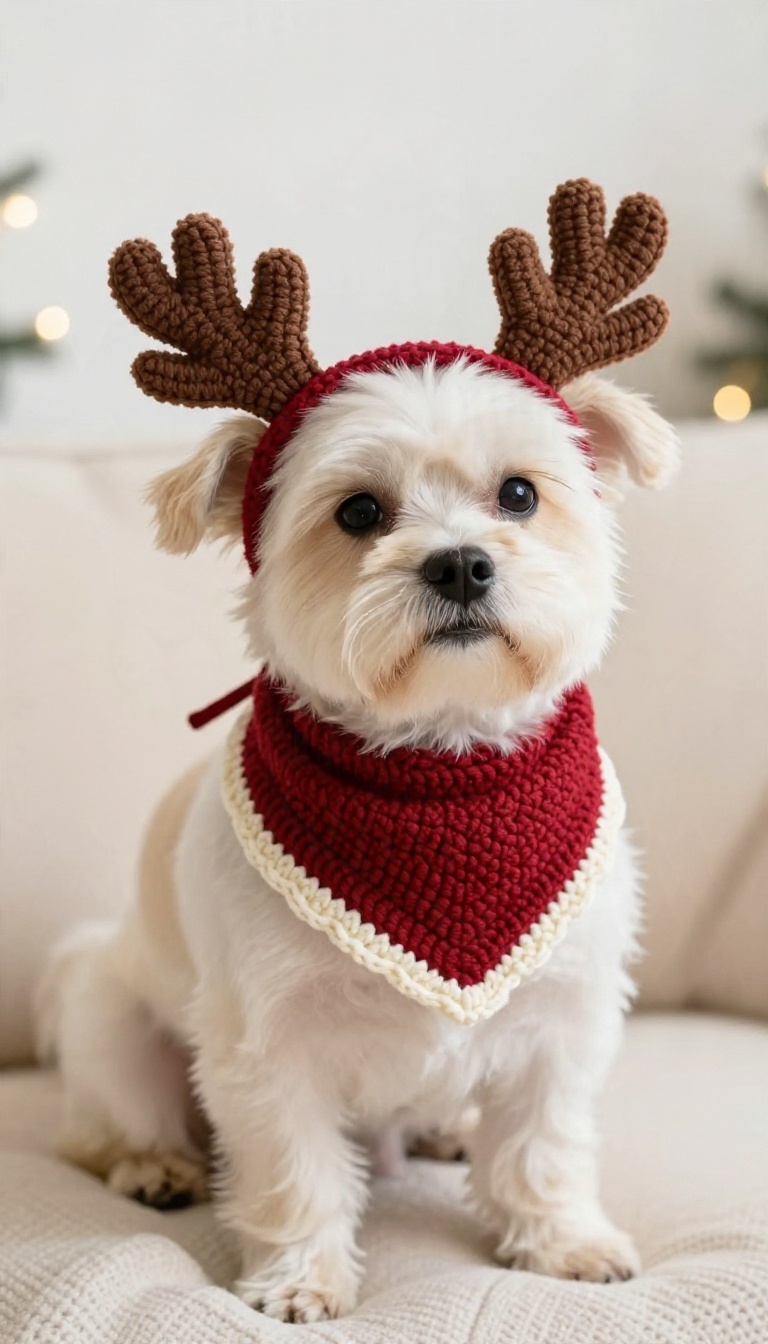
A bandana alone is cute, but add a soft crochet antler headband and you've got a full holiday photo setup. The antlers frame your dog's face without blocking their ears or eyes, and the matching bandana ties the whole look together. The key is keeping both pieces light and stretchy so your dog forgets they're wearing anything at all.
Start with the bandana in a simple triangle or cowl shape, using a worsted-weight yarn in a rich holiday color like cranberry, forest green, or oatmeal. Work a few rows of single crochet for the body, then switch to a contrasting color for a border. For the antlers, crochet two small tapered tubes and attach them to a thin, stretchy headband.
Use a soft acrylic or cotton blend so the headband doesn't dig in behind the ears.
Keep The Headband Comfortable
A crochet headband can slide or squeeze if you're not careful. Choose a pattern that uses a stretchy stitch, like half double crochet in the back loop, and measure your dog's head snugly but not tight. Add a small piece of elastic thread through the last row to help it grip without pressure.
Test it for a minute before the photo session—if your dog shakes their head or paws at it, loosen the fit.
Make The Antlers Stand Up
Fluffy antlers look great but tend to flop. Work the antlers in a tight single crochet spiral and stuff them lightly with fiberfill. Attach them to the headband with a few sturdy stitches, then reinforce the base with a small circle of crochet to keep them upright.
A pipe cleaner threaded inside the antler can add structure without extra weight.
Tie The Set Together
Match the bandana border to the antler color for a cohesive look. If you're short on time, make the bandana first and use the same yarn for the antlers. A simple button or Velcro closure on the bandana makes it easy to put on and take off, which helps when your dog is ready to be done with the photo shoot.
6. Chunky Bernat Blanket Yarn Bandana
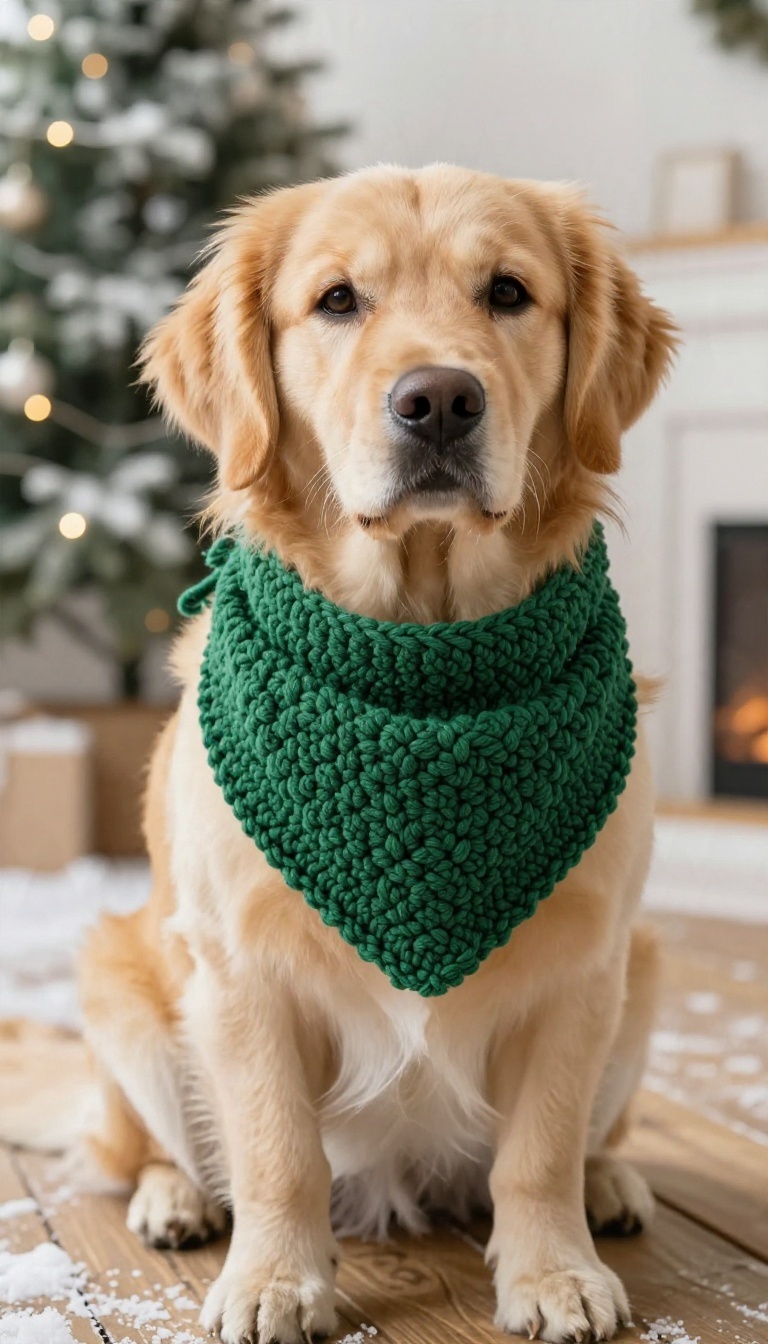
Bulky chenille yarn turns a simple triangle into something that looks almost like a tiny fleece cape. Bernat Blanket works up so fast that you can finish a dog-sized bandana during a single movie. The thick texture hides beginner tension issues, which makes it forgiving if you're new to shaping.
The real draw here is speed and softness. Because the yarn is so thick, you use a large hook and far fewer stitches than a worsted-weight version, so a big-dog bandana takes an hour or two instead of a whole evening. The plush surface also catches light in a way that reads cozy in photos, especially against a Christmas tree or a snowy porch.
Size matters more with this yarn than with thinner options. A chunky triangle can get heavy, so keep the ties simple and short for smaller breeds, or scale up the base chain for a Lab or Shepherd. If your dog runs warm indoors, save this one for outdoor walks and holiday cards rather than all-day wear.
Picking The Right Hook And Stitch
Go up a hook size or two from the label suggestion so the fabric stays drapey instead of stiff. Half double crochet gives you a dense, squishy triangle that holds its shape, while double crochet works up even faster if you're short on time. Either way, keep your turning chains loose so the edges don't pucker.
Sizing It For Bigger Dogs
Start with a longer foundation chain than you'd use for a small breed, then increase at both ends of each row to build the triangle. Measure across your dog's chest where the bandana will sit, and aim for a width that covers the shoulders without dragging on the ground. A quick try-on before you add ties saves a lot of unraveling.
Finishing Touches That Stay Put
Skip long dangling ties that a big dog can step on. Instead, crochet two short straps and add a button or a length of hook-and-loop tape for a secure, adjustable closure. A single row of contrasting single crochet along the bottom edge adds a clean border and helps the triangle keep its point through the wash.
7. Ribbed Knit-Look Bandana With a Button Closure

Store-bought bandanas have that crisp, finished look that makes people ask where you got them. You can fake it with a hook and a single stitch change. Working every row in the back loop only gives crochet a vertical rib that reads like a knit sweater, and a button closure turns a plain triangle into something adjustable and polished.
This one suits dogs who hate things sliding over their heads. The bandana sits flat across the chest, the button does the fastening, and you can shift it between buttonholes as the fit changes. It's a good pick for holiday photos where you want the outfit to look intentional rather than handmade-and-proud-of-it.
The whole trick here is the back loop only stitch, often written as BLO in patterns. Instead of going under both loops at the top of each stitch, you only work into the loop farthest from you. That pushes the front loop forward and creates a raised ridge, so the fabric looks ribbed and stretchy instead of flat.
Pair that texture with a sturdy yarn and a nice button, and the bandana holds its shape through a whole evening of treats and greetings.
Getting The Ribbed Texture Right
Use a worsted or DK weight yarn in a solid holiday color so the ribbing actually shows. Busy variegated yarns swallow texture, and you'll lose the knit effect entirely. A medium hook, around 4.
5 to 5 mm, gives you a firm fabric that won't flop. Work the triangle from the top edge down, decreasing at both ends every other row to shape the point. Keep every stitch in the back loop only, including your decreases, and the ridges will line up in clean vertical lines.
Half double crochet works well here because it's quick but still shows the rib clearly. If your first attempt curls at the edges, go up half a hook size. Tight tension is the usual culprit.
Choosing A Button That Holds Up
A wooden button adds a warm, handmade touch that fits holiday outfits, while a smooth plastic button is easier to wash. Either way, pick something at least three-quarters of an inch wide so it doesn't slip through the buttonhole during a good shake. Sew it on with doubled thread and go through the shank several times.
Dogs pull, roll, and rub against furniture, and a loose button is a choking hazard. Give it a firm tug before you call it done. On the other end, crochet a small loop or leave a gap between stitches as your buttonhole.
Test the fit on your dog before you weave in the ends so you can adjust the loop size.
Making The Fit Adjustable
The real advantage of a button closure is that you can build in options. Add two or three buttonholes spaced about an inch apart along the neck edge, then sew the button to the opposite corner. As your dog's coat thickens in winter or thins out in spring, you just move to a different hole.
Measure the neck snugly but not tight, then add an inch of ease. You should be able to slide two fingers under the bandana comfortably. This style also works well for puppies who are still growing.
One bandana can last through a whole season of size changes.
8. Mini Bandana for Small Breeds and Puppies
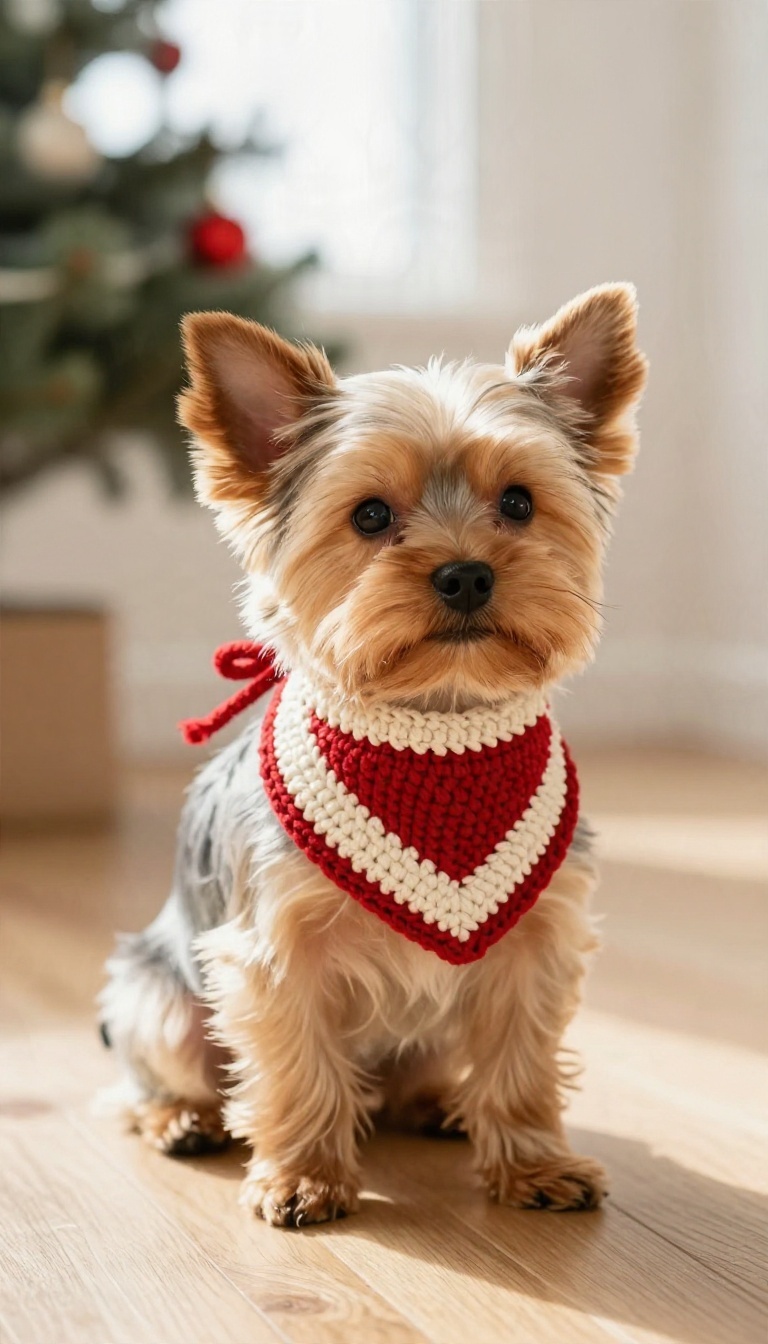
Tiny necks need tiny triangles. A full-size bandana on a Chihuahua or a Yorkie puppy looks more like a cape than a neckpiece, and it slides around or gets chewed. This mini version scales everything down: shorter rows, a narrower tie, and a fit that stays put without bulk.
It's also the fastest stash-buster in this list, so you can make a few in different colors before the holidays hit.
The key is keeping the triangle proportional. For most toy breeds, a finished width of 4 to 5 inches across the top and a depth of 3 to 4 inches works well. Puppies need even less, so measure their neck and subtract a little room for growth.
A thin tie or a soft elastic loop replaces the bulky double-knot, and the whole thing works up in about 20 minutes.
Sizing For Tiny Necks
Wrap a soft tape measure around the widest part of your dog's neck, then add half an inch for comfort. For a triangle bandana, the top edge should be roughly the same as that measurement, maybe a touch shorter. Puppies grow fast, so aim for a snug fit now rather than a loose one they'll trip over.
If you're between sizes, go smaller—a mini bandana that stays on beats a big one that drags.
Yarn And Hook Choices
Sport weight or DK cotton works best here because it's light and holds its shape without stiffness. A 3. 5mm to 4mm hook keeps the fabric dense enough to block cold air but still drapey.
Avoid bulky yarn—it adds weight that tiny dogs notice. Scraps from other projects are perfect, and you can mix two colors for a simple striped effect without extra effort.
Fastening Without The Bulk
Skip the long ties that wrap twice around. Instead, crochet a thin chain tie about 6 inches long on each side, or sew a small elastic loop to one corner and a button to the other. Elastic loops are great for puppies because they pop on and off without fuss.
A single button closure also keeps the bandana from sliding under the chin when your dog sniffs the ground.
9. Fair Isle-Style Colorwork Bandana
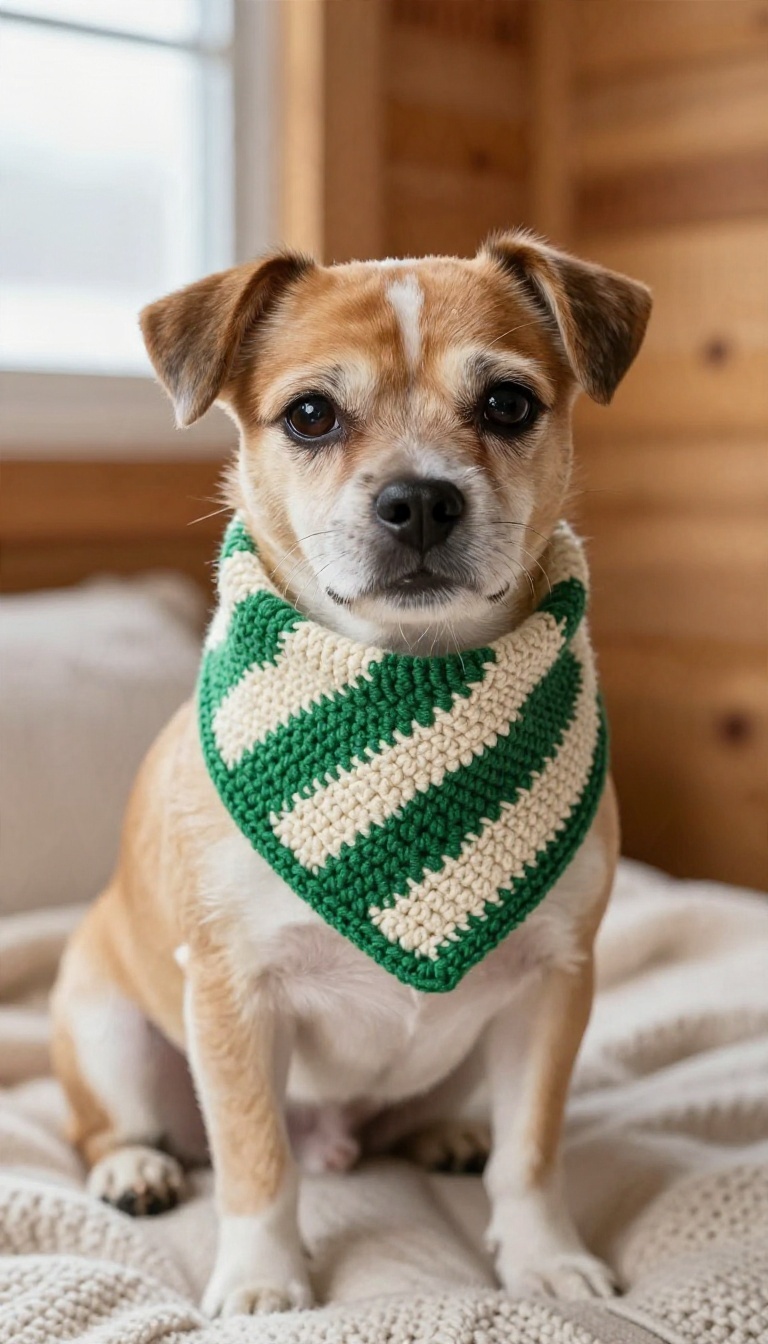
Fair Isle sweaters look complicated until you realize most of the magic comes from simple two-color stripes. This bandana borrows that look without asking you to juggle five charts at once. You pick two holiday colors, alternate them in tidy rows, and let the pattern do the heavy lifting.
The result reads as cozy and traditional, like something pulled from a winter cabin closet. It works especially well on short-haired dogs who need a little extra warmth around the neck. And because the colorwork stays simple, you can actually finish it before the holidays arrive.
The trick is choosing a method you enjoy, because carrying two colors can feel fiddly the first time. Tapestry crochet keeps the fabric dense and neat, while carried floats give you a softer drape. Either way, keep your color changes on the same side so the back stays tidy.
Stick to two colors for your first attempt. A cream and forest green pairing feels classic, but cranberry and gray works just as well. Once you've got the rhythm down, you can add a third shade for a single accent row.
Choosing Your Two Colors
Pick one light and one dark shade so the stripes actually pop. Cream with pine green, oatmeal with burgundy, or white with navy all read clearly from a distance. Avoid two colors with similar values, or the pattern turns into mush in photos.
If your dog has a dark coat, lean toward a lighter main color so the bandana stands out. Light-colored dogs can handle deeper, richer shades without disappearing. Hold the skeins next to your dog's fur before you commit.
Tapestry Vs. Carried Floats
Tapestry crochet means you work over the unused color, trapping it inside each stitch. The fabric comes out thick and structured, which suits a bandana that needs to hold its triangle shape. It also hides the wrong side nicely, so both faces look clean.
Carried floats leave the unused yarn running behind your work. This gives you a lighter, drapier bandana that's better for warmer climates or wiggly dogs. Just keep those floats loose, or the bandana will pucker and pull.
Keeping The Stripes Even
Change colors on the last pull-through of a stitch so the transition stays sharp. Count your rows as you go, since two-color work makes it easy to lose track. A simple sticky note or row counter saves you from ripping back.
Keep your tension consistent by pausing every few rows to smooth the fabric flat. If one section looks tighter, give it a gentle stretch before moving on. Blocking at the end evens out small wobbles.
Finishing Touches
A single row of contrasting single crochet around the edge frames the colorwork like a picture. Add a wooden button or a small tassel at the point for a handmade touch. Keep embellishments flat so nothing bothers your dog's neck.
Weave in your ends securely, especially if your dog likes to chew. A quick hand wash and flat dry keeps the colors from bleeding. Store it folded so the triangle holds its shape between wears.
10. Personalized Bandana With Initial or Name

A plain bandana does its job, but a single letter or a short name turns it into something people notice. You work the letter right into the triangle, or you crochet a small tag and stitch it to the corner. Either way, you end up with a piece that looks custom without demanding a ton of skill.
The practical side matters too. At a holiday party with six dogs running around, a name on the bandana saves a lot of confusion. And as a gift, it reads as thoughtful because it's made for one specific dog.
You don't need a fancy chart or a new technique to pull this off. Most of the work is planning where the letter sits and picking a yarn weight that won't fight the bandana fabric. A few small choices make the difference between crisp and sloppy.
Pick Your Lettering Method
You have two solid routes. The first is surface crochet or duplicate stitch, where you add the letter on top of a finished bandana using the same or a contrasting yarn. It's forgiving, and you can rip out a crooked letter without touching the base.
The second is to crochet a separate letter or name patch and sew it on. This works better for longer names because you can build the letters flat and arrange them before attaching anything. Small letters in single crochet tend to curl, so block them first with a quick spritz of water and a pin.
Choose Colors That Actually Show
A dark letter on a cream bandana pops. A cream letter on a cream bandana disappears, no matter how neat your stitches are. Pick a contrast that holds up in photos, especially if the bandana is a deep holiday red or green.
Metallic or sparkly yarn looks festive but can be scratchy against the neck. If you want shine, keep it to the letter and use a soft cotton or acrylic for the bandana itself. That way the decoration sits away from sensitive skin.
Size The Letter To The Dog
A Great Dane can carry a chunky four-inch letter without it looking lost. A Yorkie needs something closer to an inch and a half, or the bandana turns into a billboard. Sketch the letter on paper first and hold it against the bandana before you commit.
Keep the placement toward one corner rather than dead center. Corner placement looks intentional and leaves the middle of the bandana clean. It also means a slightly wobbly letter reads as charming instead of like a mistake.
Make It Gift-ready
If you're giving the bandana away, add a small hanging tag with the dog's name in the same yarn. Tie it on with a bit of twine so the new owner can remove it. A quick wash-and-block before wrapping keeps the letter flat and the edges even.
Include a short note about hand washing in cool water and laying flat to dry. Most people won't guess that on their own, and a felted or stretched bandana is a sad gift.
11. Photo-Ready Velvet Yarn Bandana

Velvet yarn has a way of making a simple triangle look expensive. The pile catches light softly, so even a basic single crochet bandana reads as dressy in photos. Pair it with a satin ribbon tie and you have a piece that belongs at a holiday party, not a muddy trail.
This one leans toward the fancy end of the list. It's the bandana you reach for when the camera comes out and the matching family pajamas are on. Keep it clean, keep it dry, and let it do its thing.
Velvet and chenille yarns feel plush in the hand and photograph beautifully, but they behave differently from your usual worsted cotton. The stitch definition disappears into that soft pile, which is fine here because you want texture and sheen more than crisp lines. Work it in a simple stitch pattern and let the yarn carry the look.
A triangle shape keeps things classic, though you can round the corners slightly for a softer drape. The satin ribbon does double duty as a tie and as a little flash of shine against the velvet. Choose a ribbon color that echoes one of the yarn tones or goes metallic for the holidays.
Picking The Right Velvet Yarn
Not all velvet yarns are created equal. Some shed, some split, and some feel slick enough that your hook keeps sliding out. Look for a chenille or velvet blend with a tight twist and a reputation for holding up.
Weight matters too. A bulky velvet gives you a thick, cozy triangle fast, while a lighter velvet makes a drapier bandana that suits small breeds. Swatch a few rows before committing so you know how the yarn behaves with your hook size.
Working With Slippery Yarn
Velvet yarn can be fussy, so a few habits help. Use a hook with a smooth, tapered throat and keep your tension a touch tighter than usual to stop stitches from loosening. Count as you go, because the pile hides mistakes and ripping back can leave the yarn looking worn.
If you're new to velvet, start with a small practice triangle before you commit to the final piece.
Adding The Satin Ribbon Tie
Skip the crochet ties here and let satin do the work. Cut a length long enough to wrap around your dog's neck and tie in a bow with room to spare. Attach the ribbon at the triangle's top corners with a few secure stitches, or thread it through a small crocheted loop so it stays put.
A bow at the back of the neck looks tidy in photos and stays out of your dog's way.
Keeping It Party-ready
This bandana is for photos, parties, and cozy indoor moments, not muddy walks. Velvet picks up dirt and doesn't wash as gracefully as cotton, so save it for the good occasions. Spot clean gently and lay it flat to dry.
Store it folded with the ribbon loosely coiled so it doesn't crease before the next holiday gathering.
FAQ
How do I measure my dog for a crochet bandana?
Measure around the widest part of the neck where the collar sits, then add about an inch for comfort. For triangle bandanas, the long edge should roughly match that neck measurement plus a little overlap for tying.
What yarn works best for dog bandanas?
Cotton and cotton blends hold their shape and wash well, which matters for something sitting near the neck. Acrylic is affordable and soft, while bulky blanket yarn suits cold-weather cowls. Avoid anything scratchy or fuzzy enough to tangle.
Are crochet bandanas safe for dogs to wear?
They're safe for supervised wear as long as the fit is loose and nothing dangles where a dog can chew it. Skip long ties on chewers, and always remove the bandana before crate time or unsupervised play.
How long does it take to crochet a dog bandana?
A simple triangle in worsted weight takes about 30 to 60 minutes. Colorwork, appliqué, or bulky cowls may take two to three hours. Most of these ideas fit comfortably into a single evening.
Can I wash a crocheted dog bandana?
Yes, most cotton and acrylic bandanas handle gentle machine washing in a mesh bag. Lay them flat to dry so they keep their shape, and skip the dryer unless the yarn label says otherwise.
Conclusion
Pick one idea that matches your yarn stash and your dog's patience, then make it once before committing to a matching set. A simple triangle in holiday colors often beats an elaborate design, especially for a dog wearing it for the first time. Once you've nailed the fit, the rest is easy.
Swap colors, add a motif, or size it up for a friend's pup. Either way, you'll have a cozy holiday bandana that's genuinely yours.

I’m Pallab Kishore, the owner of Little Pets Realm — an animal lover and pet care enthusiast sharing easy tips, healthy recipes, and honest advice to help every small pet live a happy, healthy, tail-wagging life.