Looking for a simple way to manage your dog's meals without breaking the bank? These DIY food dispenser ideas are perfect for pet owners who want practical, budget-friendly solutions. You'll find projects that use everyday materials, making them easy to build in just a weekend.
From repurposing household items to crafting durable setups, each idea focuses on safety and convenience for your furry friend. Whether you have a small apartment or a spacious yard, there's an option to fit your space and needs.
Get ready to create a feeding station that keeps kibble fresh and accessible. With clear steps and realistic advice, you can tackle these projects confidently and improve your dog's daily routine.
1. Repurpose a Large Plastic Container for Under $10
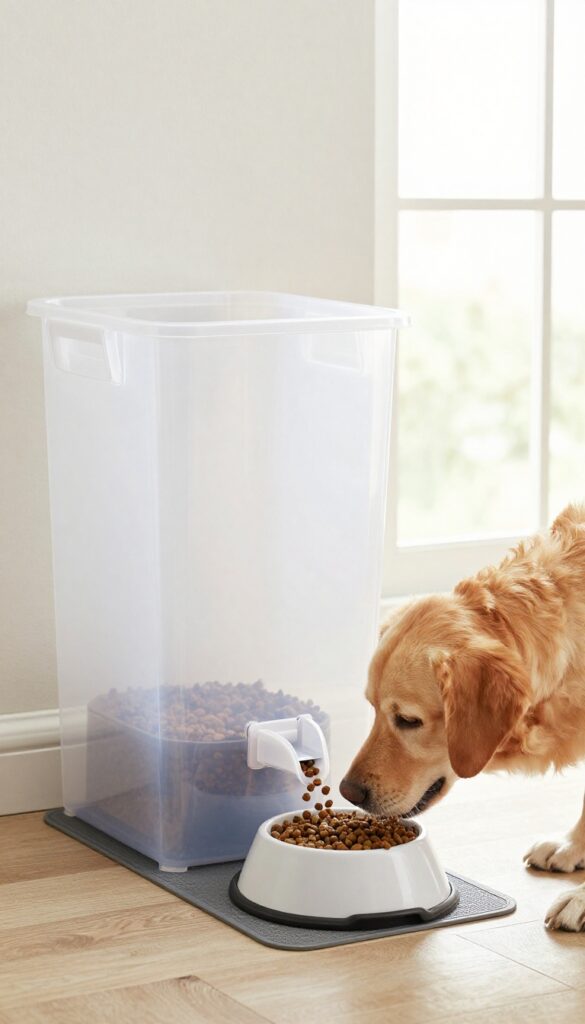
Got an old plastic storage bin gathering dust in the garage? Transform it into a straightforward food dispenser that's both functional and frugal. This project involves cutting a spout into the container, allowing kibble to flow out smoothly when your dog nudges it.
Dog owners love how it repurposes items they already own, reducing waste while keeping feeding times hassle-free.
Why It Works
The large opening and sturdy plastic make it easy to fill and clean, while the spout controls portion sizes to prevent overeating. It's a simple design that relies on gravity, so there are no complicated parts to break or maintain.
Best For
This dispenser suits budget-conscious pet owners in apartments or small homes with limited space. It works well for dogs of all sizes that eat dry kibble, especially those who aren't aggressive chewers.
Practical Tip
Place the dispenser on a non-slip mat in a corner of your kitchen or laundry room to keep it stable during use. Clean it weekly with mild soap and water to prevent residue buildup, ensuring your dog's food stays fresh and safe.
Budget-Friendly Option
If you don't have a spare bin, check local thrift stores or online marketplaces for cheap options—often under $5. You can also use a large plastic jug with a handle for easier carrying, just cut a similar spout near the base.
2. Build a Wooden Crate Dispenser with a Simple Hinge
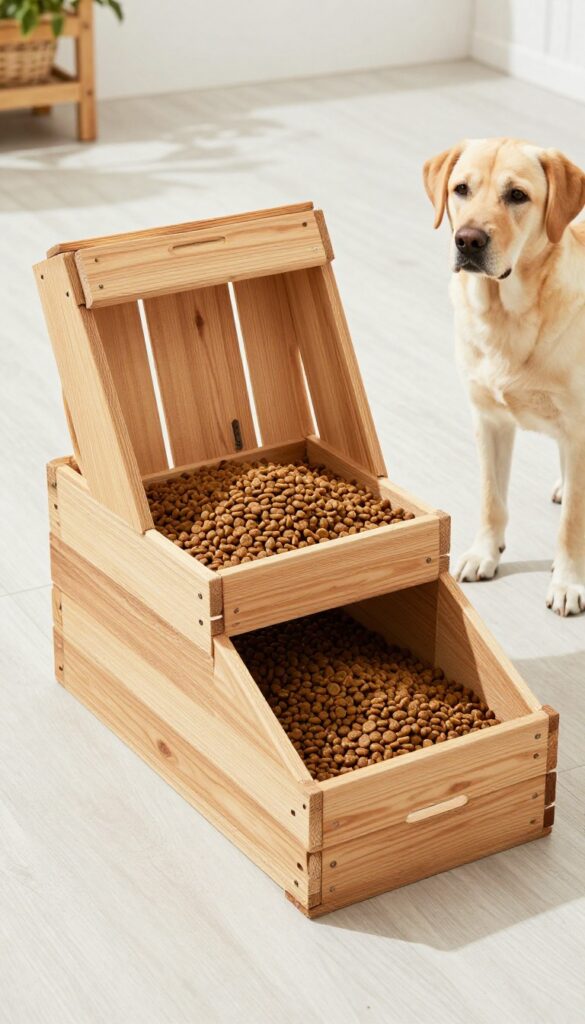
A wooden crate dispenser brings a touch of rustic charm to your feeding area while keeping kibble secure and dry. It's a straightforward project that uses scrap wood or basic lumber, making it eco-friendly and cost-effective. Dog owners love how the hinged lid makes refilling a breeze, and the sturdy build handles enthusiastic eaters without wobbling.
Why It Works
This design works because the solid wood construction prevents spills and keeps food fresh by blocking moisture. The hinge allows quick access for top-ups, saving you time during busy mornings or evenings.
Best For
It's ideal for larger breeds like Labradors or German Shepherds who need durable setups, or for homes with outdoor patios where weather resistance matters. Apartment dwellers with spacious corners can also benefit from its compact footprint.
Practical Tip
Place the dispenser in a low-traffic spot to avoid tripping, and add a non-slip mat underneath to catch any stray kibble. For easy cleaning, wipe the interior with a damp cloth weekly to prevent mold or odors.
3. Use PVC Pipes for a Space-Saving Wall Mount
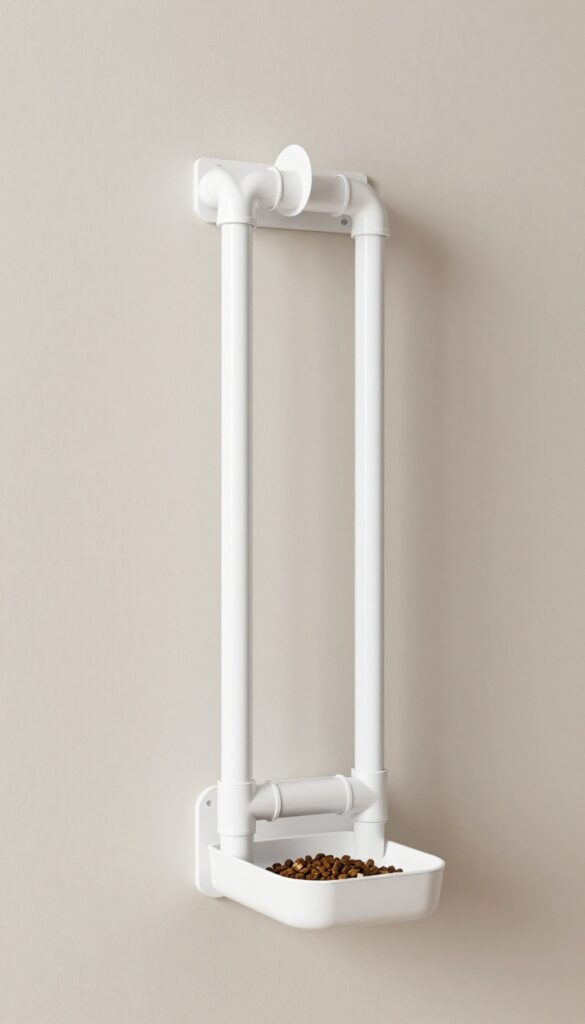
Tight on floor space but need a reliable spot for your dog's meals? This PVC pipe dispenser mounts right on the wall, freeing up valuable room in corners or small apartments. It's a clever way to keep kibble organized without cluttering your living area.
Assembling it is straightforward with basic tools, and the vertical design makes it easy to fill and access. Dog owners love how it blends practicality with a clean, minimalist look that doesn't dominate the room.
Why It Works
PVC pipes are durable, lightweight, and easy to cut to size, creating a sturdy dispenser that holds kibble securely. The vertical stack allows gravity to feed food down smoothly, ensuring your dog gets consistent portions without jams or spills.
Best For
This idea fits perfectly in apartments, small homes, or any feeding corner where floor space is limited. It works well for dogs of all sizes, especially in multi-pet households where you want separate stations without taking up extra room.
Practical Tip
Mount it at a height your dog can reach comfortably, and consider adding a small tray at the bottom to catch any stray kibble for easier cleanup. Use sandpaper to smooth any rough edges on the pipes for safety, and paint it with pet-safe colors if you want to match your decor.
4. Convert a Glass Jar into a See-Through Dispenser
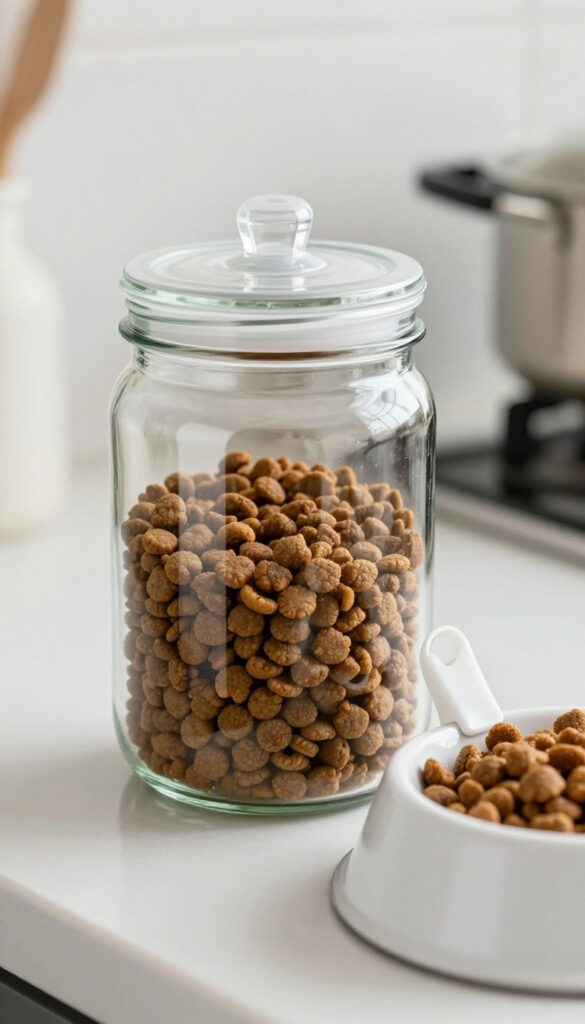
A clear glass jar with a simple plastic lid and spout turns into a handy food dispenser that lets you keep an eye on kibble levels at a glance. This setup is great for pet owners who want something straightforward and functional without a lot of fuss. You can easily see when it's time to refill, and the airtight seal helps keep food fresh longer, making mealtime smoother for both you and your dog.
Why It Works
The glass jar's transparency means no more guessing about food amounts, reducing waste and ensuring your dog always has enough. The plastic lid with a spout controls the flow of kibble, preventing spills and keeping things tidy in your feeding area.
Best For
This idea suits apartment dwellers or anyone with limited space, as it's compact and can fit on a counter or shelf. It's also ideal for small to medium dogs, where portion control is easy to manage with the spout design.
Practical Tip
Place the jar on a stable surface near your dog's bowl to avoid tipping. Clean the jar and lid regularly with mild soap to prevent residue buildup, and check the spout for clogs to ensure smooth dispensing.
Budget-Friendly Option
If you don't have a glass jar, use a large plastic container with a clear lid—just drill a hole for the spout. For the spout, repurpose a funnel or cut a plastic bottle neck to save money while keeping functionality.
5. Craft a Cardboard Box Dispenser for Quick Trials
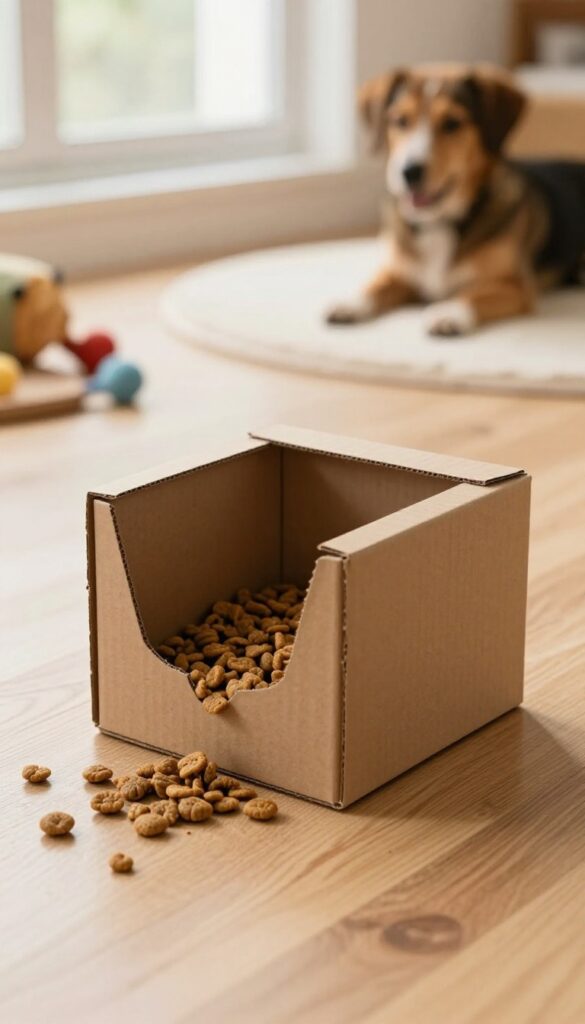
Sometimes you just need a quick, no-fuss way to test out a food dispenser before committing to a permanent build. A cardboard box dispenser lets you experiment with sizes and designs without spending a dime. It's perfect for those moments when you're brainstorming ideas or want to involve the kids in a fun, easy project that won't take all day.
This temporary setup uses sturdy cardboard from shipping boxes or old packaging, so it's eco-friendly and readily available. You can cut and tape it into shape in minutes, making it ideal for trial runs or as a playful addition to your dog's feeding routine. Plus, if it doesn't work out, you can easily recycle it and try something else.
Why It Works
Cardboard is lightweight and easy to customize, allowing you to adjust the dispenser's size and opening based on your dog's needs. It holds kibble securely while being simple to assemble, so you can test different configurations without any tools or hassle. This makes it a low-risk way to see what works best before investing in more durable materials.
Best For
This idea suits dog owners who want to test dispenser sizes or involve children in a safe, creative activity. It's great for small breeds or puppies in apartments where space is limited, as you can quickly set it up and remove it. If you're on a tight budget or just need a temporary solution, this cardboard version fits perfectly.
Practical Tip
Place the dispenser on a flat, dry surface away from moisture to prevent the cardboard from weakening. For added stability, use double-sided tape or small weights inside the box. Keep an eye on wear and tear—replace the box if it gets soggy or chewed to ensure your dog's safety and keep kibble fresh.
6. Assemble a Metal Can Dispenser for Durability
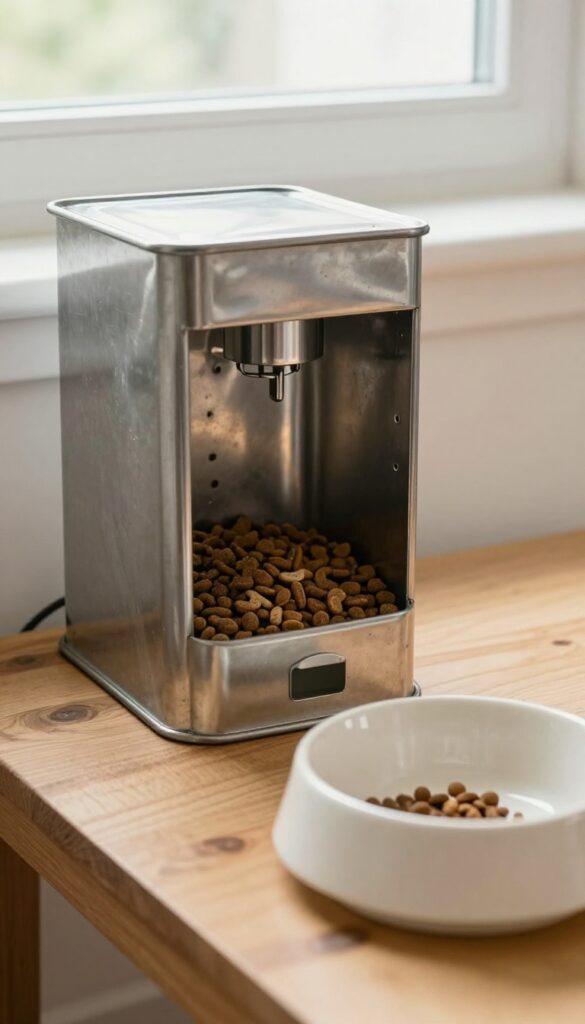
Metal cans or tins from your pantry can transform into a sturdy food dispenser that stands up to enthusiastic chewers. This project taps into simple materials you might already have, creating a robust setup that keeps kibble secure and accessible. Dog owners appreciate how it resists damage and cleans up easily, making it a practical choice for busy households.
Why It Works
The rigid metal construction prevents dogs from gnawing through the dispenser, ensuring it lasts longer than plastic alternatives. It also seals well to keep food fresh and dry, reducing waste and maintaining your dog's meal quality over time.
Best For
This idea suits owners with strong-jawed breeds like German Shepherds or Pit Bulls who tend to destroy flimsier feeders. It's also great for homes with multiple dogs or outdoor feeding areas where durability is key.
Practical Tip
Place the dispenser on a stable surface near your dog's feeding bowl to prevent tipping. Regularly wipe down the metal with a damp cloth to avoid rust and check for sharp edges that could harm your pet.
7. Design a Multi-Bin Dispenser for Multiple Dogs
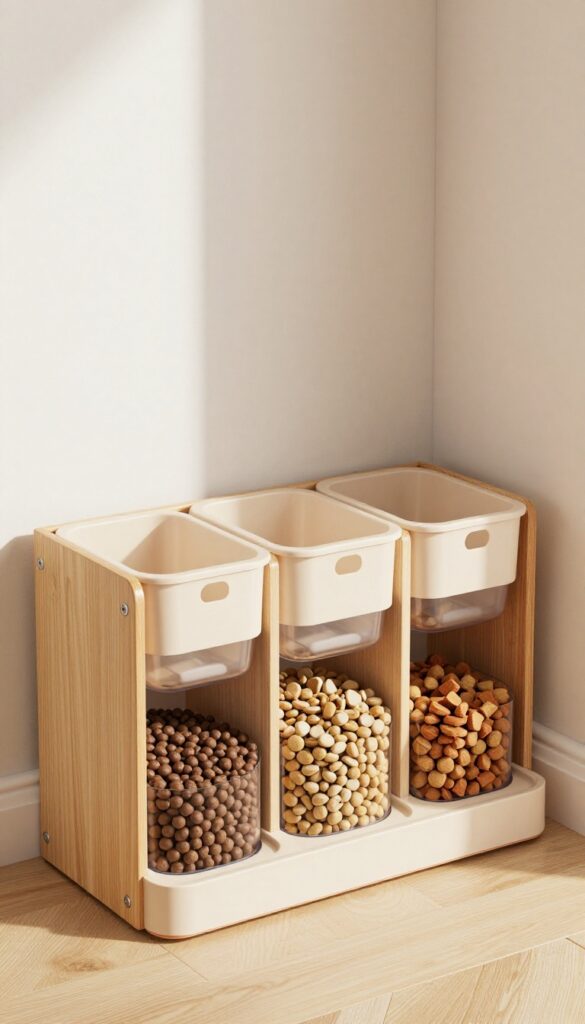
Managing meals for more than one dog can get messy, but a multi-bin dispenser keeps things organized and stress-free. This DIY project uses separate compartments to hold kibble or treats for each pup, so you can easily control portions and avoid mix-ups. Dog owners love how it streamlines feeding time and adds a neat touch to any corner of the home.
Why It Works
Separate bins prevent food from spilling together, which is great for dogs with different diets or portion needs. It also helps reduce mealtime squabbles by giving each dog their own dedicated space, making feeding smoother and more peaceful.
Best For
This idea fits perfectly for households with multiple dogs, especially if they have varied feeding schedules or dietary requirements. It's also handy for storing treats alongside regular kibble in one compact unit.
Practical Tip
Place the dispenser in a low-traffic area to keep it stable during use, and label each bin with your dogs' names for quick identification. Opt for durable materials like plastic or wood that are easy to wipe clean after meals.
FAQ
What materials do I need to start a DIY dog food dispenser?
Basic materials include plastic containers, wood, PVC pipes, or jars, plus tools like a drill, saw, and hinges, depending on the project.
Are these DIY dispensers safe for all dog breeds?
Yes, but ensure materials are non-toxic and edges are smooth to prevent injury, and adjust size for larger or smaller breeds.
How can I make a dispenser that keeps food fresh?
Use airtight lids or seals, and store in a cool, dry place to maintain kibble freshness and prevent pests.
Can I build these if I have no crafting experience?
Absolutely, start with simpler projects like the plastic container or cardboard box, which require minimal tools and skills.
How do I clean and maintain a DIY food dispenser?
Wipe down regularly with a damp cloth, and for deeper cleans, use mild soap and water, ensuring all parts are dry before refilling.
Conclusion
So there you have it—seven DIY dog food dispenser ideas that are both budget-friendly and practical. Whether you're in an apartment or have a spacious yard, these projects can make feeding time easier and more fun for you and your pup.
Remember to prioritize safety and comfort when building, and don't be afraid to tweak designs to suit your dog's needs. Happy crafting, and here's to smoother mealtimes ahead!

I’m Pallab Kishore, the owner of Little Pets Realm — an animal lover and pet care enthusiast sharing easy tips, healthy recipes, and honest advice to help every small pet live a happy, healthy, tail-wagging life.