Last updated on June 27th, 2026 at 03:17 pm
Deep cleaning your entire house can feel overwhelming, but breaking it down into 15 manageable steps makes it achievable in a single day. This guide walks you through each room with a logical order that prevents backtracking and maximizes efficiency.
Start with the rooms that require the most effort—kitchen and bathrooms—while you have the most energy. Then move to living areas and bedrooms before finishing with floors and windows.
By following this sequence, you'll avoid spreading dust from one room to another and ensure every surface gets the attention it deserves. Let's dive in.
1. Declutter Every Room First

Before you pick up a single cleaning spray, take a lap through each room with a laundry basket or a box. Clutter is the enemy of efficient cleaning—it hides surfaces, slows you down, and makes everything feel messier than it actually is. Spend 10 to 15 minutes per room removing items that don't belong: mail, stray toys, empty water bottles, or that sweater draped over the chair.
Return each item to its proper home or toss it into a temporary holding bin for later sorting. This single step cuts your actual cleaning time in half.
Decluttering first ensures you're not just moving piles around while wiping surfaces. It also gives you a mental reset—seeing clear counters and floors makes the rest of the job feel less daunting. Plus, you'll avoid the frustration of cleaning around stuff or having to stop mid-task to put things away.
Start With One Room At A Time
Don't try to declutter the whole house in one go. Focus on one room, finish it, then move on. This prevents burnout and helps you stay organized.
Use a timer if needed—15 minutes per room is plenty.
Create A "relocation" Bin
Keep a laundry basket or box handy for items that belong in another room. Instead of running back and forth, toss everything in and then make one trip to distribute them later. This keeps you in the zone.
Be Ruthless With Trash And Donations
As you declutter, have a trash bag and a donate bag ready. Toss expired coupons, broken pens, and anything that's clearly garbage. Set aside items you no longer use but are still in good condition for donation.
Less stuff means less to clean.
2. Tackle the Kitchen: Grease and Grime
The kitchen is often the dirtiest room in the house, thanks to cooking splatters, sticky spills, and hidden grease. Tackling it early in your cleaning marathon means you can focus on the toughest areas while your energy is still high. This step covers the surfaces that need the most elbow grease, so you can leave your kitchen sparkling.
Start with the stovetop: remove grates and burners, soak them in hot soapy water, and scrub off baked-on food. Spray a heavy-duty degreaser on the range hood filters and let it sit while you wipe down cabinet fronts with a damp cloth. For the microwave, heat a bowl of water with lemon slices for two minutes, then wipe the interior easily.
Finish by scrubbing the backsplash and sink with a non-abrasive cleaner.
Stovetop And Oven
Remove all burner grates and drip pans, and soak them in a sink full of hot, soapy water. While they soak, spray the stovetop surface with a degreaser and let it sit for five minutes. Wipe clean with a microfiber cloth, then scrub the oven interior with a baking soda paste—spray with vinegar after 15 minutes and wipe away grime.
Microwave And Range Hood
For the microwave, place a microwave-safe bowl with 1 cup of water and a few lemon slices inside. Run on high for two minutes, then let it sit for another minute. The steam loosens food residue, so you can wipe the interior with a damp cloth.
For the range hood, remove the filter and spray with degreaser. Let it sit for 10 minutes, then scrub with a brush and rinse.
Cabinets And Backsplash
Wipe down cabinet fronts with a solution of warm water and dish soap, paying extra attention to handles and areas near the stove. For greasy spots, use a mixture of vinegar and water. Tackle the backsplash with the same solution, scrubbing gently with a sponge to remove splatters.
Rinse with a damp cloth and dry.
Sink And Countertops
Sprinkle baking soda over the sink, then scrub with a wet sponge to remove stains and odors. Rinse thoroughly and wipe dry. For countertops, use an appropriate cleaner based on the material—granite needs a stone-safe cleaner, while laminate can handle all-purpose spray.
Disinfect cutting boards with hydrogen peroxide or a bleach solution.
3. Deep Clean the Refrigerator and Pantry
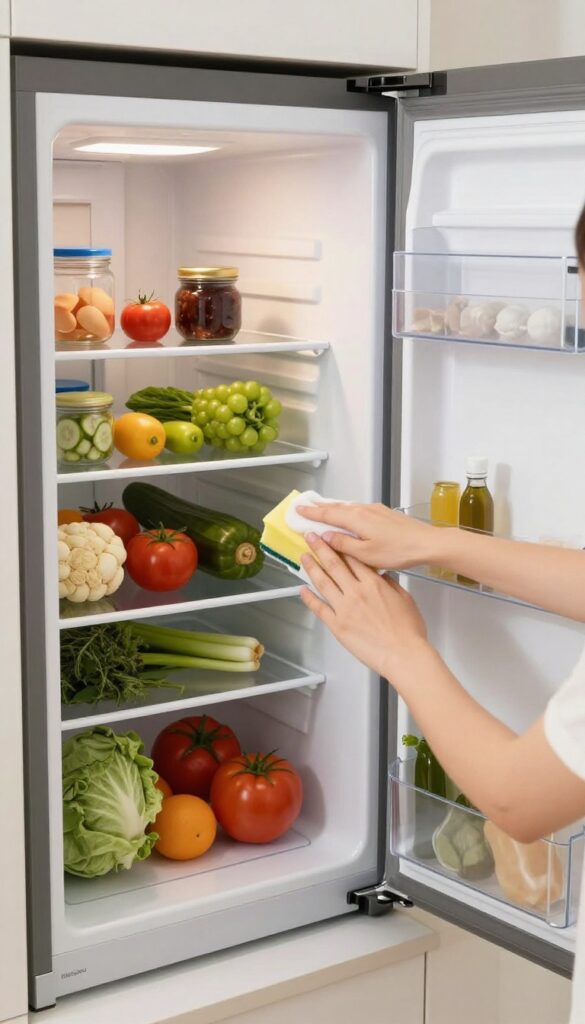
The refrigerator and pantry are the heart of your kitchen, but they often get overlooked during routine cleaning. Taking everything out and starting fresh not only improves hygiene but also helps you rediscover forgotten items and plan better meals. This step is surprisingly satisfying and will make your kitchen feel brand new.
Begin by removing all items from the refrigerator and pantry. Check expiration dates and toss anything past its prime—old condiments, stale crackers, mystery leftovers. Wipe down every shelf, drawer, and door bin with warm soapy water or a mild disinfectant.
Don't forget the rubber seals and the top of the fridge, which often collects dust and grime. For the pantry, vacuum crumbs and wipe shelves before returning items. Organize by category: canned goods together, grains together, snacks together.
Use clear bins or baskets to keep small items tidy. Finally, clean the exterior surfaces—doors, handles, and the top of the fridge—for a polished finish.
Empty And Sort
Pull everything out of the fridge and pantry. As you go, check dates and discard anything expired or no longer edible. Group similar items together on your counter or table so you can see what you have.
This is also a good moment to wipe down containers or jars that are sticky or dusty before putting them back.
Scrub Every Surface
Remove all shelves and drawers that are removable and wash them in warm, soapy water. For fixed shelves, use a sponge or cloth with a gentle cleaner. Pay attention to corners and crevices where spills hide.
In the pantry, vacuum or sweep crumbs, then wipe down shelves with a damp cloth. Let everything dry completely before restocking.
Organize And Restock
Return items in a logical order: put frequently used items at eye level, group like with like, and use bins or dividers for small items. In the fridge, designate zones for dairy, meats, produce, and condiments. This not only looks neat but also helps you find things faster and reduces food waste.
Don't Forget The Exterior
Wipe down the front, sides, and top of the refrigerator with an appropriate cleaner. Stainless steel needs a gentle polish to avoid streaks. Check the coils (if accessible) and vacuum them for better efficiency.
The pantry door and handles also deserve a quick wipe to remove fingerprints and dust.
4. Scrub Bathrooms from Top to Bottom
Bathrooms collect grime, soap scum, and bacteria faster than any other room. Tackling them from top to bottom ensures you aren't dripping dirty water onto already-cleaned surfaces. Start with the shower and tub, then work your way down to the toilet and sink.
Work from the highest point in the room downward so you don't have to re-clean anything. Spray the shower walls and tub with a disinfectant cleaner and let it sit for a few minutes to break down soap scum and mildew. Scrub with a non-abrasive sponge or brush, then rinse thoroughly.
For glass doors, use a squeegee or a vinegar-water solution to prevent streaks. Next, move to the toilet: spray the exterior and interior, let the cleaner sit, then scrub the bowl with a toilet brush and wipe down the seat, lid, and tank. Finally, clean the sink and countertops, then polish mirrors and fixtures with a microfiber cloth for a streak-free shine.
Finish by sweeping or vacuuming the floor before mopping.
Shower And Tub First
Spray cleaner on walls, doors, and tub surfaces. Let it sit for 3–5 minutes to dissolve grime. Scrub with a sponge or brush, then rinse.
For stubborn hard water stains, use a paste of baking soda and vinegar. Wipe down fixtures to prevent water spots.
Toilet Details
Apply cleaner inside the bowl and under the rim. Let it sit while you clean the exterior. Scrub the bowl with a toilet brush, then flush.
Wipe the seat, lid, tank, and base with a disinfectant wipe or cloth. Don't forget the area behind the toilet.
Sink And Mirror Magic
Clean the sink with a spray cleaner or a mixture of dish soap and water. Use an old toothbrush to scrub around the faucet base and drain. For mirrors, spray with glass cleaner and wipe with a lint-free cloth in a zigzag motion to avoid streaks.
5. Wash Bedding and Towels
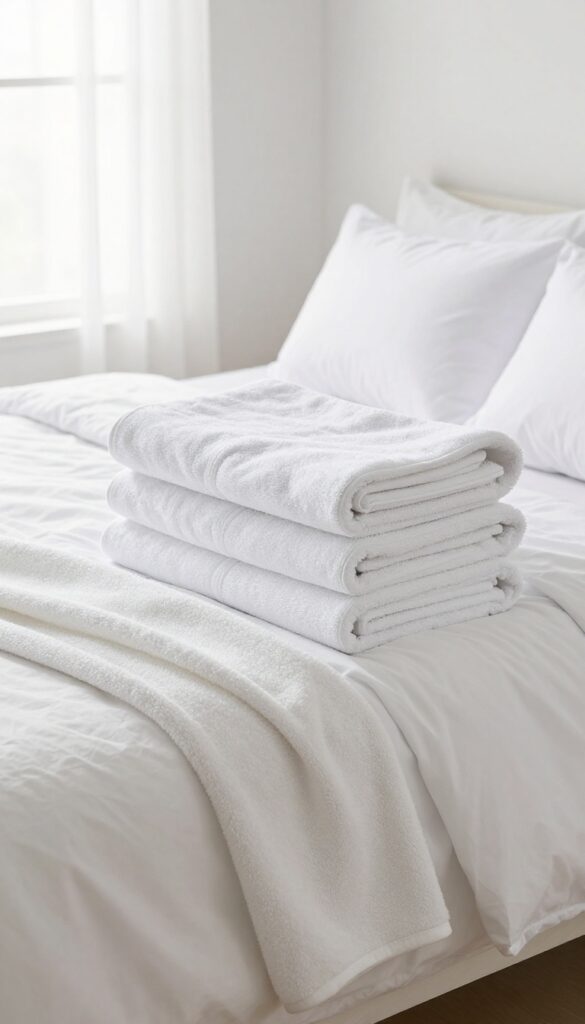
Your bed and bath linens collect dead skin cells, body oils, and dust mites faster than you think. A deep clean isn't complete until every sheet, pillowcase, and towel is fresh and sanitized. This step is quick to start and runs in the background while you tackle other chores.
Strip all beds and gather used towels from bathrooms. Wash them in hot water with a quality detergent and, if desired, a cup of white vinegar to kill bacteria and remove odors. While the machine runs, move on to other tasks—just remember to transfer everything to the dryer when the cycle ends.
Strip And Sort
Pull all sheets, pillowcases, duvet covers, and mattress protectors from every bed. Collect bath towels, hand towels, and washcloths from bathrooms. Sort lights and darks if needed, but most bedding can go together on hot.
Wash On Hot
Set your machine to the hottest water setting the fabric allows. Hot water kills dust mites and dissolves body oils better than warm or cold. Add a scoop of oxygen bleach for whitening and disinfecting, and skip fabric softener—it reduces absorbency in towels.
Dry Thoroughly
Tumble dry on high heat until completely dry. Overloading the dryer can leave linens damp, which invites mildew. For extra freshness, toss in a dryer sheet or wool balls with a few drops of lavender oil.
6. Dust Every Surface in Living Areas
Living rooms, family rooms, and dens collect dust from daily activity, pets, and airflow. This step focuses on removing dust from all surfaces before you vacuum or mop, so particles fall to the floor where they can be captured later. Work systematically from top to bottom to avoid cleaning the same spot twice.
Grab a microfiber cloth or an extendable duster and start with the highest surfaces: ceiling fans, light fixtures, and the tops of tall furniture. Dust these first so any falling debris lands on lower surfaces that you'll clean next. Move to shelves, electronics, and window sills, then finish with baseboards and furniture legs.
Microfiber traps dust rather than spreading it, and a damp cloth works best for sticky spots like TV screens or remote controls. Don't forget picture frames, blinds, and any decorative items that collect dust.
Start High, End Low
Begin with ceiling fans and light fixtures. Use a microfiber duster or an old pillowcase to trap dust without scattering it. Then work your way down to shelves, mantels, and the tops of cabinets.
This order ensures that any dust that falls will be picked up when you clean lower surfaces.
Electronics Need Special Care
TV screens, computer monitors, and gaming consoles attract dust due to static electricity. Use a dry microfiber cloth or an electronics-specific duster. Avoid paper towels or rough fabrics that can scratch screens.
For keyboards and remote controls, a soft brush or compressed air works well to dislodge crumbs and dust from crevices.
Don't Overlook Baseboards And Blinds
Baseboards and window blinds are often ignored but collect a surprising amount of dust. Wipe baseboards with a damp microfiber cloth or a Swiffer duster. For blinds, close them flat and run a damp cloth or a duster over each slat.
Alternatively, wear a microfiber glove and wipe each slat individually.
7. Wipe Down All Windows and Mirrors
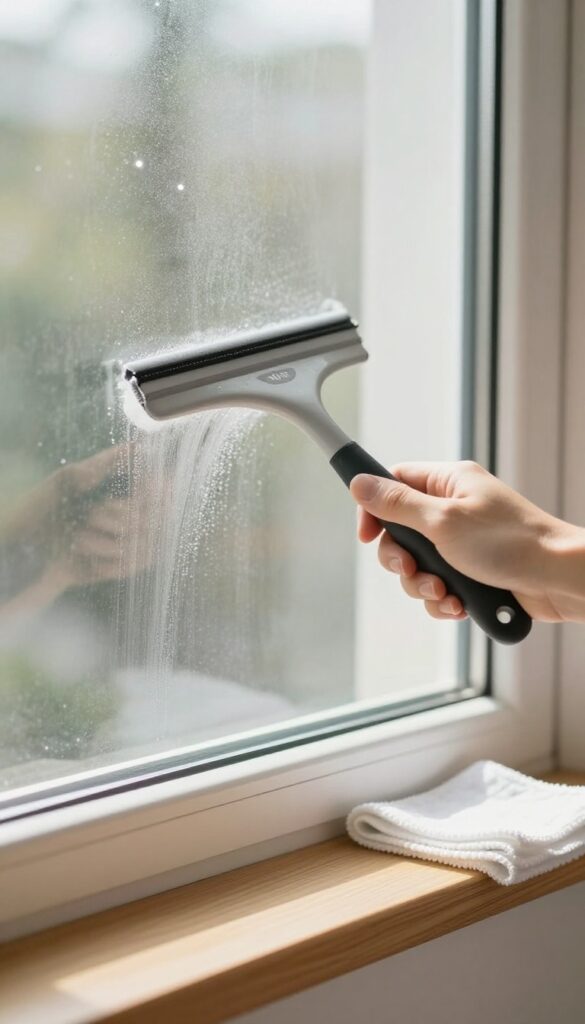
Windows and mirrors collect dust, fingerprints, and smudges that dull the whole room. Cleaning them last ensures you don't have to redo them after dusting or vacuuming. Plus, sparkling glass instantly makes your home feel fresher and brighter.
Choose The Right Tools
A squeegee gives the best streak-free finish on windows, but a microfiber cloth works well for smaller panes and mirrors. Use a bucket of warm water with a few drops of dish soap or a dedicated glass cleaner. Avoid paper towels—they leave lint and streaks.
Work From Top To Bottom
Start at the top corner of each window and pull the squeegee down in overlapping strokes. Wipe the blade dry between passes. For mirrors, spray the cleaner directly onto the cloth, not the mirror, to prevent drips on the frame or counter.
Don't Forget The Details
Clean window sills and tracks with a vacuum brush or damp cloth before washing the glass. For stubborn spots on mirrors, use a microfiber cloth with a bit of rubbing alcohol. Finish by buffing with a dry cloth for extra shine.
8. Vacuum and Shampoo Carpets
Carpets trap dirt, allergens, and odors that regular vacuuming alone can't remove. This step focuses on deep cleaning to restore freshness and extend carpet life. With the right technique, you can tackle even high-traffic areas without professional help.
Prep And Vacuum Thoroughly
Start by moving furniture out of the room or at least to one side. Remove small items like toys and shoes. Vacuum slowly in overlapping rows, going over high-traffic areas twice.
Don't forget edges and corners—use a crevice tool to get into baseboards. Empty the vacuum canister or bag when it's half full for maximum suction.
Spot-clean Stains First
Treat visible stains before shampooing the whole carpet. Blot spills immediately with a clean cloth—never rub. Apply a carpet stain remover or a DIY solution of white vinegar and water.
Let it sit for 5 minutes, then blot again. For tough stains like red wine or pet accidents, use an enzyme cleaner. Test any cleaner on a hidden area first.
Shampoo High-traffic Areas
If you own a carpet cleaner, fill it with hot water and a carpet shampoo solution. Focus on hallways, entryways, and spots in front of sofas or beds. Work in small sections, overlapping passes to avoid streaks.
For a deeper clean, do a second pass with just water to rinse out residue. If you don't have a machine, rent one from a local hardware store—it's worth the effort.
Dry Completely Before Use
After shampooing, open windows and turn on fans to speed drying. Avoid walking on the carpet until it's fully dry—usually 6 to 12 hours. Place towels at doorways to catch any moisture.
If the carpet feels damp after 24 hours, use a dehumidifier or increase airflow. Walking on damp carpet can re-soil it and cause mildew.
9. Mop Hard Floors
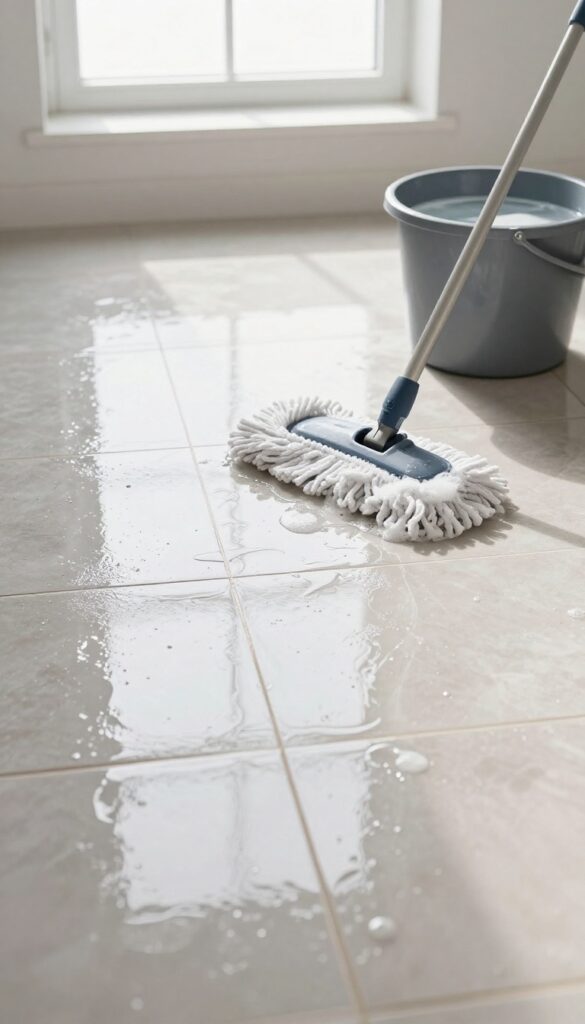
Hard floors take a beating with daily foot traffic, spills, and tracked-in dirt. A quick once-over with a mop won't cut it for a deep clean. This step ensures every inch of tile, vinyl, or hardwood looks its best without leaving behind residue or spreading grime.
Start by clearing the floor of any furniture, rugs, or obstacles. Sweep or vacuum thoroughly to remove loose dirt and debris—mopping over dust just turns it into mud. Pay extra attention to corners and under furniture where dust bunnies hide.
Then, choose a cleaner appropriate for your floor type (pH-neutral for stone, hardwood-safe for wood, etc. ). Use a microfiber mop head for better absorption and less streaking. For kitchens and bathrooms, use separate mop heads to avoid cross-contaminating bacteria from the bathroom into food prep areas.
Work in sections, rinsing the mop head frequently, and let floors air dry completely before replacing furniture.
Prep The Floor
Move small furniture like chairs and trash cans out of the way. Sweep or vacuum thoroughly, getting into corners and along baseboards. For textured tiles, use a brush attachment to dislodge dirt from grout lines.
This step prevents you from pushing debris around with the mop.
Choose The Right Cleaner
Not all floor cleaners are created equal. For hardwood, use a cleaner designed for wood to avoid damaging the finish. For tile and vinyl, a mild all-purpose cleaner works well.
Avoid using too much soap—it leaves a dull film. Always follow the manufacturer's instructions for dilution.
Mop Like A Pro
Dip your mop into the cleaning solution, wring it out well so the floor isn't soaking wet. Work from the farthest corner of the room toward the exit to avoid walking on wet floors. Use a figure-eight motion and overlap each pass.
Rinse the mop head in clean water between sections to avoid spreading dirty water.
Avoid Cross-contamination
Kitchen floors can have food spills and grease, while bathroom floors harbor bacteria and soap scum. Using the same mop head for both spreads germs. Designate one mop head for the kitchen and another for bathrooms, or wash the mop head thoroughly between rooms with hot water and bleach.
10. Clean Upholstery and Curtains
Upholstered furniture and curtains are magnets for dust, allergens, and odors. They often get overlooked during routine cleaning, but a deep refresh makes your whole home feel cleaner and smell fresher. This step tackles both fabric surfaces in one go.
Start by vacuuming all upholstered pieces—sofas, armchairs, ottomans, and even decorative pillows—using the upholstery attachment. Work slowly in overlapping strokes to lift embedded dirt. Don't forget the crevices where crumbs and dust collect.
For curtains, use the same attachment on a low suction setting to avoid pulling fabric. If your curtains are machine-washable (check the care label), remove them and launder according to instructions. For non-washable drapes, a thorough vacuum and spot cleaning will do.
Upholstery Vacuuming Technique
Use the upholstery brush attachment and set your vacuum to medium suction. Start at the top of each cushion and work your way down. Use a crevice tool to get into seams, around armrests, and along the base.
Flip cushions if possible and vacuum both sides. For pet hair, a rubber squeegee or a damp microfiber cloth can help lift stubborn fur before vacuuming.
Treating Stains On Fabric
Blot fresh spills immediately with a clean cloth—never rub, as it pushes the stain deeper. For set-in stains, use a fabric-safe upholstery cleaner or a mixture of mild dish soap and water. Test on a hidden area first.
Apply the cleaner with a soft brush, then blot with a damp cloth. Allow to air dry completely before using the furniture again.
Curtain Care And Freshening
Check the care tag on your curtains before washing. Most cotton, polyester, and linen blends can go in the washing machine on a gentle cycle with cold water. Hang them back up while slightly damp to prevent wrinkles.
For dry-clean-only curtains, steam them with a handheld steamer to kill dust mites and refresh the fabric. If you don't have a steamer, a quick tumble in the dryer on low heat with a damp towel can help remove wrinkles and dust.
11. Wipe Down Light Switches and Door Handles
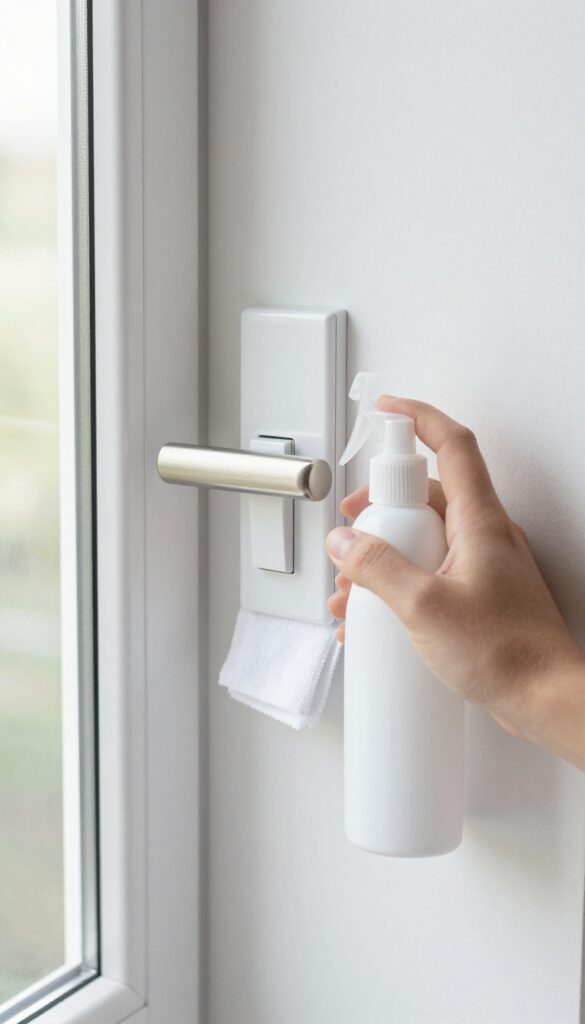
Light switches and door handles are among the most frequently touched surfaces in any home, yet they're often overlooked during routine cleaning. Over time, they accumulate oils, dirt, and germs from countless hands. A quick wipe-down not only improves hygiene but also restores a fresh, clean feel to every room.
Gather your supplies: disinfectant wipes or a spray bottle with an all-purpose cleaner and a microfiber cloth. Start at the top of the house and work your way down, hitting every switch plate, knob, and handle. Pay special attention to bathroom and kitchen fixtures, where germs tend to thrive.
For intricate or textured surfaces, use a cotton swab dipped in cleaner to reach crevices. Finish by drying with a clean cloth to prevent streaks or moisture damage.
Don't Forget The Hidden Spots
Cabinet knobs, drawer pulls, and appliance handles are easy to miss but just as grimy. In the kitchen, include the refrigerator door, microwave handle, and stove knobs. In bathrooms, hit towel bars, toilet flush handles, and faucet levers.
Remote controls, phone chargers, and light pull chains also benefit from a quick sanitizing.
Choose The Right Cleaner
For most surfaces, a standard disinfectant wipe or a 70% isopropyl alcohol spray works well. Avoid harsh bleach on painted or delicate finishes. On brass or antique hardware, use a gentle cleaner to avoid tarnishing.
Always test an inconspicuous area first if you're unsure about compatibility.
Make It A Quick Habit
Incorporate this step into your regular cleaning routine to keep high-touch areas consistently fresh. A daily or weekly pass with a disinfectant wipe takes just a few minutes and significantly reduces germ buildup. Keep a small caddy of wipes or spray in each room for easy access.
12. Organize Closets and Drawers
Closets and drawers often become dumping grounds for things you don't really need. Tackling them one at a time makes the job manageable and leaves you with a sense of calm every time you open a door or pull out a drawer.
Start by removing everything from the space. Wipe down all surfaces with a damp cloth. Sort items into keep, donate, and trash piles.
Be honest about what you actually use and love. Fold or hang the keepers neatly, using dividers or small bins to keep categories separate. Consider adding drawer liners for a fresh feel.
The Purge First
Empty the entire closet or drawer onto a bed or table. This forces you to see everything you own. Sort quickly into three piles: keep, donate, and trash.
If you haven't worn or used something in a year, it's probably safe to let it go.
Wipe And Refresh
With the space empty, vacuum or wipe down all shelves, corners, and drawer bottoms. Use a mild cleaner or a vinegar-water solution. Let it dry completely before putting anything back.
This step removes dust and any musty smells.
Smart Folding And Hanging
Fold items so they stand upright (like the KonMari method) to maximize visibility. Hang clothes by category—shirts together, pants together—and within each category, by color. Use matching hangers for a uniform look.
For drawers, use small organizers to separate socks, underwear, and accessories.
Maintain The System
Once everything is organized, commit to a simple rule: one in, one out. When you buy something new, donate or discard something old. Spend five minutes each week tidying up the spaces you use most.
This prevents clutter from building up again.
13. Deep Clean the Oven and Microwave
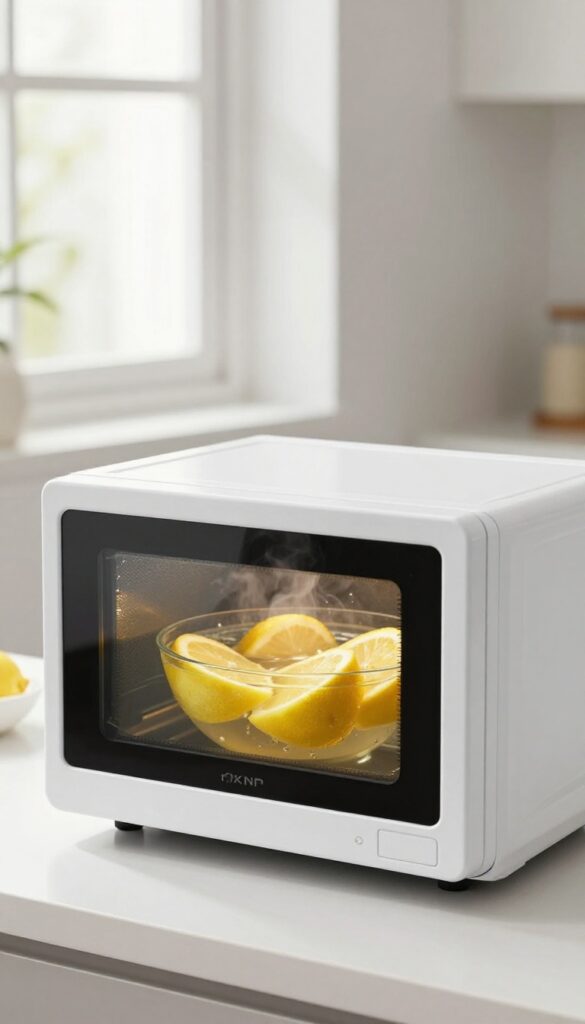
These two kitchen workhorses take a beating from splatters, spills, and baked-on grease. A deep clean now will make them look and perform like new. Plus, it eliminates lingering odors that can affect your food's taste.
Tackle the oven first, then the microwave. Both jobs require a bit of soaking time, so plan accordingly. You'll need baking soda, vinegar, a lemon, and a spray bottle.
Oven: Self-clean Or Diy Paste
If your oven has a self-cleaning cycle, remove the racks and run it according to the manual. Be prepared for some smoke and heat—open windows and keep pets away. For a gentler approach, make a paste of baking soda and water.
Spread it over the interior, avoiding heating elements. Let it sit overnight, then wipe clean with a damp cloth. Spray vinegar on stubborn spots to fizz away residue.
Microwave: Steam And Wipe
Fill a microwave-safe bowl with water and add slices of lemon or a few tablespoons of vinegar. Microwave on high for 5 minutes. Let it sit for 2 minutes without opening the door so steam loosens grime.
Carefully remove the bowl, then wipe down the interior with a sponge. The lemon leaves a fresh scent. Don't forget the turntable and the ceiling.
Final Touches
Replace oven racks and give the microwave door a final wipe. For glass oven doors, use a glass cleaner for streak-free shine. Run a quick cycle with a lemon-water bowl in the microwave to freshen it up.
Your kitchen will smell amazing.
14. Wash Trash Cans and Recycling Bins
Trash cans and recycling bins are some of the dirtiest items in your home, yet they rarely get cleaned. Over time, residue, spills, and bacteria build up, creating unpleasant odors that can spread through your kitchen or garage. A quick deep clean every few months keeps them fresh and hygienic.
Take Everything Outside
Start by removing all trash and recycling bags. Take the empty bins outside to a driveway or patio where you have space to work. This prevents messes inside your home and allows you to hose them down without worry.
Scrub With Disinfectant
Spray the inside and outside of each bin with a disinfectant cleaner or a mixture of vinegar and water. Let it sit for a few minutes to loosen grime. Then scrub thoroughly with a stiff-bristled brush, paying extra attention to corners and the bottom where residue collects.
Rinse And Dry In The Sun
Rinse the bins with a garden hose until all soap residue is gone. Turn them upside down to drain and let them dry completely in direct sunlight. The sun's UV rays help kill remaining bacteria and eliminate odors naturally.
15. Final Touches: Air Out and Freshen Up

After all that scrubbing, dusting, and organizing, the last step is about making your home feel as good as it looks. This is the moment to add those sensory details that turn a clean house into a welcoming sanctuary. A few simple actions can make the whole space smell fresh, look polished, and feel complete.
Open The Windows
Even if you've used natural cleaning products, indoor air can feel stale after a deep clean. Open windows in every room for at least 15 minutes to let in fresh air and circulate out any lingering fumes or dust particles. If the weather cooperates, this simple step instantly makes the whole house feel lighter and cleaner.
Add A Pleasant Scent
Light a candle, use an essential oil diffuser, or place a bowl of dried lavender on the counter. Choose a subtle, natural fragrance—think lemon, eucalyptus, or lavender—rather than something overpowering. This small touch creates a calming atmosphere and signals that the deep clean is truly complete.
Fluff And Arrange
Fluff sofa cushions, arrange throw pillows neatly, and fold blankets or throws. Straighten rugs and adjust curtains so they hang evenly. These minor adjustments make the room look intentionally styled rather than just cleaned.
A quick walk-through allows you to spot any missed spots or items out of place.
Final Walk-through
Take a few minutes to walk through each room with fresh eyes. Pick up any stray items, wipe a smudge you missed, or adjust a picture frame. This final check ensures everything is in order and gives you a sense of accomplishment before you sit down and enjoy your sparkling clean home.
FAQ
How long does a whole house deep clean take?
For a typical home, expect 4-8 hours depending on size and how thorough you are. Breaking it into 15 steps helps you stay focused and efficient.
What order should I clean my house?
Start with the dirtiest rooms (kitchen and bathrooms), then move to living areas and bedrooms. Finish with floors and windows to avoid re-cleaning.
Do I need special cleaning products?
Not necessarily. All-purpose cleaner, glass cleaner, disinfectant, degreaser, and a good vacuum are sufficient. Baking soda and vinegar work for many tasks.
How often should I deep clean?
Every 3-6 months is ideal, but high-traffic homes may need it more often. Regular maintenance cleaning between deep cleans keeps things manageable.
Can I deep clean in one day?
Yes, with a plan and focus. The 15-step approach is designed to be completed in a single day. Enlist help from family members to speed things up.
Conclusion
A deep clean doesn't have to be an all-day ordeal when you break it into these 15 focused steps. Each room gets the attention it needs without overwhelming your schedule or energy.
Once you've finished, maintaining that fresh feeling is much simpler with a quick daily reset. Stick to a weekly maintenance routine, and your next deep clean will be even faster.

I’m Pallab Kishore, the owner of Little Pets Realm — an animal lover and pet care enthusiast sharing easy tips, healthy recipes, and honest advice to help every small pet live a happy, healthy, tail-wagging life.


