You don't need to spend hours scrubbing to keep a clean home. Small, smart habits can make a huge difference, especially when your schedule is packed. These 23 tips are designed to fit into your busiest weeks, helping you stay on top of mess without the overwhelm.
Think of cleaning as a series of micro-wins rather than a marathon. A few minutes here and there add up to a noticeably fresher space.
Ready to reclaim your time and your sanity? Let's dive into the strategies that actually work for real life.
1. Make Your Bed Every Morning

Starting your day by making the bed is a small win that pays off all day. It takes less than two minutes but transforms your bedroom from chaotic to calm. Plus, it sets a productive tone that can carry into the rest of your morning routine.
Why It Works
A made bed instantly makes the room look tidier, even if other surfaces are cluttered. It also creates a psychological trigger: completing one simple task often motivates you to tackle the next. You'll feel a sense of order that reduces stress.
How To Make It Stick
Keep your bedding simple. Use a duvet or a quilt that you can just pull up and smooth out—no fussy layers or decorative pillows required. If you're really short on time, just straighten the top sheet and blanket.
Even that small effort makes a difference.
When You're Running Late
If the morning chaos is real, make the bed right after you get up or while your coffee brews. It becomes a habit faster than you think. And on days when you truly can't, don't stress—just aim for a quick straighten when you get home.
2. Keep Cleaning Supplies in Every Room
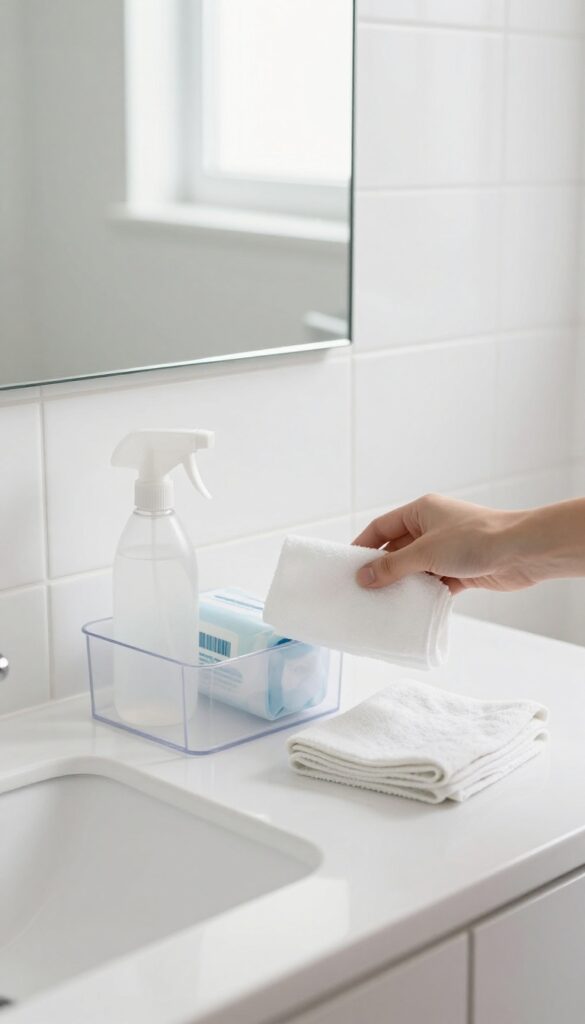
Imagine wiping up a toothpaste splatter the second it happens instead of letting it harden into a crusty mess. That's the power of having supplies within arm's reach. When you stash a mini cleaning kit in each bathroom and the kitchen, you remove the biggest barrier to quick cleanups: the trip to the closet.
What To Put In Each Caddy
Grab a small plastic bin or a shower caddy. Fill it with all-purpose spray, a pack of disinfecting wipes, and a couple of microfiber cloths. That's it.
No fancy products needed. Keep it under the sink or on a shelf where you can grab it in seconds.
The One-minute Wipe Down
After you brush your teeth or wash your face, spend sixty seconds wiping the counter, faucet, and mirror. Because the supplies are right there, you'll actually do it. This habit prevents soap scum and water spots from building up, so your weekly deep clean becomes much faster.
Stock Up And Rotate
Buy refills in bulk and keep a stash in a hall closet. Once a week, check each caddy and restock. Toss empty bottles and replace worn cloths.
This small weekly check keeps your system running smoothly and ensures you never run out mid-clean.
3. Use the 'One-Minute Rule'
If a task takes less than a minute—like wiping a counter or hanging a coat—do it right away. This prevents small messes from piling up. It's a simple mental shift that keeps your home tidy without blocking your schedule.
The one-minute rule is a game-changer for busy weeks. Instead of letting tiny tasks accumulate into a weekend chore list, you handle them in the moment. This habit reduces clutter and keeps surfaces clean with almost no effort.
Over time, it becomes automatic, saving you from deep cleans.
Start With The Obvious
Focus on tasks you see daily: wipe toothpaste splatters from the sink, hang a jacket instead of draping it, or toss junk mail straight into the recycle bin. These take seconds but prevent buildup. Once you start noticing them, you'll do them without thinking.
Involve The Whole Household
Teach family members the one-minute rule too. When everyone puts away their own dish or wipes the table after a snack, the collective effort is huge. Make it a game—see who can spot and complete a one-minute task first.
It turns cleaning into a shared habit.
Tackle The Kitchen Sink
After each meal, rinse and load dishes into the dishwasher immediately. Wipe the counter and stove with a quick swipe. This one-minute routine keeps your kitchen guest-ready and prevents food from hardening.
It's the most impactful minute you can spend.
4. Clean as You Cook
Dinner prep doesn't have to leave your kitchen looking like a disaster zone. By weaving small cleaning tasks into your cooking routine, you can have a meal and a tidy kitchen ready at the same time. It's all about using those little pauses—while water boils, sauce simmers, or veggies roast—to knock out quick cleanups.
The key is to stay ahead of the mess instead of letting it pile up. Start by filling your sink with hot, soapy water before you begin cooking. As you finish using a measuring cup, spatula, or cutting board, drop it in to soak.
While your food cooks, wash a few items, wipe down counters, and put away ingredients you no longer need. By the time you plate your meal, the kitchen is almost clean, and you can enjoy dinner without the dread of a post-meal cleanup marathon.
Set Up A Wash Station
Before you turn on the stove, fill one side of your sink with hot, soapy water. As you cook, toss in any used utensils, measuring cups, or small bowls. This simple step prevents sticky residue from hardening and makes washing a breeze.
You can even add a few drops of lemon essential oil for a fresh scent.
Use Downtime Wisely
Every recipe has built-in waiting periods—while pasta boils, sauce simmers, or bread toasts. Use those minutes to wash a few dishes, wipe the stovetop, or put away spices. Set a timer if you're worried about burning food, but you'll be surprised how much you can accomplish in five minutes.
Put Away As You Go
Instead of leaving all ingredients out until the meal is done, return them to the pantry or fridge as soon as you're finished using them. This not only clears counter space but also prevents cross-contamination. Plus, it's one less thing to do after eating.
Finish With A Quick Wipe
Once the food is on the table, do a final pass: wipe down counters, rinse the sink, and put the dish rack away. This takes less than two minutes and leaves your kitchen looking spotless. You'll come back to a clean space after dinner, making the post-meal cleanup feel effortless.
5. Set a 10-Minute Daily Tidy

When your week is packed, even a small cleaning session can feel overwhelming. That's where the 10-minute tidy comes in—it's quick, effective, and almost always doable. Set a timer and race around the house putting things back where they belong.
Ten minutes is enough to make a visible difference without eating into your evening.
The key is to move fast and focus on high-impact areas. Don't get sidetracked by deep cleaning—just pick up clutter, straighten cushions, and wipe down surfaces. You'll be surprised how much you can accomplish when you're racing the clock.
Plus, it's oddly satisfying to see the transformation in such a short time.
Pick Your Hotspots
Identify the spots that get messy fastest: the coffee table, kitchen island, entryway bench. Hit those first. Once they're clear, the whole room feels cleaner.
If you have time left, move to secondary zones like bathroom counters or bedroom dressers.
Use A Timer, Not Your Phone
A physical timer or smart speaker works best—your phone is too distracting. Set it for 10 minutes and go. When it beeps, stop.
You can always do another round later. This keeps the task from ballooning into a longer chore.
Get The Whole Family Involved
Turn it into a game. Challenge kids to see who can put away the most items before the timer goes off. Even a quick team effort can reset the house in minutes.
It's a low-pressure way to build a cleaning habit without resentment.
6. Declutter High-Traffic Zones Weekly
Entryways, kitchen counters, and coffee tables have a way of collecting random stuff fast. A quick weekly declutter stops these surfaces from turning into catch-all zones. Spend just 10 minutes per area, and you'll keep your home feeling organized without a major time commitment.
High-traffic zones are the first places guests see and the spots you use most. When they're cluttered, the whole house feels messy. A weekly reset prevents that buildup and makes daily cleaning easier.
Start With The Entryway
Shoes, mail, jackets, and bags pile up here fast. Grab a basket or bin for items that need to go upstairs or to another room. Hang coats and put away shoes immediately.
A clear entryway sets a calm tone for the whole house.
Tackle Kitchen Counters
Appliances, papers, and random gadgets often crowd counters. Clear everything off, wipe down the surface, and only put back what you use daily. Store small appliances you rarely use in cabinets.
A clear counter makes cooking and cleaning feel effortless.
Reset The Coffee Table
Remote controls, magazines, coasters, and snacks accumulate quickly. Take everything off, dust, and return only the essentials. Use a tray or small caddy to corral remotes and coasters.
A tidy coffee table makes your living room look instantly cleaner.
7. Use Baskets for Quick Cleanup

Clutter has a way of migrating from room to room. A basket in each room catches those stray items and turns cleanup into a simple lap around the house. No more hunting for where things belong—just drop, collect, and return.
The basket method works because it removes the friction of putting things away immediately. Instead of walking to another room for every single item, you toss it in the basket and deal with it later. When the basket is full, you take one efficient trip to return everything.
This cuts down on decision fatigue and keeps surfaces clear in seconds.
Pick The Right Baskets
Choose baskets that fit the room's style and size. A small woven basket on the coffee table works for remotes and magazines. A larger bin in the bedroom catches clothes that need to go to the laundry.
Avoid baskets that are too big—they encourage piling rather than periodic emptying.
Set A Basket-emptying Routine
Empty each basket at the same time every day or every other day. Link it to an existing habit, like after dinner or before bed. Consistency prevents baskets from becoming permanent clutter zones.
Label Baskets For Different Zones
If you have multiple baskets in one room, label them by destination—"Upstairs, " "Kitchen, " "Office. " This makes the return lap even faster because you can grab all items headed the same way at once.
8. Vacuum in Reverse
Most people start vacuuming at the door and move inward, but that means you end up walking all over the clean carpet. Flipping your route saves time and keeps your floors fresher longer.
When you vacuum from the farthest corner of the room toward the exit, you never have to step on the spot you just cleaned. It's a simple change that makes a big difference in how long your floors stay looking good.
Why It Works
Think about it: if you start at the door, every pass you make pushes dust and debris deeper into the room. By the time you're done, you've walked across the cleanest parts, leaving footprints and re-depositing dirt. Reverse vacuuming eliminates that problem entirely.
How To Do It
Before you start, scan the room for large debris or clutter. Pick those up by hand. Then, take your vacuum to the farthest corner from the door.
Vacuum in straight lines, overlapping slightly, and work your way back toward the entrance. When you're done, simply step out and close the door.
Bonus Tip
Use this same logic for mopping or sweeping. Always start at the back and work toward the exit. You'll avoid spreading dirt and save yourself from having to redo sections.
9. Microwave a Bowl of Lemon Water
A microwave can get pretty grimy after a week of reheating leftovers and popping popcorn. But you don't need harsh chemicals to clean it. A simple bowl of water with lemon slices does the job in minutes.
Fill a microwave-safe bowl with water, add a few slices of lemon, and microwave on high for three minutes. The steam loosens stuck-on food and grease, while the lemon leaves a fresh, clean scent. After the time is up, let the bowl sit for a minute so the steam can work its magic.
Then carefully remove the bowl and wipe down the interior with a sponge or cloth. Everything wipes away easily, even stubborn spots.
Why Lemon Water Works
The steam from the hot water softens dried-on food particles, making them easy to wipe off. Lemon adds a natural acidity that helps cut through grease and neutralizes odors. It's a gentle, non-toxic alternative to spray cleaners.
How To Do It Right
Use a large microwave-safe bowl to maximize steam coverage. Add about a cup of water and a few lemon slices. Microwave on high for three minutes.
Let it sit for a minute after the timer goes off, then open the door and wipe down the interior with a damp cloth. Avoid touching the hot bowl directly.
When To Use This Trick
This is perfect for a quick midweek refresh. Do it after a few days of heavy microwave use, or whenever you notice lingering food smells. It's also a great way to start a cleaning session because it requires almost no effort.
10. Use Dryer Sheets for Dusting
If you have a box of dryer sheets in your laundry room, you already own a surprisingly effective dusting tool. They work especially well on surfaces that attract static, like baseboards, blinds, and electronics. Plus, they leave behind a subtle fresh scent that makes your whole room smell just-laundered.
Why Dryer Sheets Work So Well
Dryer sheets are designed to reduce static cling in the dryer, and that same antistatic property helps repel dust from surfaces you wipe. Instead of just moving dust around, the sheet traps it in the fibers. The mild conditioning agents also leave a thin protective layer that makes future dusting easier.
Best Surfaces For Dryer Sheet Dusting
Baseboards and blinds are perfect candidates because they tend to collect dust quickly and can build up static. Electronics like TV screens and computer monitors also benefit—the antistatic effect reduces the amount of dust that settles back. Avoid using them on unfinished wood or glass, as the residue can leave streaks or a slight film.
Quick Tip For Maximum Efficiency
Grab a used dryer sheet from the laundry—it still has plenty of dusting power. For a deeper clean, dampen the sheet slightly with water. You can also pair it with a microfiber cloth for larger areas.
Keep a stash under the sink so you always have one handy for a fast wipe-down.
11. Clean Your Shower While You Shower
Turn your daily shower into a mini cleaning session. By keeping a squeegee or spray cleaner within arm's reach, you can wipe down surfaces right after rinsing off. This habit takes less than a minute but prevents soap scum and mildew from building up over time.
Why It Works
Soap scum and mildew form when water and soap residue sit on surfaces. By wiping them away while the shower is still warm and wet, you remove the conditions they need to grow. It's much easier than scrubbing later.
What You Need
A small squeegee or a spray bottle with a mix of water and vinegar (or a daily shower spray). Keep it in the shower caddy or hang it on a hook. No need for heavy-duty cleaners—just something to break down residue.
Make It A Habit
After you turn off the water, spend 30 seconds squeegeeing the walls and door. If you use a spray, mist the surfaces and let it sit while you dry off. It becomes automatic after a week or two.
12. Rotate Your Cleaning Focus
Trying to deep clean your entire home every week is a recipe for burnout. Instead, rotate your focus: one week tackle windows, the next baseboards, then ceiling fans. This way, each area gets a thorough cleaning without eating up your whole weekend.
Why Rotation Works
When you spread deep cleaning tasks across weeks, nothing gets neglected for too long. You avoid the overwhelm of a massive to-do list and still maintain a high standard of cleanliness. Plus, it’s easier to stay motivated when you only have one or two big tasks per week.
Sample Rotation Schedule
Week 1: Wash windows and mirrors. Week 2: Wipe down baseboards and door frames. Week 3: Vacuum under furniture and behind appliances.
Week 4: Dust light fixtures and ceiling fans. Customize based on your home’s needs—just keep it simple and stick to the plan.
Pair Rotation With Daily Habits
Use your daily 10-minute tidy to handle surface clutter and quick wipes. Then, when your rotation week arrives, you only have to focus on the deeper task. This combo keeps your home consistently clean without last-minute panic.
13. Use a Lint Roller for Lampshades
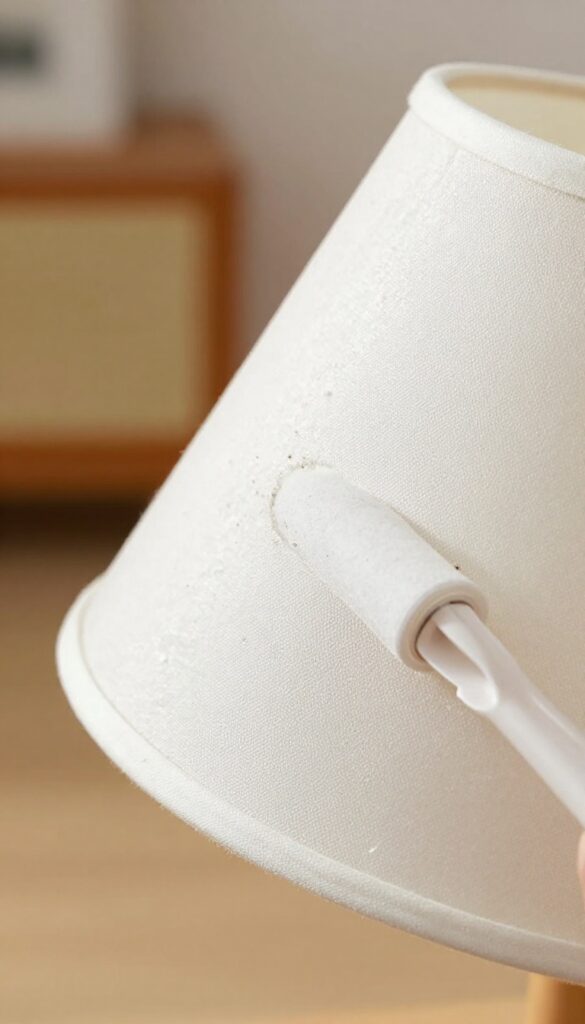
Fabric lampshades are dust magnets, but cleaning them usually means hauling out the vacuum with a brush attachment—and hoping you don't bend the shade. There's a faster, gentler method that takes seconds. Grab a lint roller.
A lint roller picks up dust from fabric lampshades quickly and easily. Much faster than vacuuming with a brush attachment. Simply roll it over the surface in overlapping strokes, and watch the dust transfer to the adhesive sheet.
No bending, no awkward angles, and no risk of damaging the shade. It works on silk, linen, cotton, and synthetic blends. For heavily soiled shades, use multiple sheets.
This trick also works on pleated lampshades, where dust settles into the folds. Keep a lint roller in your cleaning caddy or near your lamps for a quick weekly refresh.
Why It Works So Well
Fabric lampshades have a textured surface that traps dust. Vacuum brush attachments can miss fine particles or press dust deeper into the weave. A lint roller's tacky surface grabs dust without pushing it around.
It's also much quieter—no vacuum noise when you just want a quick touch-up.
Best Practices For Different Shade Types
For flat or slightly curved shades, roll in straight lines from top to bottom. For pleated or ruffled shades, follow the contours of the fabric. Change sheets as soon as they lose stickiness.
Avoid pressing too hard on delicate silk shades. For lamp bases or hard-to-reach areas, wrap the roller with a microfiber cloth instead.
When To Upgrade To A Deeper Clean
If a lint roller no longer picks up dust (the shade looks clean but feels gritty), it's time for a deeper clean. Spot-test a small area first with a damp cloth and mild soap. For most shades, a lint roller weekly keeps them fresh for months between deeper washes.
14. Keep a Trash Bag in Your Car
Your car is basically a mobile extension of your home, and it collects clutter just as fast. Coffee cups, fast-food wrappers, receipts, and random junk pile up without you even noticing. The fix is simple: stash a small trash bag or a reusable container in your car and make it a habit to toss garbage every time you park.
This tiny habit keeps your car tidy without a dedicated cleaning session. It also makes the daily commute feel less chaotic. Plus, a clean car sets a positive tone for the day and reduces the mental load of knowing there's a mess waiting for you.
Where To Keep The Bag
Hang a small bag on the back of the passenger seat headrest or keep a reusable container in the door pocket. Choose something that's easy to reach while driving, but not distracting. A simple grocery bag works, but a dedicated car trash bag with a clip is even better.
Make It A Routine
Every time you park at home or work, take a moment to collect wrappers, receipts, and empty bottles. Drop them in the nearest trash can. This takes less than 30 seconds and prevents clutter from building up.
You'll never need to dedicate an hour to cleaning out the car again.
Bonus: Keep Wipes Handy
Pair the trash bag with a pack of disinfecting wipes in the glove compartment. Wipe down the steering wheel, cup holders, and door handles while you're clearing trash. It keeps surfaces clean and kills germs, especially during cold and flu season.
15. Soak Showerheads in Vinegar Overnight

Hard water deposits can silently sabotage your shower pressure and leave your showerhead looking crusty. A simple overnight soak in vinegar dissolves that buildup without any scrubbing. This is one of those set-it-and-forget-it tasks that pays off immediately the next morning.
Mineral buildup from hard water clogs the tiny nozzles on your showerhead, reducing water flow and creating an uneven spray. Vinegar’s acidity breaks down calcium and lime deposits effortlessly. The best part?
You barely have to lift a finger—just fill a plastic bag with vinegar, secure it around the showerhead, and let it work overnight. By morning, you’ll have a like-new fixture and noticeably better water pressure.
What You’ll Need
Grab a sturdy plastic bag (a quart-size zip-top bag works well), white distilled vinegar, and a rubber band or twist tie. That’s it—no special tools required. If your showerhead is particularly large, you might need a bigger bag or two bags taped together.
Step-by-step Soak
Fill the bag about halfway with vinegar. Slip it over the showerhead so the nozzles are fully submerged. Secure the bag with a rubber band or twist tie just below the head to keep it in place.
Let it soak for at least six hours—overnight is ideal. In the morning, remove the bag and run the shower for a minute to rinse away any loosened debris.
Extra Tips For Stubborn Deposits
If your showerhead hasn’t been cleaned in a while, you might need a second soak. For really tough buildup, gently scrub the nozzles with an old toothbrush after the vinegar bath. Also, avoid using bleach or harsh chemicals—vinegar is gentle on most finishes, but check your manufacturer’s instructions if you have a specialty coating.
16. Use a Pillowcase to Clean Ceiling Fans
Ceiling fans collect dust fast, and cleaning them usually means a cloud of grime raining down on your floor or furniture. There's a smarter way that traps the mess before it spreads. A simple pillowcase turns this annoying chore into a quick, no-dust-fall task.
Why It Works So Well
The pillowcase acts like a dust bag. When you slide it over the blade, the fabric captures all the loose dust and dirt. Pulling the case off in one motion keeps everything contained.
No more sweeping or vacuuming after each blade.
How To Do It Right
Grab an old pillowcase you don't mind getting dusty. Slide it over one fan blade, covering as much of the blade as possible. Gently pull the pillowcase back toward you, letting the dust fall inside.
Repeat for each blade. Shake the pillowcase outside or toss it in the wash.
Bonus Tips For Best Results
For stubborn dust, lightly spray the inside of the pillowcase with a dusting spray or diluted vinegar before starting. Work from a sturdy step stool or ladder to reach high fans safely. Clean your fans monthly to prevent heavy buildup.
17. Wipe Down Sinks After Each Use
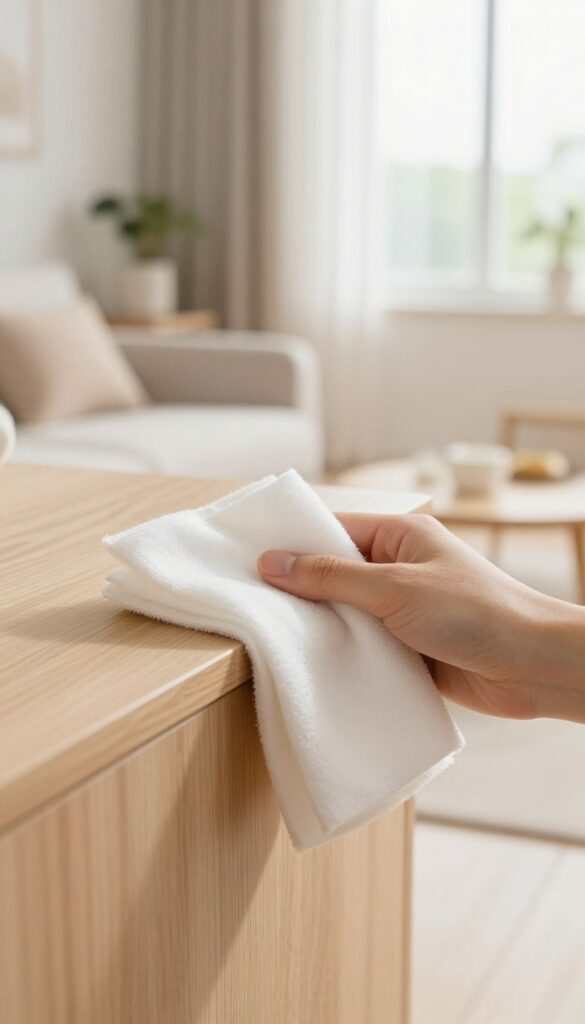
A quick swipe with a dry cloth after brushing teeth or washing hands keeps sinks sparkling and prevents toothpaste gunk. This tiny habit takes seconds but saves you from scrubbing dried-on residue later. It's one of those micro-wins that keeps your bathroom looking fresh with almost no effort.
Instead of letting water spots and toothpaste splatters harden, grab a dedicated microfiber cloth and give the sink a quick once-over. Focus on the faucet handles and the basin rim where gunk tends to collect. If you do this after every use, you'll rarely need a deep scrub.
Why It Works
Toothpaste contains abrasives that can etch surfaces if left to dry. A dry cloth picks up residue before it bonds, and wiping away water prevents mineral deposits. Plus, a dry sink discourages mold and mildew growth around the drain.
Make It A Habit
Keep a small cloth or squeegee within arm's reach of the sink. Pair the wipe-down with an existing routine, like after brushing or washing your face. After a week, it'll feel automatic.
What To Use
Microfiber cloths work best because they trap grime without scratching. Avoid paper towels, which can leave lint. For an extra shine, use a dedicated glass cloth on chrome fixtures.
18. Organize Under the Sink with Tension Rods
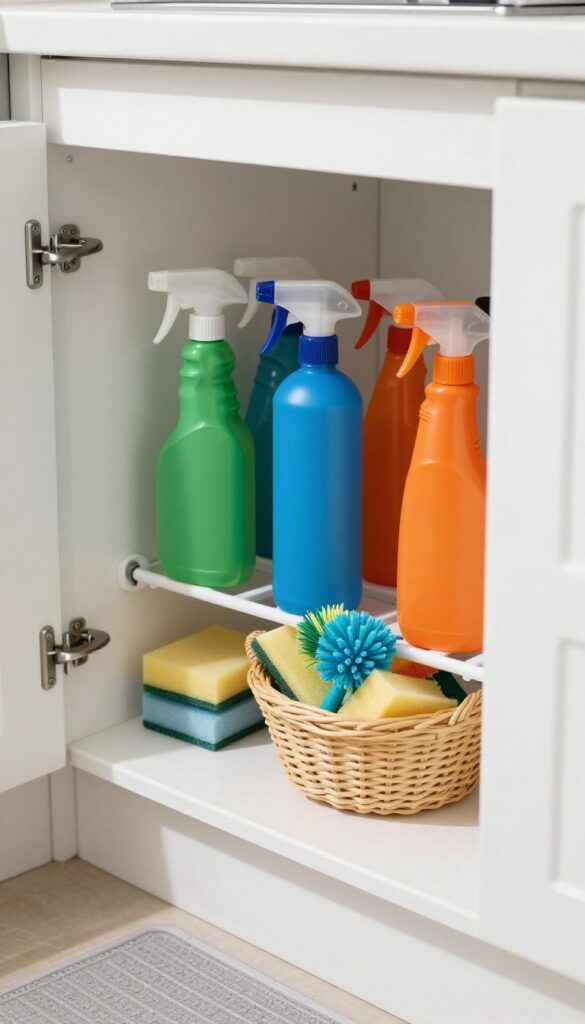
The space under your kitchen or bathroom sink can quickly become a black hole of clutter. Bottles tip over, sponges get lost, and you end up playing a frustrating game of Tetris every time you need something. A simple tension rod can transform that chaos into an organized, easy-to-access zone.
Tension rods aren't just for curtains. They're a cheap, no-drill solution for vertical storage under the sink. By hanging spray bottles from a rod, you free up floor space for larger items like trash bags or cleaning caddies.
Plus, bottles stay upright and within reach.
What You'll Need
Grab a tension rod that fits the width of your under-sink cabinet (most standard rods adjust from 18 to 30 inches). You'll also need spray bottles with trigger handles that can hook over the rod. If your bottles have smooth necks, attach small adhesive hooks to the rod.
How To Set It Up
First, clear everything out from under the sink. Measure the width and choose a rod that extends slightly longer than the space so it stays snug. Install the rod near the top of the cabinet, leaving enough room below for your items.
Hang spray bottles by their triggers or necks. Group similar cleaners together for easy access.
Bonus Tips
Use a second rod lower down for dish towels or scrub brushes. You can also attach small baskets to the rod with shower hooks to hold sponges or scrub pads. For extra stability, place a non-slip mat under the rod ends.
19. Use a Toothbrush for Grout
Grout lines are magnets for dirt and mildew, but they're too narrow for most sponges or scrub brushes. That's where an old toothbrush comes in—it's the perfect tool to get into those tight spaces without splashing cleaner everywhere. Pair it with a simple baking soda paste for a deep clean that costs pennies.
An old toothbrush is ideal for scrubbing grout lines in the kitchen or bathroom because its bristles are stiff enough to dislodge grime but soft enough not to damage the grout. The small head lets you target individual lines without scrubbing adjacent tiles. For tough stains, make a paste of baking soda and water (or hydrogen peroxide for whitening), apply it to the grout, let it sit for 5–10 minutes, then scrub with the damp toothbrush.
Rinse with water and wipe dry. This method works wonders on floor grout, backsplashes, and shower walls.
Why A Toothbrush Works Best
Toothbrushes are designed to reach small crevices—exactly what grout lines are. Their compact size gives you control, and the angled bristles of some models help you scrub at the perfect angle. Plus, you're repurposing something you'd otherwise throw away.
The Baking Soda Paste Trick
Mix three parts baking soda with one part water to form a thick paste. For extra stain-fighting power, substitute water with white vinegar or hydrogen peroxide. Apply the paste along the grout lines, let it sit for a few minutes, then scrub with the toothbrush.
The mild abrasiveness lifts dirt without scratching tiles.
Maintenance Between Deep Cleans
To keep grout looking fresh longer, give it a quick toothbrush scrub once a week during your regular cleaning routine. Focus on areas prone to moisture, like around the shower drain or kitchen sink. A dry toothbrush can also sweep away dust from grout lines before they get wet.
20. Freshen Carpets with Baking Soda

Carpets trap odors from pets, cooking, and daily foot traffic. Before you reach for a chemical spray, try this simple trick: baking soda. It's cheap, non-toxic, and surprisingly effective at neutralizing smells.
Why Baking Soda Works
Baking soda is a natural deodorizer. It absorbs odors rather than covering them up with fragrance. When you sprinkle it on carpet fibers, it pulls in and traps smelly particles.
After a short wait, vacuuming removes both the baking soda and the odors.
How To Do It Right
Start by vacuuming the carpet to remove loose dirt. Then sprinkle a generous, even layer of baking soda over the area. Let it sit for at least 15 minutes—longer for stronger smells, like pet accidents.
Finally, vacuum thoroughly, going over the area in multiple directions to pick up all the powder.
Boost The Power With Essential Oils
Mix a few drops of your favorite essential oil (lavender, lemon, or tea tree) into the baking soda before sprinkling. Stir well to avoid clumps. This adds a light, natural scent while still neutralizing odors.
Just be sure to test on a small hidden spot first to avoid staining.
21. Clean Your Dishwasher with Vinegar
Your dishwasher works hard to clean your dishes, but it needs a little TLC itself. Over time, grease, soap scum, and hard water minerals build up inside, leading to odors and less effective cleaning. A simple vinegar cycle every month keeps it fresh and running smoothly.
Running an empty cycle with a cup of white vinegar placed in a dishwasher-safe bowl on the top rack is one of the easiest ways to maintain your machine. The vinegar breaks down residue, deodorizes, and helps prevent clogs. For extra grime, you can also sprinkle baking soda on the bottom of the dishwasher before starting a short rinse cycle.
This combo tackles stubborn buildup without harsh chemicals.
Why Vinegar Works
Vinegar is mildly acidic, which dissolves mineral deposits and cuts through grease. It’s also a natural deodorizer, neutralizing musty smells without leaving a strong scent behind. Unlike commercial cleaners, it’s safe for your dishwasher’s seals and internal components.
Step-by-step Instructions
Start by removing any food debris from the filter and drain. Place a cup of white vinegar in a dishwasher-safe bowl on the top rack. Run a normal cycle with hot water.
For a deeper clean, pause the cycle halfway through and let the vinegar sit for 15 minutes before resuming. Once done, check for remaining residue and wipe the door gasket with a damp cloth.
When To Skip The Vinegar
If your dishwasher has a stainless steel interior, check the manual first—some manufacturers advise against vinegar because it can dull the finish over time. In that case, use a commercial dishwasher cleaner or a citric acid rinse instead. Also avoid vinegar if your machine has a rubber gasket that’s already cracked, as acid may worsen damage.
22. Use a Squeegee on Windows After Showering
Shower doors and windows are notorious for collecting water spots and soap scum. A simple squeegee habit can keep them crystal clear with almost no effort. Spending just 30 seconds after each shower prevents mineral deposits from building up, so you rarely need to do a deep scrub.
Why It Works So Well
Hard water contains minerals that leave white spots when they dry on glass. By squeegeeing while the surface is still wet, you remove most of that water before it evaporates. This stops spots from forming and keeps soap scum from bonding to the glass.
The Right Tool For The Job
A good-quality squeegee with a rubber blade is key. Look for one with a stainless steel handle and a replaceable blade – it'll last longer and glide smoothly. Keep it hanging inside your shower or on a nearby hook so it's always handy.
Make It A Habit
The trick is consistency. After you turn off the water, do a quick squeegee before you step out. Start from the top and pull down in overlapping strokes.
Wipe the blade dry with a towel every few passes to avoid streaks. In a week, it'll feel automatic.
23. Create a Cleaning Playlist

Music can transform a chore into something you almost look forward to. A carefully curated playlist gives you a built-in timer and a mood boost at the same time. Instead of scrolling through songs mid-clean, set yourself up with a go-to list that keeps you moving.
Pick The Right Length
Aim for a playlist that's exactly 20 minutes long. That's enough time to tackle a focused task like wiping down the kitchen, vacuuming the living room, or tidying the bathroom. When the music stops, you're done—no need to keep going unless you want to.
Choose Upbeat Tunes
Songs with a fast tempo help you work faster and feel less tired. Pop, dance, or classic rock anthems work well. Avoid slow ballads or anything that might make you want to sit down.
The goal is energy, not relaxation.
Refresh It Regularly
Even the best playlist gets stale. Swap out a few songs every month to keep it fresh. You can also create different playlists for different cleaning sessions—one for deep cleaning, one for quick daily tidying, and maybe one for laundry folding.
Use Headphones Or A Speaker
If you live with others, headphones let you zone in without disturbing them. A portable speaker works great if you're moving from room to room. Either way, make sure the volume is loud enough to motivate but not so loud that you miss the doorbell or phone.
FAQ
How often should I deep clean my house?
For most homes, a deep clean every 3-6 months is sufficient. Focus on high-traffic areas and tasks like oven cleaning, window washing, and baseboard dusting.
What's the best way to clean a microwave quickly?
Heat a bowl of water with lemon slices for 3 minutes. The steam loosens food residue, making it easy to wipe away with a cloth.
How can I make cleaning less overwhelming?
Break tasks into small chunks using the one-minute rule or a 10-minute daily tidy. Focus on one room or one type of task at a time.
What are the most important areas to clean weekly?
Kitchen counters, bathroom sinks and toilets, floors in high-traffic areas, and any surfaces that collect dust or food debris.
How do I remove hard water stains from glass shower doors?
Use a mixture of equal parts white vinegar and water. Spray on, let sit for 10 minutes, then scrub with a non-abrasive sponge and rinse.
Conclusion
Busy weeks don't leave much room for deep cleaning, but these 23 tips prove that small, consistent efforts keep your home from spiraling into chaos. Focus on the hacks that fit your biggest pain points—whether it's a faster kitchen reset or a clutter-free living room. You don't need to overhaul everything at once.
Pick two or three tricks to try this week, then build from there. Over time, these habits become second nature, and you'll spend less time cleaning and more time enjoying your space.


