Soap scum and hard water stains can make your shower look dingy no matter how often you clean. But you don't need expensive specialty products to cut through that stubborn film.
These 20 hacks rely on everyday items like vinegar, baking soda, and even dryer sheets to save you time and elbow grease. From glass doors to grout lines, each tip targets specific problem areas with minimal effort.
Whether you're dealing with a light haze or crusted-on mineral deposits, there's a solution here that actually works without breaking the bank.
1. White Vinegar and Dish Soap Spray
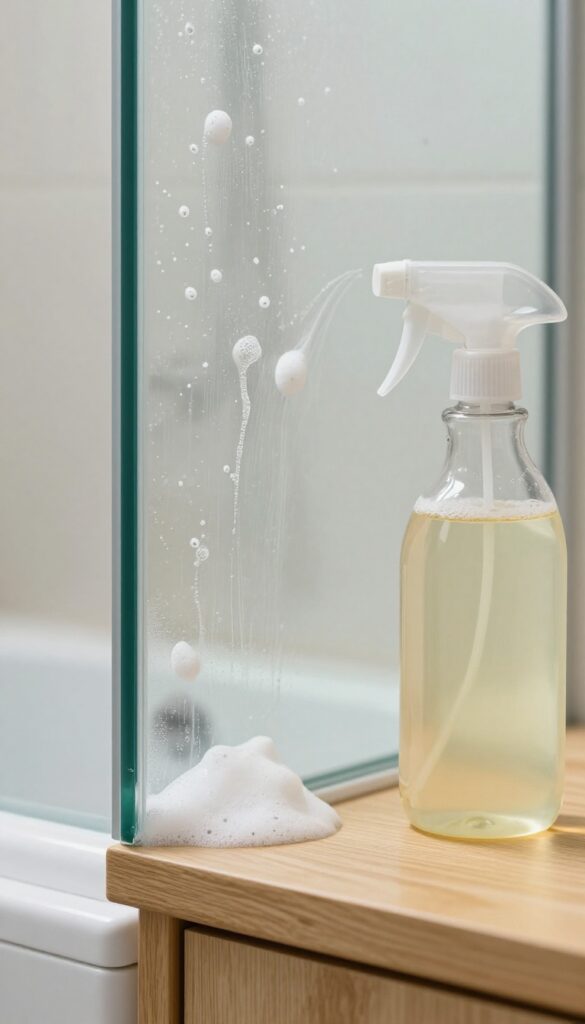
White vinegar and dish soap are a powerhouse duo for cutting through soap scum and hard water stains. The vinegar's acidity dissolves mineral deposits, while the dish soap breaks down greasy residue. Together, they create a spray that works better than many commercial cleaners.
Mix equal parts white vinegar and warm water in a spray bottle, then add a generous squirt of dish soap. Shake gently to combine. Spray the solution onto soap scum buildup on shower doors, tiles, or fixtures.
Let it sit for 10 minutes so the vinegar can penetrate the minerals. Wipe away with a damp sponge or microfiber cloth. For tough spots, scrub with a soft brush.
Rinse thoroughly with water to avoid any vinegar smell. This hack is safe for most surfaces, but avoid using it on natural stone like marble or granite, as the acid can etch them.
Why This Combo Works
Vinegar is acidic, so it breaks down the alkaline calcium and lime deposits in hard water stains. Dish soap is a surfactant, meaning it reduces surface tension and lifts away oily soap scum. Together, they tackle both parts of the grime.
Best Surfaces To Use It On
This spray is ideal for glass shower doors, ceramic tiles, chrome fixtures, and acrylic tubs. Avoid using it on natural stone, unsealed grout, or aluminum, as the acid can cause damage over time.
Pro Tips For Maximum Effect
Heat the vinegar slightly in the microwave before mixing to boost its cleaning power. Use a spray bottle with a fine mist setting to cover large areas evenly. For extra stubborn scum, add a tablespoon of baking soda to the mixture for gentle abrasion.
2. Baking Soda Paste for Stubborn Spots
When white vinegar alone won't cut it, baking soda steps in as a gentle abrasive that lifts mineral deposits and soap scum without scratching surfaces. This two-ingredient paste is a go-to for those crusty rings around the drain or cloudy patches on glass doors. It's cheap, non-toxic, and surprisingly effective.
Mix baking soda with just enough water to form a thick, spreadable paste—think toothpaste consistency. Apply it directly to hard water spots or soap scum rings, let it sit for 15 minutes to soften the buildup, then scrub gently with a soft sponge or microfiber cloth. Rinse thoroughly with warm water.
For extra stubborn areas, add a splash of white vinegar to the paste for a fizzy boost, but be careful not to let it bubble over. This method works well on tile, glass, and even chrome fixtures, though avoid prolonged contact with natural stone.
Why It Works
Baking soda is mildly alkaline, which helps break down acidic soap scum and mineral deposits. Its fine grit provides just enough scrubbing power to dislodge grime without scratching surfaces like glass or acrylic. The short dwell time allows the paste to penetrate and soften crusty spots, making them easier to wipe away.
Best Application Tips
Use a soft sponge or an old toothbrush for tight corners and grout lines. Avoid abrasive scrubbers like steel wool, as they can scratch. Work in small sections so the paste doesn't dry out before you scrub.
If the paste dries, simply rewet it with a spray bottle of water.
When To Skip This Hack
Skip baking soda paste on delicate surfaces like marble, limestone, or other natural stone, as the abrasiveness can etch the finish. Also avoid on scratched or worn acrylic tubs where the grit might worsen the damage. For those surfaces, stick to a mild dish soap and water solution.
3. Lemon Juice and Salt Scrub
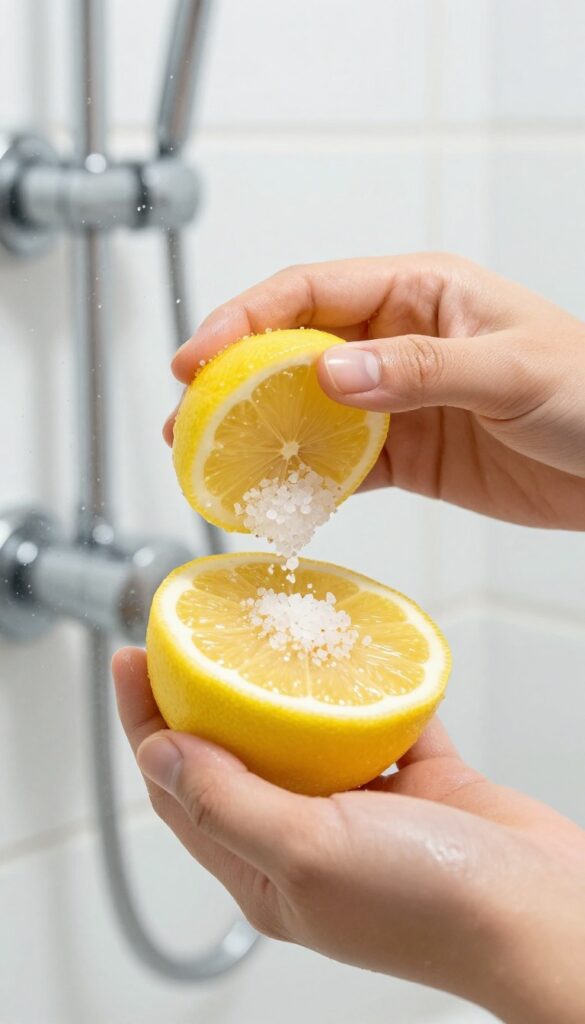
Lemons aren't just for lemonade—they're a natural acid that dissolves calcium deposits in hard water stains. When paired with salt, you get a gentle abrasive scrub that lifts grime without scratching glass or tile. This hack is especially effective on shower doors and chrome fixtures where mineral buildup is most visible.
The combination of citric acid and salt creates a fizzing action that breaks down soap scum and hard water crust. It's also completely non-toxic, so you don't have to worry about harsh fumes in a small bathroom. Just be sure to rinse thoroughly afterward to avoid any sticky residue.
How To Make The Scrub
Cut a fresh lemon in half crosswise. Pour a small pile of coarse salt (kosher or sea salt works best) onto a plate. Dip the cut side of the lemon into the salt, pressing gently so it sticks.
You can also sprinkle salt directly onto the stained surface and rub with the lemon half.
Best Surfaces To Use It On
This scrub works wonders on glass shower doors, chrome fixtures, and porcelain tiles. Avoid using it on natural stone like marble or granite, as the acid can etch the surface. Also steer clear of any sealed grout that might be damaged by the acidity.
Pro Tip For Stubborn Spots
For thick, crusted-on deposits, let the lemon juice sit on the stain for 5–10 minutes before scrubbing. You can also add a squeeze of lemon juice to a spray bottle and spritz the area first. The extra dwell time helps the acid penetrate deeper, making the salt scrub more effective.
4. Pumice Stone for Toilet Ring Stains
Hard water rings in the toilet bowl can be stubborn and unsightly, but a pumice stone offers a surprisingly simple fix. This porous volcanic rock gently abrades mineral deposits without scratching the porcelain, as long as you keep both the stone and the surface wet. It's a low-cost, chemical-free method that works when scrubbing with a brush just won't cut it.
How It Works
Pumice stone is abrasive enough to wear down calcium and lime deposits, but soft enough to leave porcelain unharmed when used wet. The water acts as a lubricant, reducing friction and preventing scratches. As you rub, the stone slowly erodes the hard water ring, turning it into a fine powder that flushes away.
Step-by-step
First, drain the toilet bowl so the water level is below the stain. Wet the pumice stone thoroughly, then gently rub the stain in a circular motion. Apply light pressure—let the stone do the work.
Rinse and check progress frequently. Once the ring is gone, flush to remove any residue.
Tips For Best Results
Always use a wet stone on a wet surface—never dry. If the stone feels too rough, wet it again. Avoid using pumice on colored or coated porcelain, as it may dull the finish.
For tough stains, you can also dip the stone in a little vinegar to boost its cleaning power.
5. Magic Eraser for Glass Doors
Melamine foam erasers—often sold as magic erasers—are a surprisingly effective tool for glass shower doors. They work like a very fine sandpaper, lifting soap scum and hard water spots without the need for harsh chemicals. Just dampen the eraser, wipe the glass, and rinse thoroughly to avoid any residue.
Magic erasers are a quick, chemical-free way to restore clarity to foggy glass doors. They're especially good for light to moderate buildup and can be used on both framed and frameless doors. Always test a small area first, and never use them on textured or etched glass, as they may cause scratching.
How To Use A Magic Eraser On Shower Doors
Start by wetting the eraser until it's damp but not dripping. Gently wipe the glass in circular motions, focusing on areas with visible scum or spots. Rinse the door with water immediately after wiping to remove any foam residue.
For best results, dry the glass with a squeegee or microfiber cloth to prevent new water spots.
When To Skip The Magic Eraser
Avoid using magic erasers on glass with decorative etching, frosted finishes, or any coating like Rain-X. The abrasive action can damage these surfaces. Also, don't use them on acrylic or fiberglass shower enclosures—they can scratch and dull the finish.
Stick to glass doors only.
Pro Tip: Pair With A Squeegee For Maintenance
After cleaning with a magic eraser, use a squeegee on your glass doors after every shower. This simple habit prevents soap scum and hard water from building up again, keeping your doors streak-free and reducing how often you need to deep clean.
6. Hydrogen Peroxide and Baking Soda for Grout
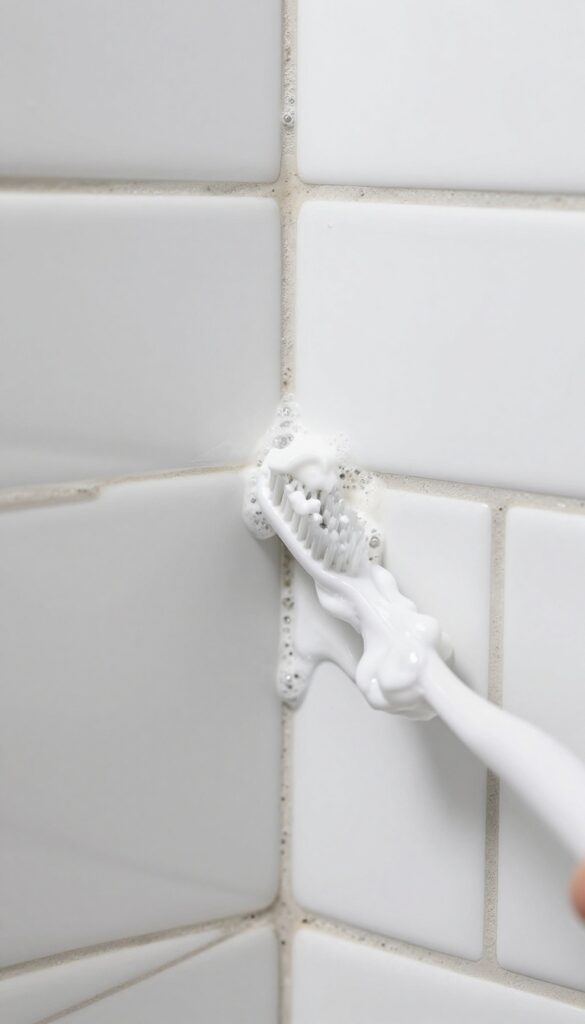
Grout lines are notorious for trapping soap scum and mildew, turning from white to dingy gray or even black. A simple paste of hydrogen peroxide and baking soda can restore them without harsh chemicals. Hydrogen peroxide acts as a mild bleach and disinfectant, while baking soda provides gentle scrubbing power.
Mix baking soda with hydrogen peroxide to form a paste. Apply to grout lines, let sit for 10 minutes, then scrub with a toothbrush. This whitens and removes mildew stains.
Why This Combo Works
Hydrogen peroxide is a natural whitener and kills mold spores on contact. Baking soda is a mild abrasive that lifts grime without scratching tile. Together, they create a fizzing action that helps loosen embedded dirt.
Step-by-step Application
Start by mixing 1/2 cup of baking soda with enough hydrogen peroxide to form a thick paste. Apply the paste to grout lines using an old toothbrush or a small brush. Let it sit for 10 minutes to break down stains.
Scrub in circular motions, then rinse with warm water. For tough stains, let the paste sit longer or add a few drops of dish soap.
Safety Tips
Always test on an inconspicuous area first, especially if you have colored grout. Hydrogen peroxide can lighten some surfaces. Wear gloves to protect your skin, and avoid mixing with bleach or ammonia.
7. Shower Head Soak in Vinegar
A clogged shower head doesn't just ruin water pressure—it also sprays bacteria and mineral chunks at you. Luckily, you don't need to replace it or call a plumber. A simple overnight soak in vinegar dissolves hard water deposits and restores full flow.
Start by filling a sturdy plastic bag with enough white vinegar to fully submerge the shower head. Secure the bag around the head using a rubber band or zip tie, making sure the bag doesn't leak. Let it soak overnight—at least 8 hours.
In the morning, remove the bag and run the shower for a few minutes to flush out any loosened debris. If your shower head is fixed or hard to reach, you can also pour vinegar into a small bowl and hold it against the head with a towel, though the bag method is easier.
Why Vinegar Works
White vinegar is mildly acidic, which breaks down the calcium and magnesium carbonates found in hard water scale. Unlike harsh chemical descalers, vinegar is safe for most metal and plastic finishes when used occasionally. For heavily clogged heads, you may need to repeat the soak or follow up with an old toothbrush to scrub stubborn deposits.
Tips For Best Results
Use distilled white vinegar—not apple cider or cleaning vinegar with additives. If your shower head is brass or has a special coating, test a small area first to avoid discoloration. For handheld shower heads, you can detach them and soak in a bowl of vinegar instead.
After soaking, wipe the exterior with a damp cloth to remove any residue.
When To Call It Quits
If your shower head still sprays unevenly after two soaks, the internal parts may be too corroded. In that case, replacing the head is more cost-effective than descaling again. Also, if you notice black specks in the water after soaking, that's usually rubber gasket deterioration—time for a new head.
8. Rubbing Alcohol for Streak-Free Glass
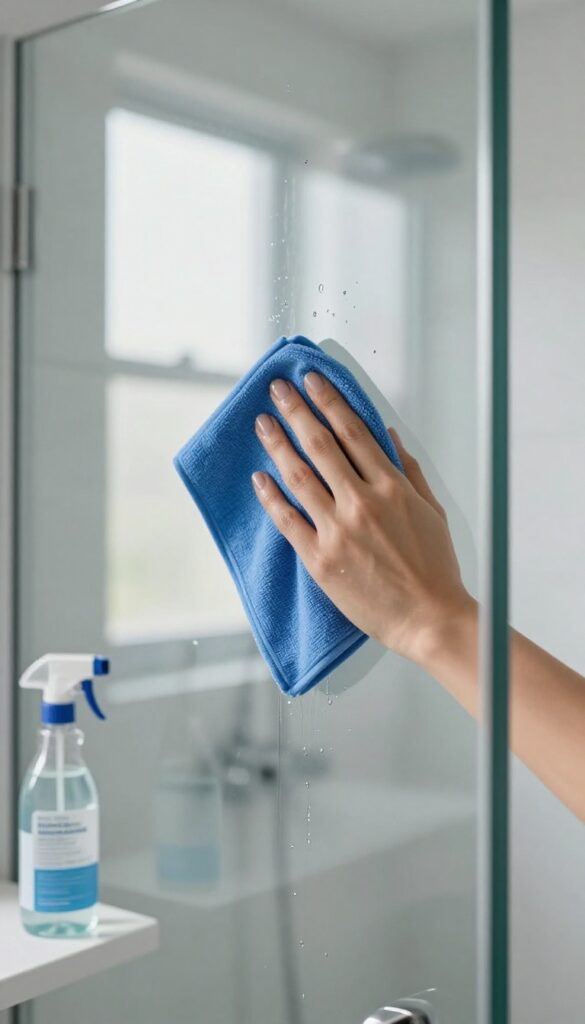
Glass shower doors look great when they're clean, but they also show every single water spot and streak. Commercial glass cleaners work, but they're pricey and often leave a residue. Rubbing alcohol cuts through soap scum and hard water minerals without any of that filmy buildup.
It evaporates almost instantly, so you get a crystal-clear shine with minimal effort.
Mix 1 part rubbing alcohol with 1 part water in a spray bottle. Spray on glass doors and wipe with a microfiber cloth. It evaporates quickly, leaving no streaks.
For extra stubborn spots, add a drop of dish soap to the mix.
Why It Works So Well
Rubbing alcohol is a solvent that dissolves soap scum and hard water minerals on contact. Unlike vinegar, it doesn't have a strong smell that lingers, and it dries fast so you're not left wiping away excess liquid. The alcohol also disinfects, killing any mold or mildew spores on the glass.
Best Practices For Application
Always use a clean microfiber cloth—paper towels can leave lint. Spray the solution onto the glass, then wipe in one direction (top to bottom or side to side) to avoid streaks. If the glass is very dirty, let the solution sit for 30 seconds before wiping.
For daily maintenance, a quick spritz and wipe after each shower keeps soap scum from building up.
9. Dishwasher Rinse Aid for Shower Doors
You’ve probably got a bottle of rinse aid sitting in your kitchen cabinet, right next to the dishwasher detergent. That same liquid that makes your glasses sparkle can work wonders on your shower doors. The secret is a hydrophobic coating that forces water to bead up and roll off, taking soap scum and minerals with it.
No more scrubbing every week—just a quick wipe-down and you’re set.
Dishwasher rinse aid is formulated to break the surface tension of water, which is exactly what you need to prevent hard water spots and soap residue from sticking to glass. A single application can keep your doors looking clean for days, even with daily showers. It’s cheap, it’s easy, and it doesn’t require any harsh scrubbing.
How To Apply It Right
Grab a soft, lint-free cloth and spray or dab a small amount of rinse aid onto it—don’t pour it directly on the glass, or you’ll get streaks. Wipe the entire surface of the shower door in a thin, even layer. Let it sit for about a minute, then buff it dry with a clean cloth.
That’s it. You’ll notice the water beading up immediately.
How Often To Reapply
The coating lasts anywhere from a week to two, depending on how often you shower and how hard your water is. When you start seeing water spots again, just reapply. It’s a quick maintenance step that saves you from deep cleaning sessions.
A Word Of Caution
Rinse aid is safe for glass and most metal fixtures, but avoid getting it on painted surfaces or natural stone like marble or granite—it can cause etching or discoloration. Also, make sure the room is well-ventilated; the fumes can be strong in a small, enclosed shower.
10. Toothbrush for Tight Corners
An old toothbrush might be the most underrated tool in your cleaning caddy. Its small head and stiff bristles can reach into crevices where sponges and cloths simply can't go. Dipped in vinegar or a baking soda paste, it becomes a precision weapon against soap scum hiding in corners, around faucet bases, and along tile edges.
Don't toss that worn-out toothbrush—repurpose it for detail work. The bristles are firm enough to dislodge grime but gentle on surfaces. For best results, dip the brush in white vinegar and scrub in small circular motions.
For tougher buildup, make a paste of baking soda and water, apply it to the area, and let it sit for five minutes before scrubbing. Rinse thoroughly afterward. This method works wonders on shower door tracks, behind faucet handles, and along the edges of soap dishes.
Where To Focus
Concentrate on the spots that get overlooked during regular cleaning: the corners where walls meet, the base of faucets and showerheads, and the narrow gap between the shower door and the frame. These areas collect moisture and soap residue, making them prime real estate for scum buildup.
Pro Tips For Best Results
Keep a dedicated toothbrush just for cleaning—label it so no one accidentally uses it. After scrubbing, rinse the brush and store it bristle-up to dry. For extra stubborn scum, dip the brush in hydrogen peroxide instead of vinegar; it cuts through grime without the smell.
Replace the brush every few months as bristles wear down.
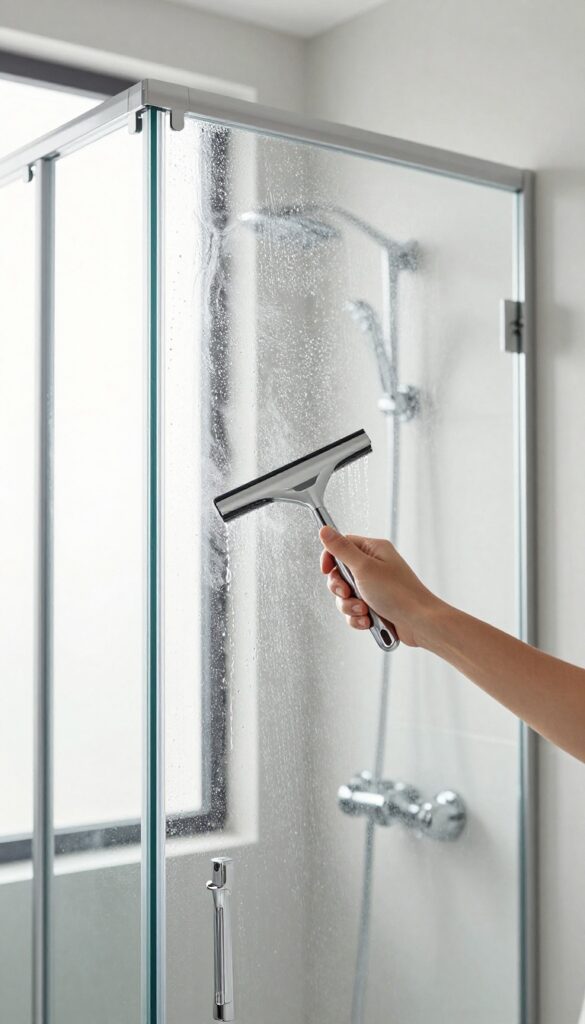
11. Squeegee After Every Shower
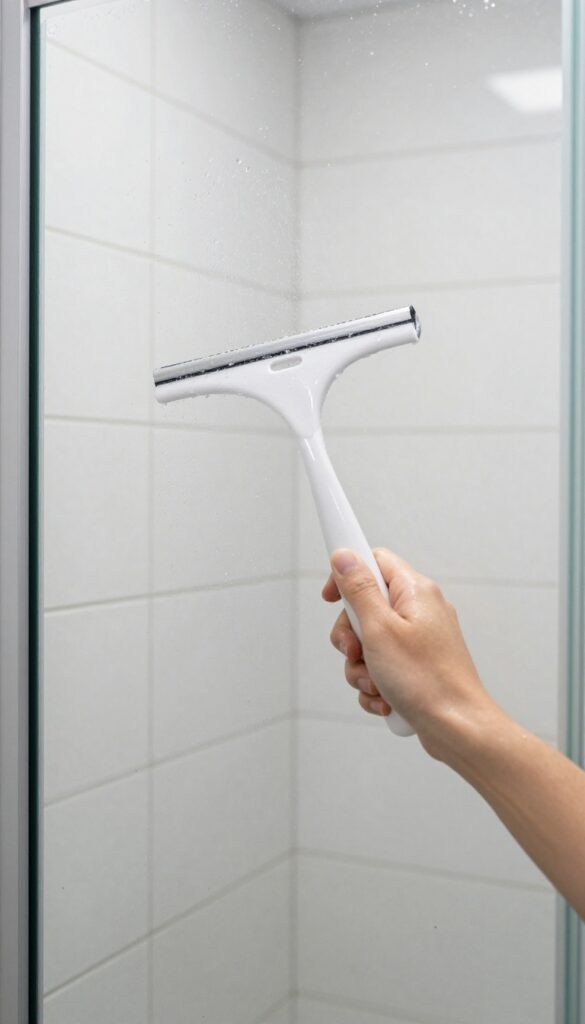
The easiest way to deal with soap scum and hard water spots is to stop them from forming in the first place. A simple squeegee swipe after every shower can cut your deep-cleaning frequency in half. It takes about 30 seconds and costs next to nothing.
Keeping a squeegee in your shower is the single most effective habit for preventing buildup. When you wipe down wet surfaces immediately, water doesn't have a chance to evaporate and leave behind mineral deposits or soap residue. Over time, this small routine saves you from scrubbing and harsh chemical use.
Why It Works So Well
Hard water stains are caused by minerals like calcium and magnesium that are left behind when water dries. Soap scum forms when soap reacts with those minerals. By removing the water before it dries, you eliminate both problems at the source.
It's preventive maintenance that actually works.
Choosing The Right Squeegee
Look for a squeegee with a rubber blade and a hook or suction cup for easy storage. A wall-mounted holder keeps it within reach right after you turn off the water. Avoid cheap plastic blades that can scratch glass or leave streaks.
A good one costs under $10 and lasts for years.
Making It A Habit
Keep the squeegee visible and easy to grab. Some people hang it on a hook inside the shower, others on the outside of the door. The key is consistency—just a few passes on the walls and door after each shower.
You'll notice the difference in a week.
12. Dryer Sheets for Soap Scum
Dryer sheets aren't just for laundry. A used one, slightly damp, can wipe away soap scum from glass shower doors and tile with surprising ease. The anti-static agents help loosen the grime so you don't have to scrub as hard.
Grab a used dryer sheet (the softer, the better) and wet it under the faucet. Scrub the soap scum directly—the sheet's texture grabs residue while the chemicals break it down. Rinse the area with water, then buff dry with a clean cloth for a streak-free shine.
This trick works best on light to moderate buildup; for thick crust, pair it with a vinegar spray first.
Why It Works
Dryer sheets contain surfactants and anti-static agents that reduce the bond between soap scum and surfaces. The fabric itself provides a gentle abrasive that lifts grime without scratching glass or tile.
Best Surfaces To Use It On
Glass shower doors, ceramic tiles, and acrylic shower walls respond well. Avoid using on natural stone like marble or granite, as the chemicals may dull the finish.
Pro Tip For Stubborn Spots
For dried-on scum, let the wet dryer sheet sit on the spot for a few minutes before scrubbing. The extra dwell time softens the residue, making it easier to wipe away.
13. Cream of Tartar and Lemon for Metal Fixtures
Chrome and stainless steel fixtures can lose their luster fast when hard water deposits build up. Instead of scrubbing with harsh chemicals, try a natural paste made from cream of tartar and lemon juice. This combo cuts through mineral spots and leaves metal surfaces gleaming like new.
Cream of tartar is a mild acid that works wonders on hard water stains, while lemon juice adds extra acidity and a fresh scent. Together, they form a non-abrasive polish that's safe for most metal finishes. Just avoid using it on brushed or matte surfaces unless you test a small spot first.
How To Make The Paste
Mix two tablespoons of cream of tartar with enough lemon juice to form a thick, spreadable paste. A few drops of water can help if the mixture is too stiff. Aim for a consistency similar to toothpaste.
Application And Polishing
Apply the paste to your faucets, showerhead, or towel bars using a soft cloth or sponge. Let it sit for about five minutes—don't let it dry completely. Then buff the area with a clean, dry microfiber cloth, using circular motions.
Rinse with water if any residue remains.
When To Use This Hack
This method works best on light to moderate water spots and tarnish. For heavy, crusted deposits, you may need to repeat the process or pre-soak with vinegar. Use it as a weekly maintenance step to keep fixtures shiny without commercial polishes.
14. Steam Cleaner for Deep Grime
When elbow grease isn't cutting it, a handheld steam cleaner can be a game-changer for your shower. The high-temperature steam penetrates porous surfaces like grout and textured tile, loosening years of soap scum and mineral deposits without any harsh chemicals. It also kills mold and mildew on contact, making it a powerful tool for deep cleaning.
A steam cleaner is especially effective for glass shower doors, where hard water spots can become baked on. The steam softens the deposits so you can wipe them away with a microfiber cloth, leaving the glass streak-free. For grout lines, the steam lifts dirt from deep within the pores, restoring the original color without scrubbing.
Always follow the manufacturer's instructions and use distilled water to prevent mineral buildup in the steamer itself.
Best Spots To Steam
Focus on areas with visible buildup: glass doors, tile walls, grout lines, and showerheads. The steam will also sanitize silicone seals around the base of the shower. Avoid using steam on unsealed natural stone or damaged surfaces, as the heat and moisture could cause damage.
Technique Tips
Hold the steamer nozzle a few inches from the surface and move slowly to allow the steam to work. Use the brush attachment for grout and the squeegee attachment for glass. Wipe away loosened residue immediately with a dry cloth to prevent re-depositing.
Work in small sections for best results.
15. Baby Oil for Plastic Shower Curtains
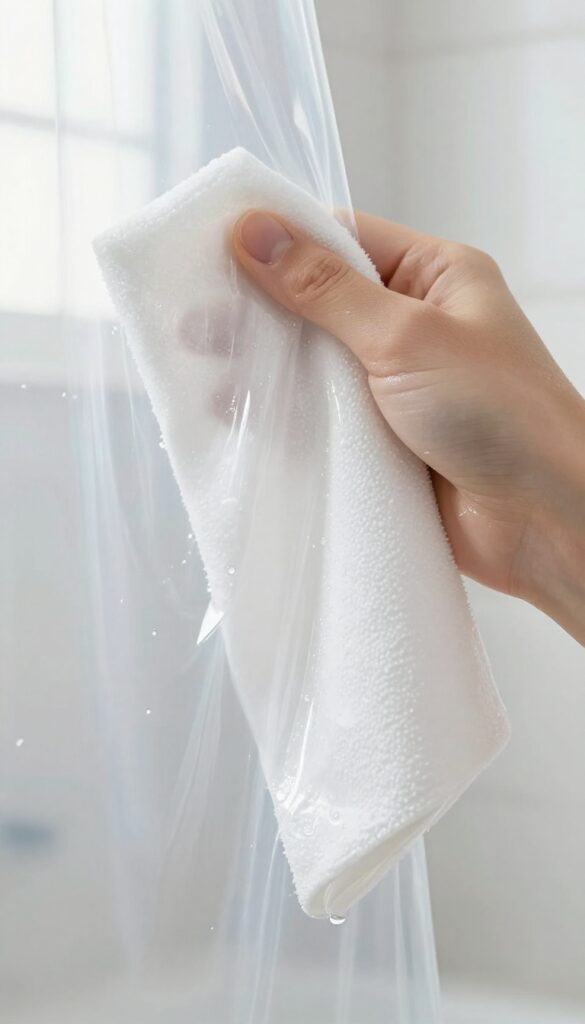
Plastic shower curtains are magnets for soap scum and hard water spots. But a simple swipe of baby oil can change that. The oil creates a thin protective layer that makes water bead up and roll off, taking grime with it.
This hack keeps your curtain looking fresh longer and cuts down on deep cleaning sessions.
Baby oil is a surprising but effective shield for plastic shower liners. Its mineral oil base repels water and prevents soap residue from sticking. Just a few drops on a microfiber cloth, wiped over the dry curtain, can make a noticeable difference.
The coating lasts through several showers before needing a refresh. Rinse the curtain with warm water every couple of weeks to prevent any oily buildup, and reapply as needed. This trick works best on new or clean curtains, so give yours a quick wash first if it's already grimy.
Why Baby Oil Works
Baby oil is mostly mineral oil, a non-toxic hydrophobic substance. When applied to plastic, it fills microscopic pores and creates a slick surface. Water droplets can't cling, so they slide off, carrying soap scum and minerals with them.
This prevents the white, chalky film that builds up on regular curtains.
How To Apply
Start with a clean, dry curtain. Put 3–5 drops of baby oil on a soft cloth. Wipe the entire curtain in long, even strokes, focusing on areas that get the most water.
Don't oversaturate—a thin layer is all you need. Let it sit for an hour before using the shower.
Maintenance Tips
The oil coating lasts about 1–2 weeks. To refresh, just wipe with a dry cloth or reapply a tiny amount. Every month, rinse the curtain with warm water to remove any oil buildup.
Avoid using harsh cleaners, as they can strip the protective layer. If the curtain starts to feel greasy, wash it with mild dish soap and start fresh.
16. CLR for Extreme Hard Water
When vinegar and baking soda just won't cut it, it's time to bring out the big guns. Commercial calcium, lime, and rust removers—commonly known as CLR—are formulated to dissolve the toughest mineral deposits that have built up over months or years. This is your last-resort hack for showers that look like they've been through a mineral storm.
Heavy calcium deposits often form around showerheads, faucets, and on glass doors where water pools. CLR works fast, but it's strong stuff, so you need to use it safely. Apply the product according to the label directions, usually spraying or wiping it onto the affected area.
Let it sit for the recommended time—often a few minutes—then scrub with a non-abrasive pad or brush. Rinse thoroughly with water. Always wear gloves and ensure the bathroom is well-ventilated, as the fumes can be strong.
This method is ideal for once-in-a-while deep cleaning, not for weekly maintenance.
Where Clr Works Best
CLR is most effective on hard, crusty white or brown deposits that won't budge with milder cleaners. Use it on showerheads, faucet aerators, glass doors, and tile grout that has turned orange or white from mineral buildup. Avoid using it on natural stone like marble or granite, as the acid can etch the surface.
How To Apply Safely
Always read the label first. Most CLR products require you to spray or apply with a cloth, let it sit for 1–5 minutes, then scrub and rinse. Wear rubber gloves to protect your skin, and open a window or turn on the exhaust fan.
Never mix CLR with bleach or ammonia—it can create toxic fumes.
When To Use This Hack
Reserve CLR for heavy-duty cleaning every few months, not for weekly upkeep. If you see thick, crusty deposits that resist scrubbing, it's time for CLR. For light haze or daily spots, stick with gentler options like vinegar or a squeegee to avoid overusing harsh chemicals.
17. Vinegar and Baking Soda Foaming Action
This classic combo creates a fizzy reaction that loosens grime without harsh chemicals. It's safe for most surfaces and surprisingly effective on soap scum and light hard water deposits.
Sprinkle baking soda generously on wet shower walls, doors, or floor. Spray white vinegar directly over the baking soda until it starts to foam. Let the mixture sit for 5–10 minutes—the bubbles help lift dirt and mineral buildup.
Scrub with a non-abrasive sponge or brush, then rinse thoroughly with warm water. For stubborn spots, repeat or let the foam sit longer.
Why It Works
Baking soda (sodium bicarbonate) is a mild alkali that reacts with vinegar (acetic acid) to produce carbon dioxide gas. The fizzing action physically agitates dirt and soap scum, while the acid helps dissolve mineral deposits. This combination is gentle enough for daily use but powerful enough for weekly deep cleans.
Best Surfaces To Use It On
This hack works well on ceramic tile, glass shower doors, fiberglass, and acrylic. Avoid using it on natural stone like marble or granite, as the acid can etch the surface. For stone, stick to a pH-neutral cleaner.
Pro Tip For Maximum Fizz
Make sure the baking soda layer is thick enough to create a paste-like consistency when you spray the vinegar. If the fizzing dies down too quickly, add more baking soda and spray again. You can also add a few drops of dish soap to the vinegar for extra grease-cutting power.
18. Wax or Car Wax for Glass Protection

Car wax isn't just for your vehicle—it works wonders on shower glass. A thin layer creates a hydrophobic barrier that repels water, preventing hard water spots and soap scum from sticking. This simple trick can cut your cleaning time in half, leaving glass doors streak-free and glossy for weeks.
Start with a clean, dry glass surface. Apply a small amount of car wax (paste or spray) to a microfiber cloth and buff it onto the glass in circular motions. Let it haze, then buff off with a clean cloth.
The wax fills microscopic pores, making the glass non-stick. Reapply every few months or when water stops beading.
Which Wax To Use
Any carnauba-based car wax works best. Avoid waxes with abrasives or cleaners. Spray waxes are easier to apply but may not last as long.
Paste wax offers longer protection.
Application Tips
Work in small sections to avoid uneven drying. Use a separate microfiber for application and buffing. For best results, apply after a thorough cleaning and on a cool, dry day.
How Often To Rewax
Check water beading every few weeks. When water starts sheeting instead of beading, it's time to reapply. Typically every 2-3 months, depending on shower usage.
19. Replace Old Shower Head for Better Flow
Sometimes the best cleaning hack is prevention. If your shower head is caked with mineral deposits that won't budge, swapping it out for a new one can save you hours of scrubbing. A modern, high-pressure model not only improves water flow but also resists future buildup, keeping your shower cleaner for longer.
Replacing a shower head is a quick DIY fix that pays off in less cleaning and a better shower experience. Here's how to choose and install one that fights soap scum and hard water.
Why A New Shower Head Helps
Old shower heads often have clogged nozzles that reduce water pressure and create uneven spray patterns. This lets soap and minerals settle, forming stubborn scum. Newer models with rubber nozzles are easy to wipe clean, and some have built-in filters that reduce hard water deposits.
What To Look For
Choose a high-pressure model with self-cleaning nozzles—rubber tips that you can rub to release debris. Look for one with a water flow rate of 2. 0 GPM or less for efficiency, and consider a handheld option for easier rinsing of walls and doors.
Installation Tips
Most shower heads screw on by hand—no tools needed. Wrap plumber's tape on the pipe threads to prevent leaks. Soak the old head in vinegar before removal if it's stuck.
After installing, run hot water for a minute to clear any debris.
Maintenance After Replacement
To keep your new shower head working well, wipe the nozzles with a damp cloth weekly. If you see buildup, soak the head in vinegar every few months. This simple routine prevents clogs and keeps water flowing strong.
20. Daily Rinse with Hot Water
The simplest hack might also be the most effective: a quick hot water rinse after every shower. It takes just 30 seconds and prevents soap scum and hard water minerals from bonding to surfaces. This daily habit dramatically reduces the need for deep cleaning.
Why Hot Water Works
Hot water dissolves soap residue and minerals before they dry and harden. When water evaporates, it leaves behind a film of soap and calcium. Rinsing with hot water keeps everything flowing down the drain instead of sticking to your walls.
How To Make It A Habit
Keep a squeegee or spray bottle in the shower. After your last rinse, spray down all surfaces with hot water from your showerhead. Focus on glass doors, tiles, and fixtures.
You don't need to scrub—just let the water do the work.
Best For Glass And Chrome
This hack shines on glass shower doors and chrome fixtures. Hard water spots and soap scum love to cling there. A daily hot rinse keeps them streak-free and shiny.
For best results, follow with a quick squeegee to prevent water spots.
FAQ
Can I use vinegar on natural stone shower tiles?
No, vinegar is acidic and can etch or dull natural stone like marble, granite, or travertine. Use a pH-neutral stone cleaner instead.
How often should I clean my shower to prevent soap scum?
A quick daily rinse and weekly deep clean are ideal. Using a squeegee after each shower significantly reduces buildup.
Will baking soda scratch glass shower doors?
Baking soda is mildly abrasive but safe for glass if used with a soft sponge. Avoid scrubbing too hard, and rinse thoroughly.
What's the best way to remove hard water stains from a glass door?
A vinegar and dish soap spray, followed by a pumice stone or magic eraser, works well. For stubborn spots, try a commercial lime remover.
How do I prevent mold in shower grout?
Keep the bathroom ventilated, use a squeegee, and clean grout weekly with a baking soda and hydrogen peroxide paste. Seal grout annually for extra protection.
Conclusion
These 20 hacks prove you don't need harsh chemicals or endless elbow grease to keep your shower spotless. A few simple ingredients and consistent habits can make a huge difference.
Pick the tips that fit your shower type and schedule, and you'll spend less time scrubbing and more time enjoying a clean, fresh bathroom. Remember, prevention is just as important as cleaning—so grab that squeegee and give your shower a quick daily rinse.


