Your cleaning closet doesn't have to be a black hole of forgotten sprays and tangled mops. A few smart tweaks can turn it into a space that actually makes your day easier.
When everything has a home and you can grab what you need in seconds, cleaning feels less like a chore and more like a quick win. These 17 ideas focus on real-world solutions that work with whatever closet you have, whether it's a tiny broom cupboard or a full utility room.
You'll see immediate results in how your closet looks and functions.
1. Install a Pegboard Wall for Instant Visibility
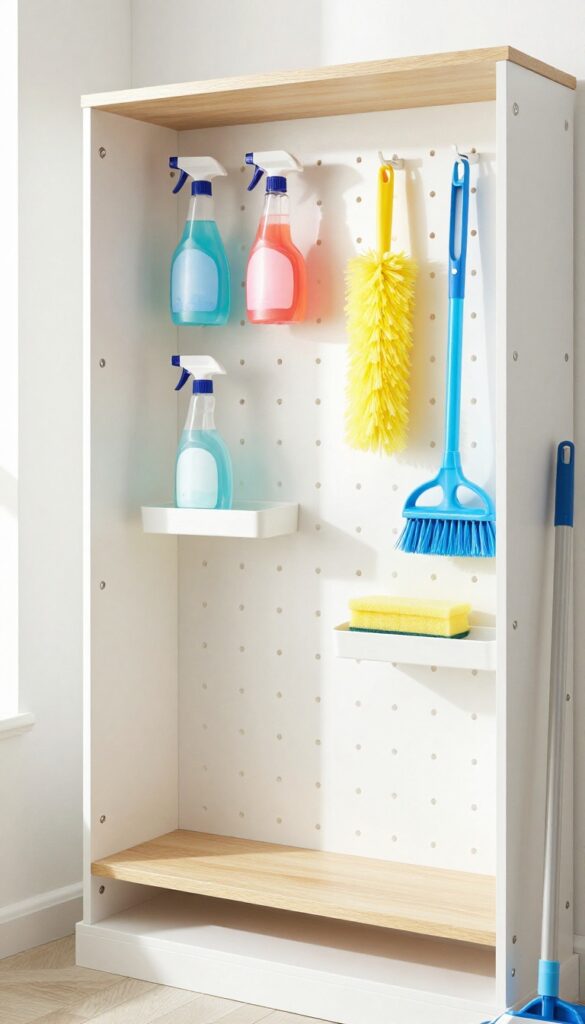
A pegboard wall is one of the quickest ways to bring order to a chaotic cleaning closet. By mounting a pegboard on an empty wall, you can hang spray bottles, dusters, and small tools so they're always in plain sight and easy to grab. No more digging through piles or knocking over bottles to find what you need.
Pegboards are incredibly versatile and can be customized to fit your specific cleaning supplies. Start by measuring your available wall space and purchasing a pegboard that fits. You can find them at most hardware stores or online.
Mount it securely using spacers to allow room for hooks. Then, add a mix of hooks, baskets, and shelves to hold everything from spray bottles to scrub brushes. The key is to group items by frequency of use—keep daily essentials at eye level and less-used items higher up.
Choose The Right Hooks And Accessories
Not all pegboard hooks are created equal. Use double hooks for spray bottles, cup hooks for smaller items like dusters, and shallow bins for sponges and rags. For bulkier items like a vacuum attachment set, consider a small shelf that clips onto the pegboard.
The goal is to maximize vertical space while keeping everything accessible.
Color Code For Extra Efficiency
If you want to take organization a step further, paint your pegboard or use colored hooks to categorize supplies. For example, use blue hooks for glass cleaners, green for all-purpose sprays, and red for disinfectants. This visual cue speeds up retrieval and makes restocking obvious.
Maintenance And Flexibility
One of the best features of a pegboard is how easy it is to reconfigure. As your cleaning routine changes or you try new products, simply move the hooks around. No drilling new holes or committing to a permanent layout.
A quick wipe-down with a damp cloth keeps it looking fresh.
2. Use Over-the-Door Organizers for Slim Storage
If your cleaning closet is so narrow that adding shelves feels impossible, look to the back of the door. That unused vertical space is prime real estate for storing lightweight items you reach for often. An over-the-door organizer turns a blank surface into instant, accessible storage without any drilling or permanent changes.
Over-the-door organizers come in many styles, from clear pocket shoe racks to heavy-duty canvas holders. For a cleaning closet, go with a transparent or mesh option so you can see what's inside each pocket at a glance. Assign pockets by category: one for microfiber cloths, one for rubber gloves, one for scrub brushes, and a few for small spray bottles.
This system keeps everything visible and within arm's reach, so you never have to dig through a pile to find a dusting cloth.
Maximize Every Pocket
Don't limit yourself to the obvious. Use the top pockets for lightweight items like dusters or extra sponge packs. Reserve lower pockets for heavier bottles or all-purpose cleaners.
If the pockets are too deep for small items, roll up cloths or use binder clips to create dividers. The goal is to make each pocket serve a specific purpose so nothing gets lost.
Choose The Right Hook
Not all over-the-door hooks fit all doors. Measure the gap between your door and the frame before buying. For a standard interior door, a hook that sits over the top panel works fine.
If your door is hollow or has a large gap, look for a no-drill adhesive hook or a strap-style organizer that hangs from the top edge. Make sure the organizer doesn't prevent the door from closing fully.
Keep It Light
Over-the-door organizers are not meant for heavy loads. Stick to lightweight items: cloths, gloves, small bottles, brushes, and dusters. Avoid storing full spray bottles of bleach or large jugs, as they can pull the organizer off the door or damage the door over time.
For heavier gear, use lower shelves or floor bins.
3. Add a Tension Rod for Hanging Spray Bottles
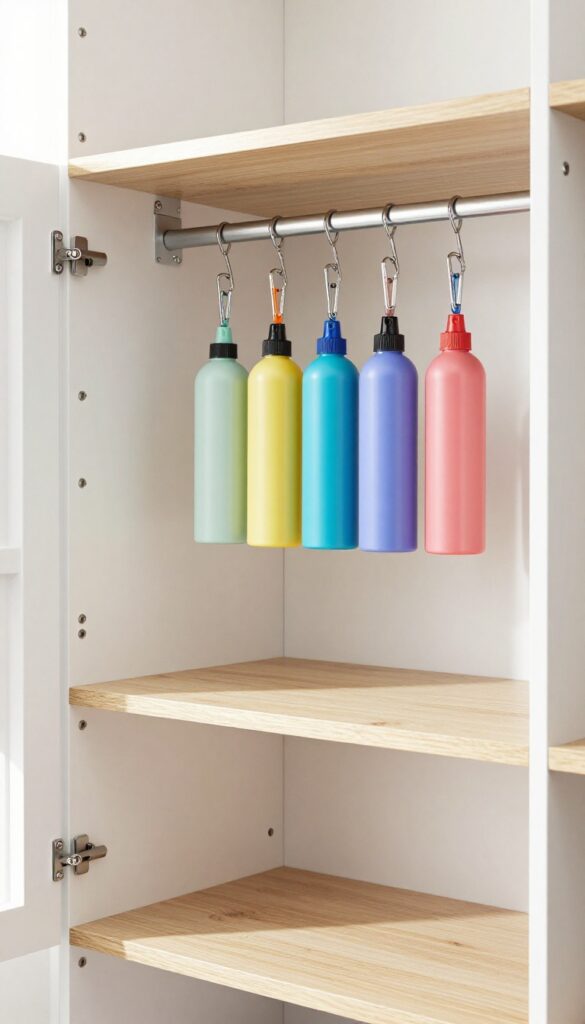
Spray bottles take up a lot of shelf space, and they always seem to leak a little at the nozzle. A tension rod near the top of your closet turns that wasted vertical space into a dedicated hanging station. You can grab any bottle in one motion, and the upside-down position stops drips from pooling on your shelves.
This trick works in closets of any size, even narrow ones. The rod doesn't require any drilling, so it's perfect for renters or anyone who wants a reversible change. Just make sure the rod is snug against the walls so it can hold the weight of several full bottles.
Pair it with carabiners or S-hooks, and you're set.
What You'll Need
A standard tension rod that fits your closet width, carabiners or small clips, and optionally some zip ties. Choose carabiners with a gate that opens wide enough to fit around the bottle neck. For heavy-duty use, look for a rod rated for at least 20 pounds.
How To Set It Up
Install the tension rod near the top of the closet, about 6 to 8 inches from the ceiling. Attach a carabiner to each bottle neck, then clip them onto the rod. Space them a few inches apart so they don't bump into each other.
Test a few bottles to make sure the rod stays secure.
Pro Tips For Best Results
Use bottles with a trigger spray handle, as they hang more naturally. If the nozzle leaks, the upside-down position keeps drips contained near the cap. For extra stability, add a second rod lower down for smaller bottles or for hanging microfiber cloths.
4. Group Like Items in Clear Bins
Clear plastic bins are a game-changer for any cleaning closet. They let you see exactly what's inside without pulling everything out. Sorting supplies by category—kitchen, bathroom, glass cleaner—and storing them in labeled bins keeps your shelves tidy and your sanity intact.
Stackable bins make the most of vertical space, so even a small closet can hold a surprising amount.
Grouping like items in clear bins transforms a jumbled mess into an organized system. You'll never dig through a pile of bottles again. Plus, the transparency acts as a visual reminder of what you have, so you don't accidentally buy duplicates.
Choose The Right Bins
Opt for sturdy, clear plastic bins with straight sides—they stack better and don't waste space. Measure your shelf depth and height before buying. Modular bins that lock together are ideal for maximizing every inch.
Label Everything Clearly
Use a label maker or simple adhesive labels to mark each bin's category. Include subcategories if needed, like 'Kitchen – Degreasers' or 'Bathroom – Tile & Grout. ' Labels save time and keep everyone in the household on the same page.
Stack Strategically
Place heavier bins on lower shelves and lighter ones on top. Group bins by frequency of use—daily cleaners within easy reach, seasonal supplies higher up. Stackable bins with lids prevent dust and spills from ruining your system.
5. Mount a Magnetic Strip for Metal Tools
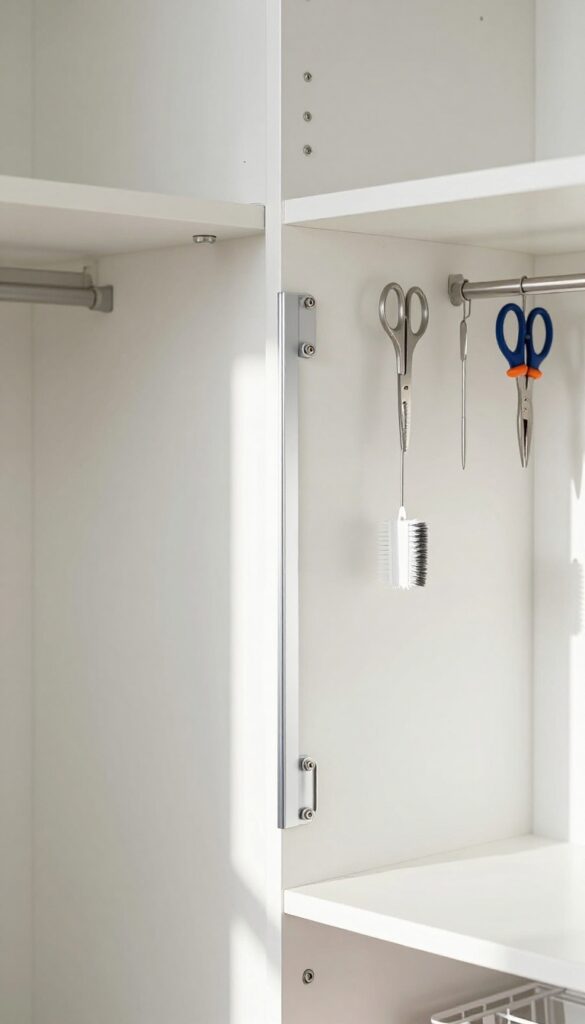
Scissors, tweezers, small brushes, and other metal tools often end up lost in drawers or scattered around the closet. A magnetic strip solves that by giving them a visible, easy-to-grab home. It's a simple upgrade that takes minutes to install and instantly declutters your space.
A magnetic strip keeps frequently used metal tools within sight and reach. Mount it on the wall or inside the closet door to free up shelf space. The strong magnets hold items securely, so nothing falls off when you open the door.
This works especially well in narrow closets where every inch counts.
Choosing The Right Strip
Look for a strip with strong neodymium magnets and a length that fits your space. A 12-inch strip is usually enough for a few tools, but longer ones work for larger collections. Make sure the strip has a protective coating to prevent scratches on your tools.
Placement Tips
Mount the strip at eye level on the wall or on the inside of the door. Avoid placing it where tools might bump into shelves or other items. If your closet door is metal, use a magnetic strip with adhesive backing that sticks to the door surface.
What To Store
Store metal tools like scissors, tweezers, small pliers, and metal brushes. You can also attach bottle openers or small wrenches if you use them for cleaning tasks. Avoid storing heavy items like hammers, as they may slide off.
6. Use a Caddy System for Grab-and-Go Cleaning
A portable caddy turns your cleaning closet into a command center. Instead of carrying armloads of supplies from room to room, you grab one handled bin and go. It’s the difference between cleaning feeling like a project versus a quick task.
A well-stocked caddy keeps everything you need in one place. You’ll spend less time hunting for supplies and more time actually cleaning. Plus, it makes it easy to clean room by room without backtracking.
The beauty of a caddy system is flexibility. You can have one main caddy for daily cleaning and a second one for deep cleaning tasks. Or you can dedicate a caddy to each floor of your home.
The key is to keep it stocked and ready so you never have to stop mid-clean to find a missing item. Start with a sturdy caddy that has a handle and compartments. Plastic caddies are lightweight and easy to clean, while metal or wire ones look nicer but can rust.
Choose one that fits your closet shelf or floor space. Stock it with the basics: an all-purpose cleaner, glass cleaner, microfiber cloths, a scrub brush, and gloves. Add a small trash bag and a few sponges.
For quick touch-ups, include a duster or a dusting wand. Adjust based on your home’s needs—add a bathroom-specific caddy with toilet cleaner and a separate cloth for that purpose. To make the system work, return the caddy to its designated spot after each use.
That way, it’s always ready for the next grab-and-go moment. Over time, you’ll find yourself reaching for the caddy automatically, and your cleaning closet will stay tidy because everything has a home.
Choose The Right Caddy
Not all caddies are created equal. Look for one with a comfortable handle and enough compartments to separate your spray bottles from your cloths. A divided caddy prevents bottles from clanking together and leaking.
If you have a lot of supplies, consider a two-tier caddy or a rolling cart that can double as extra storage.
Stock Smartly
Don’t overstuff your caddy. Stick to the essentials you use most often. For a basic caddy, include: all-purpose cleaner, glass cleaner, microfiber cloths (at least 3), a scrub brush, gloves, and a small trash bag.
If you have pets, add a lint roller. For bathrooms, swap in a toilet cleaner and a dedicated cloth.
Maintain The System
Once a week, check your caddy and restock anything that’s running low. Wipe down the caddy itself if it gets grimy. This simple habit keeps your grab-and-go system reliable.
You’ll never be caught mid-clean without the right tool.
7. Install a Folding Drying Rack on the Wall
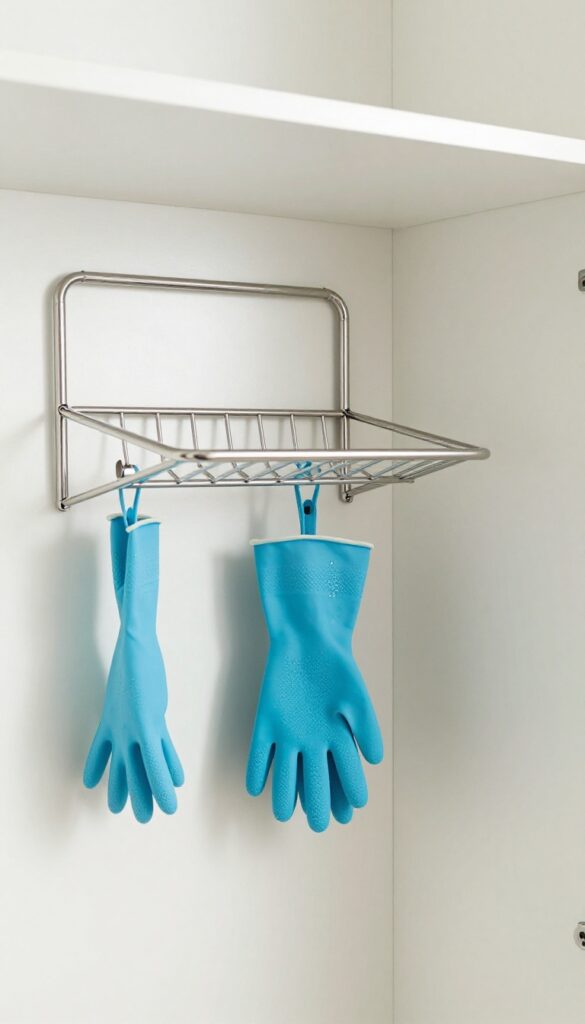
Wet mop heads, sponges, and cleaning cloths left in a pile get musty fast. A folding drying rack mounted on the wall solves that problem without taking up any counter or floor space.
Mount a foldable drying rack to dry wet mop heads, sponges, and cloths. Keeps them from getting musty and frees up counter space.
Pick The Right Spot
Place the rack near a sink if possible, or simply in a well-ventilated area of the closet. You want it low enough to reach easily but high enough that mops don't drag on the floor.
Choose A Durable Material
Stainless steel or coated wire racks resist rust and hold up to moisture. Avoid wood or plain metal that can warp or corrode over time.
Use It Beyond Mops
Drip-dry rubber gloves, scrub brushes, and even small spray bottle nozzles. The rack becomes a catch-all for anything that needs air drying after use.
8. Label Shelves and Baskets Clearly
Labels turn a chaotic closet into a system anyone can follow. When every shelf and basket has a clear label, you never have to guess where the glass cleaner goes or wonder why the dusting spray ended up with the floor supplies. A simple labeling system makes it easy for everyone in the household to put things back in the right spot.
No more hunting for misplaced items or ending up with a jumbled mess after a quick clean.
Choose The Right Label Style
A label maker gives you crisp, professional-looking labels that stick well and resist moisture. If you prefer a more flexible option, chalk labels let you rewrite categories whenever your cleaning products change. For a quick fix, use painter's tape and a permanent marker – it's easy to remove and replace.
Group By Task Or Type
Think about how you clean. Label one shelf “Kitchen Cleaners, ” another “Bathroom Supplies, ” and a third “All-Purpose. ” Or group by task: “Daily Wipes, ” “Deep Clean, ” “Floor Care. ” This way, you grab the basket that matches the room you're working on.
Make It Readable From Standing Height
Place labels on the front edge of shelves or on the side of baskets so you can read them without bending or moving items. Use large, bold fonts. If you share the closet, consider adding a small icon or color code – a picture of a mop or a blue dot – for quick recognition.
9. Utilize the Back of the Door for Brooms and Mops
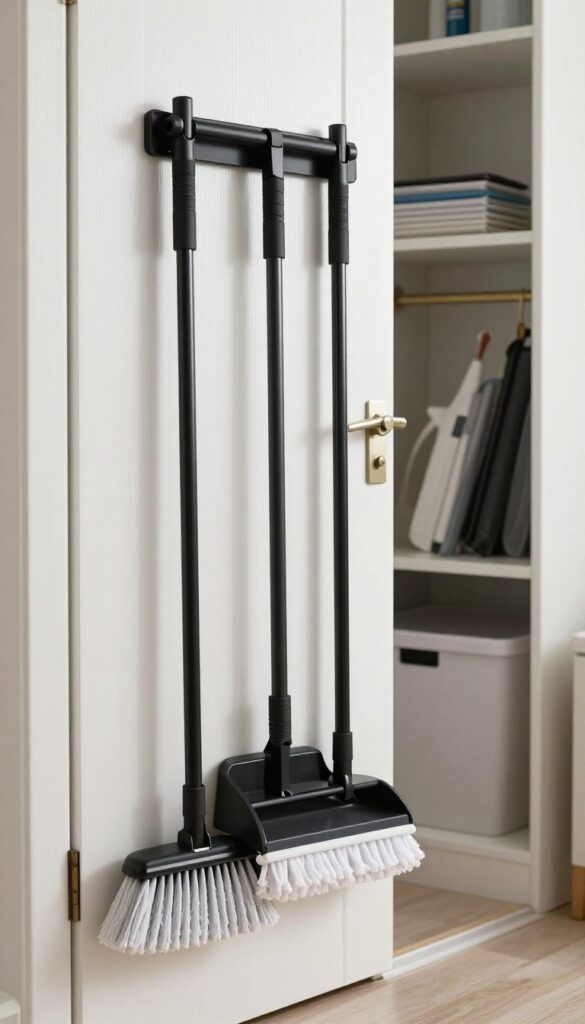
That empty space on the back of your cleaning closet door is prime real estate. Instead of letting brooms and mops lean against the wall and tumble over every time you grab a spray bottle, put them to work vertically. A simple over-the-door rack or a set of hooks can hold all your long-handled tools securely.
You'll free up floor space and never have to play pick-up-sticks with your mop again.
Mounting a broom holder on the back of the door is one of the easiest upgrades you can make. It takes about ten minutes with a screwdriver, and the payoff is immediate. No more clatter every time you open the door.
Choose a holder with rubber grips or spring-loaded clips to keep handles from sliding out. If you have multiple tools, look for a rack with several slots or add individual hooks spaced a few inches apart. For mops with bulky heads, make sure the holder is deep enough to accommodate them.
Some models are designed specifically for flat mops or sponge mops. Measure your tools before buying. If drilling isn't an option, adhesive hooks rated for heavy loads can work on smooth doors.
Just press them on firmly and let them cure for 24 hours before hanging anything.
Choose The Right Holder
Not all broom holders are created equal. Look for one with a locking mechanism or rubber grips that prevent handles from slipping. A holder with a built-in tray underneath can catch drips from wet mops.
Space Efficiently
Arrange your tools so the heaviest ones are in the middle and lighter items on the sides. This keeps the door balanced and prevents it from sagging over time. Leave a few inches between each tool so they don't tangle.
Bonus Storage
Use the top of the door for a small over-the-door caddy to hold dustpans, gloves, or a small spray bottle. This keeps everything within arm's reach without cluttering the floor.
10. Add a Small Shelf Above the Door Frame
That empty space above your cleaning closet door is just begging to be used. A narrow shelf up there can hold items you don't need every day, freeing up prime real estate for the stuff you grab constantly.
Installing a shelf above the door frame is a simple weekend project that adds instant storage without taking up any floor space. It's perfect for stashing rarely used items like extra vacuum bags, seasonal cleaning supplies, or backup sponges and scrub brushes. Just make sure the shelf is shallow enough that it doesn't bump into the door when opened, and secure it properly to the wall studs so it can hold weight safely.
What To Store Up There
Think of this shelf as your overflow zone. Store items you only reach for once a month or seasonally, such as extra vacuum filters, carpet cleaner bottles, or holiday-specific cleaning products. Avoid putting heavy bottles or anything you need daily up there, as it's not the most accessible spot.
Installation Tips
Use a narrow shelf, about 4 to 6 inches deep, and mount it at least 12 inches above the door frame to leave room for the door to swing. Opt for a shelf with a lip or guard rail to prevent items from falling. If you're renting, consider a tension rod with a small basket or a no-drill adhesive shelf as a renter-friendly alternative.
Styling It Right
Keep the shelf looking neat by grouping items in small bins or baskets. Clear containers work well so you can see what's inside, or use matching opaque bins for a cleaner look. A small label on each bin makes it easy to grab what you need without pulling everything down.
11. Use a Tiered Shelf Organizer for Countertops
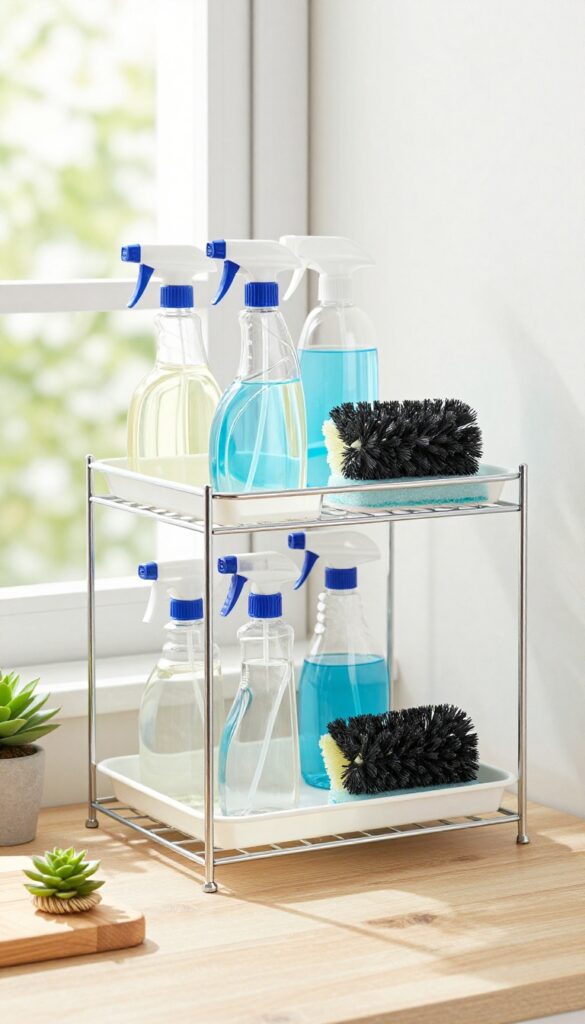
Counter space in a cleaning closet is precious. A tiered shelf organizer turns a flat surface into a two-level storage powerhouse, letting you see and grab bottles without digging. It’s a simple swap that instantly doubles your usable area without adding an inch of footprint.
A tiered shelf works wonders on a countertop, shelf, or even inside a cabinet. It keeps tall spray bottles on the back row and smaller cans or sponges up front. Everything stays visible and accessible, so you never buy a duplicate because you forgot what you had.
Pick The Right Size
Measure your counter depth before buying. A standard tiered shelf fits most spaces, but if your closet is narrow, look for a slim version. Metal or coated wire shelves are durable and easy to clean, while acrylic keeps things light and airy.
Group By Frequency Of Use
Put daily-use items like all-purpose spray and glass cleaner on the front tier. Reserve the back for weekly or seasonal products. This way you reach for what you need most without shuffling bottles around.
Add A Drip Tray Underneath
Bottles can leak or drip after use. Place a small plastic tray or a silicone mat under the tiered shelf to catch any mess. It makes cleanup quick and protects your counter from stains or sticky residue.
12. Keep a Trash Can Inside the Closet
A small trash can tucked inside your cleaning closet might seem like a minor addition, but it makes a big difference in daily use. Instead of carrying used wipes, empty bottles, or dust cloths to the kitchen bin, you can toss them right where you're working. This keeps mess contained and makes cleanup feel effortless.
Choose The Right Size
You don't need a full-size can. A slim, rectangular bin that fits beside your mop or under a shelf works perfectly. Look for one around 5 to 10 liters—big enough to hold a day's worth of debris but small enough to empty frequently.
Avoid anything that crowds your floor space or makes it hard to grab supplies.
Line It For Easy Disposal
Use small trash bags or even reused grocery bags to line the can. When it's full, just tie it up and take it out. This prevents sticky residue from building up and keeps the closet smelling fresh.
If you use reusable dust cloths, you can skip the liner and just empty the can into a larger bin.
Place It Strategically
Put the can near the door or in an easy-to-reach spot. If your closet has shelves, slide it underneath the lowest one. The goal is to make tossing trash as natural as grabbing a spray bottle.
You'll be surprised how much cleaner your closet stays when there's a designated spot for waste.
13. Store Vacuum Attachments in a Mesh Bag
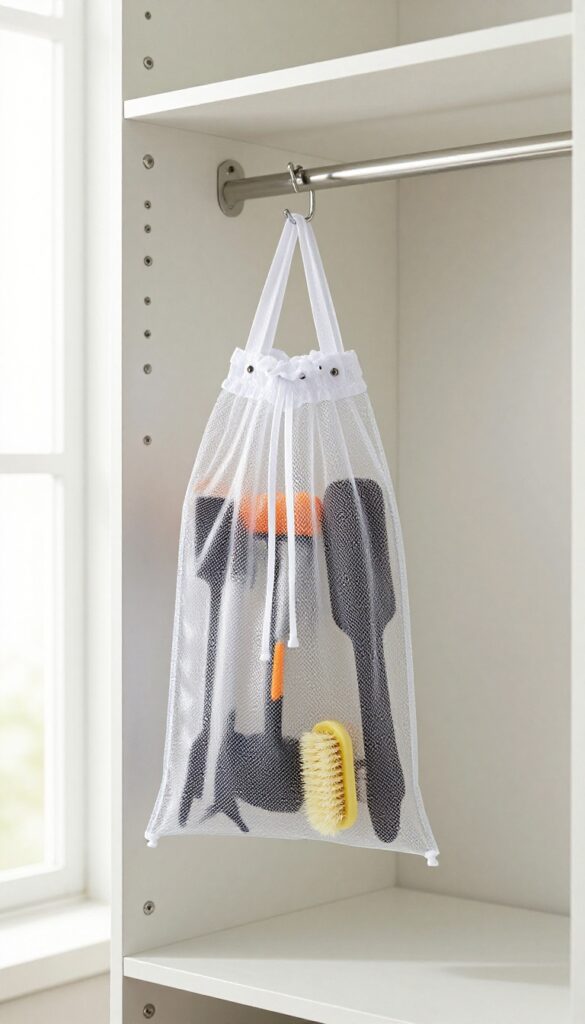
Vacuum attachments have a way of scattering to the far corners of your closet. One minute you need the crevice tool, the next you're digging under a pile of rags. A simple mesh bag solves that by keeping everything together and visible.
Gather all your vacuum attachments—crevice tool, brush head, upholstery nozzle—and drop them into a mesh or fabric bag. Hang the bag on a hook inside the closet door or on a wall. Now you can see exactly what's in there and grab the right tool without rummaging.
Choose The Right Bag
Mesh bags work best because you can see the contents at a glance. Look for one with a drawstring or zipper closure so nothing falls out. A sturdy fabric bag is fine too, but make sure it's large enough to hold all your attachments without being too bulky.
Hang It Within Reach
Install a sturdy hook or Command hook at eye level inside the closet. The bag should be easy to grab and put back. Avoid placing it behind other items—you want quick access when you're mid-clean.
Bonus: Keep Spare Bags And Filters
If your vacuum uses disposable bags or filters, toss a few extras into the same mesh bag. That way you never have to hunt for a replacement when the bag is full. Just zip it up and you're good to go.
14. Use a Spice Rack for Small Bottles
Tiny bottles of essential oils, stain removers, and spot cleaners tend to get lost in the shuffle of a cleaning closet. They slide behind larger containers or end up buried in a drawer. A simple spice rack mounted on the wall gives them a visible, accessible home.
You don't need a fancy organizer. A basic wooden or wire spice rack from the kitchen section works perfectly. It turns a messy jumble into a tidy row where you can see every label at a glance.
Where To Mount It
The inside of a cabinet door is a prime spot. Use adhesive strips or small screws to attach the rack. If you have an empty wall section near your cleaning station, that works too.
Just keep it at eye level so you can read the labels without bending.
What To Store
Think small: essential oils for DIY cleaners, travel-size stain removers, tiny bottles of wood polish, or even a mini spray of Febreze. You can also store small tools like a seam ripper or a tiny funnel. The key is to keep only items that fit the rack's dimensions.
Bonus: Label The Rungs
If you're feeling extra organized, add a small label to each shelf or rung. That way everyone in the household knows where the lavender oil goes and where the spot cleaner lives. It keeps the system from falling apart after a few weeks.
15. Create a Mop and Bucket Station
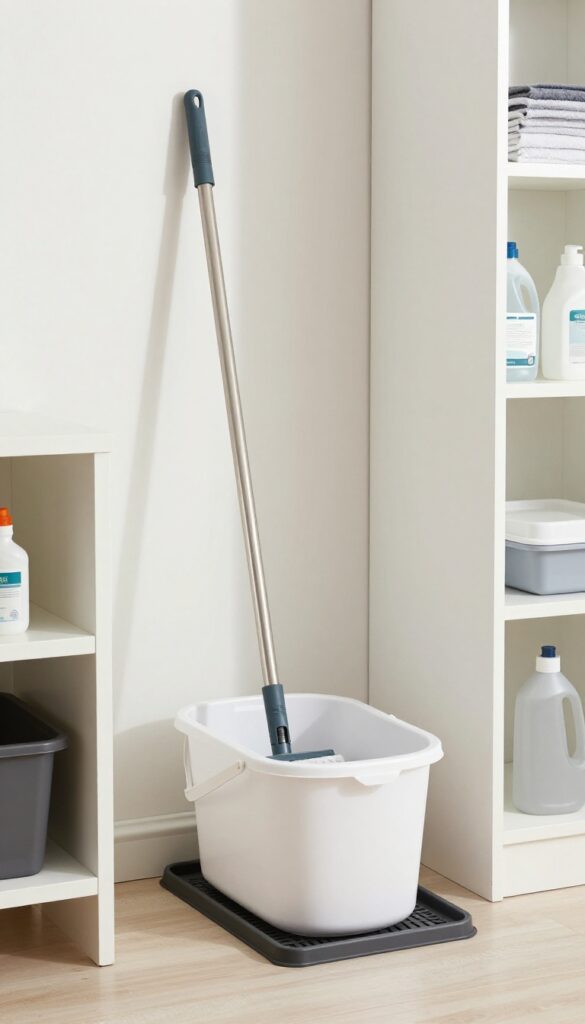
Mops and buckets are some of the bulkiest items in any cleaning closet. They tend to lean, drip, and take up more floor space than they should. A dedicated station solves all of that by giving them a proper home that keeps the area dry and organized.
A mop and bucket station doesn't need to be fancy. A simple corner with a wall-mounted mop holder and a drip tray underneath does the trick. The mop head stays off the floor, so it dries faster and doesn't get grimy.
The bucket sits on the tray, catching any stray drips and keeping your closet floor clean.
Choose The Right Mop Holder
Look for a holder that grips the mop handle securely. Rubber or silicone grips work well and won't damage the handle. Some holders also include clips for broom handles, so you can store multiple items in one spot.
Add A Drip Tray
A plastic boot tray or a shallow baking pan works great as a drip tray. Place it under the bucket to catch water that runs off the mop. Empty it once a week or when you notice standing water.
Keep The Bucket Out Of The Way
If your closet is tight, store the bucket on its side or upside down on a shelf. Some buckets have a flat top that can double as a small shelf for spray bottles or rags.
16. Add a Charging Station for Cordless Tools
Cordless vacuums, dusters, and scrubbers are game-changers, but only if their batteries are actually charged when you need them. A dedicated charging station inside your cleaning closet solves that problem neatly. It keeps devices ready to go and prevents a tangle of cords from taking over your space.
Install a power strip on a wall or shelf inside the closet, ideally near a power outlet. Use cable clips to route the cord neatly. Plug in the chargers for your cordless tools and arrange them so each device sits securely while charging.
This setup works for stick vacuums, handheld vacuums, electric dusters, and cordless scrub brushes. If you have multiple devices, consider a multi-device charging dock or a shelf with individual compartments. Label each charger to avoid confusion.
This small upgrade saves time and frustration, especially during quick cleanups.
Choose The Right Power Strip
Pick a power strip with surge protection and enough outlets for your devices. A strip with USB ports is handy for charging smaller items like a handheld vacuum or a duster. Mount it vertically on the wall to save shelf space, or use a flat plug to keep it flush against the outlet.
Organize Cords And Devices
Use cord clips or zip ties to bundle charger cables and keep them from dangling. Arrange devices so their charging ports are easily accessible. For stick vacuums, a wall mount with a built-in charger is ideal.
For smaller tools, a shallow bin or drawer with individual slots keeps chargers and devices together.
Safety And Maintenance Tips
Avoid overloading the power strip. Check the total wattage of your chargers to stay within limits. Keep the charging area dry and dust-free.
Periodically inspect cords for wear. If you notice a battery swelling or overheating, replace it immediately. A smoke detector near the closet adds an extra layer of safety.
17. Rotate Seasonal Supplies to Higher Shelves
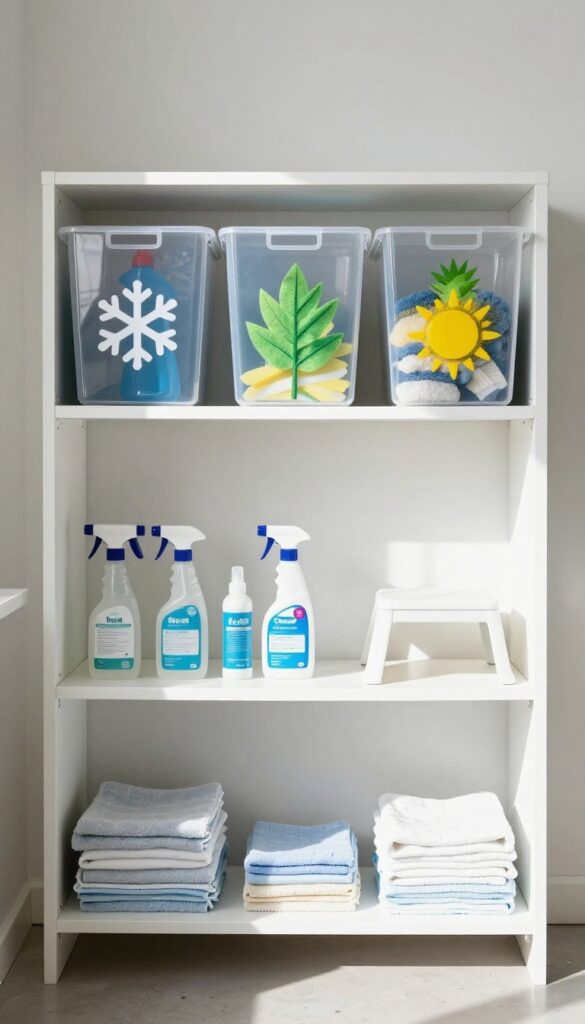
Not everything in your cleaning closet needs to be within arm's reach year-round. Seasonal items like window washing gear, outdoor cleaners, and holiday-specific products take up prime real estate that could go to everyday essentials. By rotating these less-used supplies to higher shelves, you free up easy-access space for the things you grab daily.
Reserve the top shelf for items you use only a few times a year. This simple shift keeps your closet from feeling cluttered and ensures that the stuff you reach for most is right at eye level. Plus, it forces you to evaluate what you actually use versus what's just taking up space.
What Goes Up High
Think about items tied to specific seasons: window washing solutions and squeegees in spring, outdoor furniture cleaners in summer, leaf blower attachments in fall, and ice melt or snow brushes in winter. Also stash bulk refills, extra sponges, and rarely used specialty cleaners like oven or grill cleaners on the top shelf.
How To Organize The Higher Shelves
Use clear, labeled bins to group seasonal items together. That way you can grab the whole bin when the season rolls around. A small step stool or collapsible ladder kept nearby makes accessing high shelves safe and easy.
Avoid stacking items too high—if you can't see what's up there, you'll forget about it.
Keep Everyday Essentials At Eye Level
The middle and lower shelves should hold your daily drivers: all-purpose cleaner, glass spray, disinfecting wipes, and microfiber cloths. Arrange them so the most-used items are front and center. This layout reduces rummaging and makes restocking a breeze.
FAQ
How do I organize a small cleaning closet?
Maximize vertical space with pegboards, over-the-door organizers, and tension rods. Use clear bins and label everything to keep items easy to find.
What is the best way to store mops and brooms?
Install hooks or a broom holder on the wall or inside the door to keep them upright and off the floor. This prevents damage and saves space.
Should I keep all cleaning supplies in one closet?
It's efficient to keep daily supplies in one central closet, but you can store duplicates in other areas like the kitchen or bathroom for convenience.
How often should I declutter my cleaning closet?
Go through your closet every 3-6 months to toss expired products, consolidate half-empty bottles, and donate unused items.
What are the best containers for storing cleaning supplies?
Clear, stackable plastic bins are ideal because you can see contents. Use smaller bins for categories like sponges, gloves, and cloths.
Conclusion
Your cleaning closet doesn't have to be a source of stress. Start with one or two ideas that address your biggest pain point—whether it's reclaiming floor space or taming a jumble of bottles.
Small changes add up fast, and soon you'll have a closet that actually makes cleaning easier instead of harder.


