Your home should feel fresh, but if the air seems stale or dusty, your ductwork might be the culprit. Dirty air ducts can recirculate allergens, odors, and debris, making your space feel less clean than it looks.
The good news is that you don't need professional help for every fix. With a few simple tools and a bit of know-how, you can tackle common duct issues yourself.
From knowing when to clean to sealing leaks and sanitizing safely, these 25 tips will help you breathe easier and enjoy a noticeably fresher home. Let's clear the air, starting with the basics.
1. Know When to Clean Your Air Ducts
Not every home needs duct cleaning every year. In fact, cleaning too often can be wasteful, while waiting too long can affect your health and HVAC efficiency. The trick is recognizing the right signs.
Start by checking for visible mold growth inside ducts or on other HVAC components. If you spot it, schedule a cleaning immediately. Next, pay attention to dust levels.
If you notice dust blowing from vents shortly after dusting, or if rooms get dusty faster than usual, your ducts likely need attention. Unexplained allergy symptoms that improve when you leave home also point to dirty ductwork. Musty odors when the system runs are another clear signal.
Finally, if you've had recent renovations or pest infestations, cleaning is wise to remove debris and contaminants.
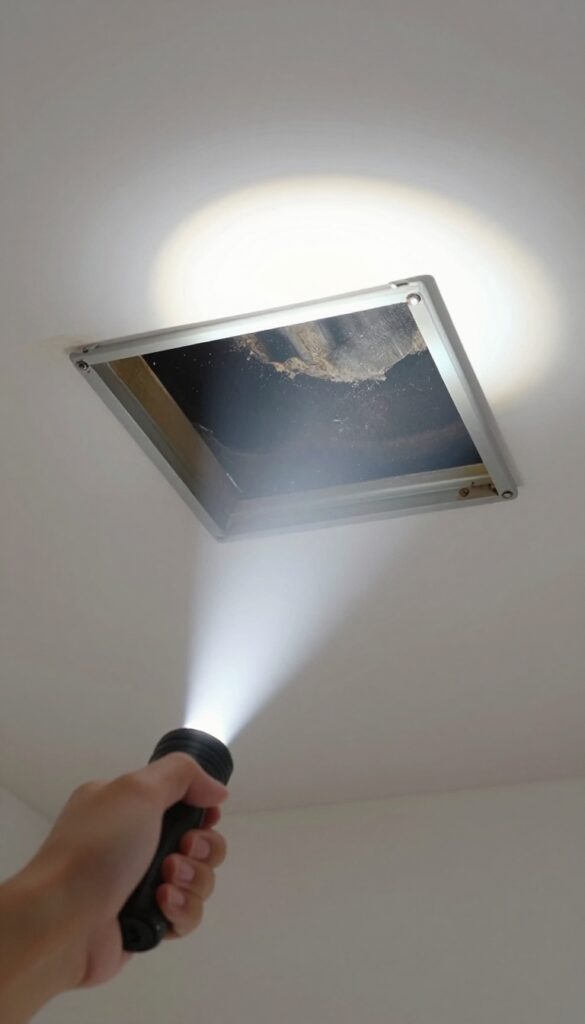
Visual Clues You Can Spot
Grab a flashlight and remove a vent cover. Shine the light inside and look for dust buildup, mold spots, or debris. If you see thick dust layers or any dark patches, it's time to clean.
Also check the air filter – if it's dirty within days of replacement, ducts may be recirculating dirt.
Health And Odor Signals
If family members experience sneezing, coughing, or itchy eyes more at home than elsewhere, dirty ducts could be the cause. Persistent musty smells when the heating or cooling runs indicate mold or mildew inside the ductwork. Don't ignore these signs – they affect indoor air quality.
2. Start with a Visual Inspection
Before you break out any cleaning tools, take a good look at what you're dealing with. A visual inspection can tell you a lot about the state of your ducts and whether a simple cleaning will do or if you need to call in a pro. It's quick, easy, and gives you a clear starting point.
Remove a few vent covers and shine a flashlight inside. You're looking for dust buildup, debris, or any signs of pests like droppings or nesting material. Pay attention to the registers in different rooms—some may be worse than others.
If you spot heavy mold growth or rodent activity, stop and contact a professional. Otherwise, note the areas that need the most attention so you can focus your cleaning efforts.
What To Look For
Check for thick layers of dust, clumps of hair, or debris that could block airflow. Also look for damp spots or stains that might indicate a leak or mold. Don't forget to inspect the insulation around ducts for signs of damage or moisture.
Tools You'll Need
A good flashlight is essential—preferably one with a bright beam. A screwdriver to remove vent covers, and maybe a mirror on a stick for hard-to-see corners. Gloves and a mask are smart if you're sensitive to dust.
When To Call A Pro
If you see heavy mold, rodent infestations, or debris that's caked on and won't budge, it's time to hire a professional. They have the equipment to handle serious contamination safely.
3. Change Your Air Filter First
You wouldn't sweep a room with a dirty broom, so why clean ducts with a clogged filter? The filter is your first line of defense. A fresh one catches dust before it settles into the ductwork, making every other cleaning step more effective.
Skipping this step is like mopping a floor without picking up the crumbs first.
Changing your air filter is the easiest and most impactful thing you can do for your air quality and duct cleanliness. A clean filter traps particles before they enter the system, reducing the buildup inside your ducts. It also helps your HVAC unit run efficiently, saving energy and preventing strain.
Make it a habit to check your filter monthly and replace it every 1-3 months, or more often if you have pets or allergies.
Why The Filter Matters For Duct Cleaning
Think of your filter as a gatekeeper. When it's dirty, dust and allergens flow past it into the ducts, where they settle and recirculate. Cleaning your ducts with a clogged filter is like trying to keep a room clean with a broken window.
A fresh filter ensures that after you clean, the air stays cleaner longer.
How Often Should You Change It?
Standard 1-inch filters should be replaced every 1-3 months. If you have thick pleated filters, they can last up to 6 months, but check them monthly. Homes with pets, smokers, or allergy sufferers need more frequent changes.
A good rule: if the filter looks gray or dusty, swap it out.
Choosing The Right Filter
Not all filters are equal. Look for a MERV rating between 8 and 13 for residential use. Higher MERV ratings trap more particles but can restrict airflow if your system isn't designed for them.
Avoid cheap fiberglass filters—they catch only large debris and let smaller particles slip through into your ducts.
4. Use a Vacuum with a HEPA Filter
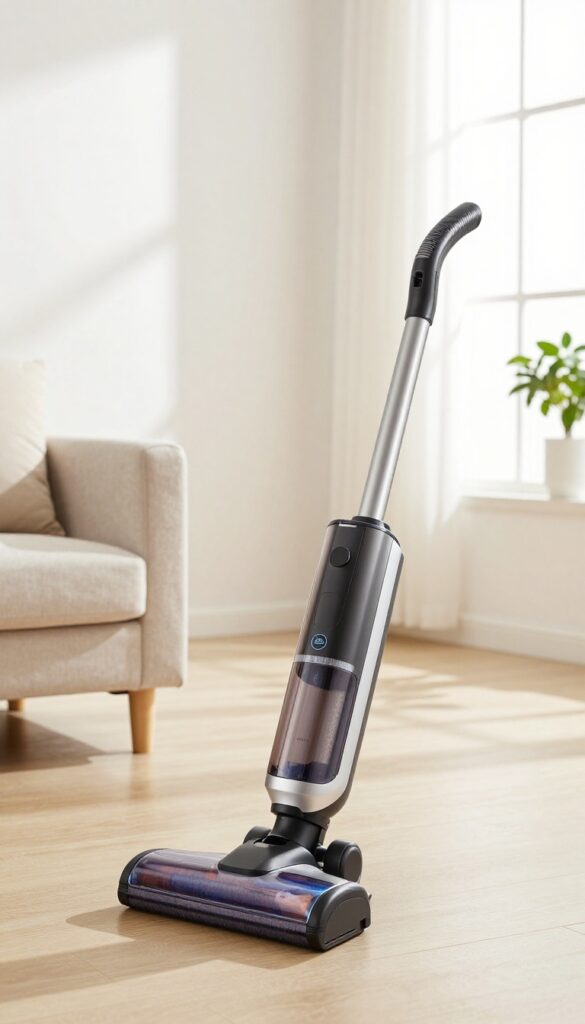
Not all vacuums are created equal, especially when it comes to air duct cleaning. A standard vacuum might suck up visible dust but then blow fine particles right back into your living space. That defeats the whole purpose.
A HEPA vacuum is a game-changer because it traps microscopic allergens like pollen, pet dander, and mold spores. If you're serious about DIY duct cleaning, this tool is worth the investment or rental.
Why Hepa Matters For Ducts
Regular vacuum bags and filters can't capture the tiniest particles that settle deep in your ducts. HEPA filters are designed to catch 99. 97% of particles as small as 0.
3 microns. That means the dust you stir up during cleaning won't just resettle elsewhere in your home.
How To Use It Effectively
Attach a brush or crevice tool to your HEPA vacuum and gently agitate the duct walls while vacuuming. Work in sections, starting from the farthest vent and moving toward the main return. Empty the canister or change the bag outdoors to avoid redistributing dust.
Rent Vs. Buy
If you only plan to clean ducts once or twice, renting a HEPA vacuum from a hardware store is cost-effective. For regular maintenance, buying a quality model pays off. Look for one with a long hose and attachments designed for tight spaces.
5. Brush Away Loose Debris
Vacuuming alone won't always get the job done. Dust and grime can cling stubbornly to duct walls, especially in corners or along seams. That's where a good brushing comes in—it loosens the debris so your vacuum can actually pull it out.
Use a stiff-bristled brush or a dedicated duct cleaning brush kit to agitate the dust before you vacuum. This two-step process makes a huge difference. Work in sections, brushing from the farthest point back toward the main return, and follow up with a strong vacuum.
Choose The Right Brush
A brush with stiff nylon or wire bristles works best. Avoid anything too abrasive that could damage the duct lining. A flexible brush rod can help you reach deeper into the ductwork without straining.
Brush In The Right Direction
Always brush toward the vacuum source, not away from it. This prevents you from pushing debris deeper into the system. If your ducts are long, brush a few feet at a time and vacuum immediately after.
Don't Forget The Register Covers
Remove and brush the register covers separately. They collect a surprising amount of dust and pet hair. A quick scrub with a brush and warm soapy water will get them clean before you reattach them.
6. Clean Vent Covers and Registers
Vent covers and registers are the most visible parts of your duct system, and they collect dust, pet hair, and grime quickly. Cleaning them not only improves airflow but also prevents debris from being sucked back into the ducts. It's a simple task that makes an immediate difference in how fresh your home feels.
Removing and washing vent covers is one of the easiest ways to boost air quality. Over time, these grilles can become caked with dust, which reduces efficiency and recirculates particles. A quick wash with soap and water removes buildup, and drying them thoroughly prevents mold or rust.
Here's how to do it right.
Remove And Soak
Start by unscrewing the vent covers or registers. Place them in a sink or bucket filled with warm water and a few drops of mild dish soap. Let them soak for 10–15 minutes to loosen dirt.
For stubborn grime, use a soft brush to gently scrub the surface.
Rinse And Dry Completely
After soaking, rinse each cover with clean water to remove all soap residue. Shake off excess water and set them on a towel to air dry. Make sure they're completely dry before reinstalling—moisture can lead to rust or mold growth inside the ducts.
Vacuum The Opening
While the covers are off, use a vacuum with a brush attachment to clean the opening of the duct. This removes any loose dust or debris that may have accumulated just inside. It's a small step that prevents that debris from blowing back into your rooms.
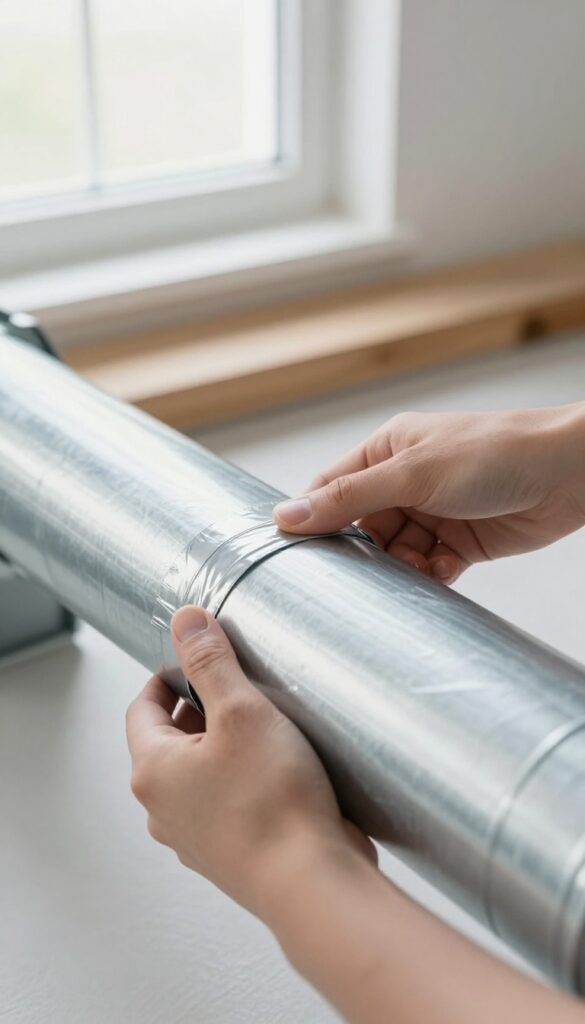
7. Seal Leaky Duct Joints
Even if your ducts look clean on the inside, hidden leaks can sabotage your efforts. Those small gaps at joints and connections pull in dust, insulation fibers, and even rodent droppings from attics or crawl spaces. Sealing them is one of the most effective ways to keep your air clean and your system efficient.
You’ll need mastic tape or duct sealant (not standard duct tape, which dries out quickly). Start by inspecting all accessible joints, especially where metal ducts connect. Clean the area around each gap with a dry cloth to ensure good adhesion.
Apply mastic tape firmly over the seam, pressing out any air bubbles. For larger gaps, use a brush-on duct sealant. This simple step can dramatically reduce the amount of debris entering your system.
Find The Leaks First
Turn on your HVAC system and hold a smoke pencil or incense stick near duct joints. If the smoke wavers or gets sucked in, you’ve found a leak. Mark these spots with a piece of painter’s tape so you don’t miss them.
Choose The Right Sealant
Mastic sealant is a thick, paste-like substance that works best on metal ducts. For flex ducts, use UL-181-rated foil tape. Avoid standard duct tape—it fails quickly under temperature changes.
Don’t Forget The Return Side
Supply ducts get most of the attention, but return ducts can also pull in dirty air from unconditioned spaces. Seal return joints just as carefully to prevent unfiltered air from entering the system.
8. Don't Forget the Return Air Vents
Return vents are the unsung heroes of your HVAC system. While supply vents push conditioned air into rooms, return vents pull air back into the system to be reheated or cooled. Because they’re constantly sucking in air, they collect more dust, pet dander, and debris than supply vents.
Neglecting them can reduce airflow and recirculate pollutants, so give them some love.
Return vents are easy to overlook because they’re often larger and located in hallways or on walls. But they play a critical role in your system’s efficiency. When they get clogged, your HVAC has to work harder, which can increase energy bills and wear down components.
Cleaning them regularly is a simple way to keep air moving freely.
Why Return Vents Get Dirtier
Return vents are designed to pull in air from the entire home, so they capture everything floating around—dust, hair, lint, and even small particles from cooking or cleaning. Over time, this buildup can restrict airflow and make your system struggle. Unlike supply vents, which blow air out, return vents actively suck in contaminants, making them a prime spot for grime.
How To Clean Return Vents
Start by turning off your HVAC system. Remove the vent cover and use a vacuum with a brush attachment to clean the interior surfaces. Pay special attention to the grille and the duct opening behind it.
For stubborn dust, use a microfiber cloth or a damp rag. If the vent has a filter, replace or wash it according to the manufacturer’s instructions.
Check For Blockages
Sometimes furniture, curtains, or rugs can block return vents without you realizing it. Make sure nothing is obstructing the airflow. Also, inspect the vent cover for damage or gaps that could let dust bypass the filter.
A quick visual check every month can prevent bigger issues down the line.
9. Check for Mold Growth
Mold in your air ducts isn't just gross—it can be a real health hazard. If you've noticed a musty smell when the HVAC runs, or if anyone in your home has unexplained allergy symptoms, mold might be lurking out of sight. The good news is you can often spot it yourself before it becomes a bigger problem.
Black or green spots on vents, registers, or inside the ductwork are telltale signs of mold. But sometimes mold hides deeper, so trust your nose too. A persistent earthy odor is a red flag even if you can't see anything.
Don't ignore it—mold spreads quickly and can affect your whole home's air quality.
Use A Diy Mold Test Kit
You don't need to call a pro right away. Home mold test kits are affordable and easy to use. Swab the suspicious area, send the sample to a lab, and get results in a few days.
This gives you clarity before deciding on next steps.
When To Call A Professional
If the test confirms mold, or if the affected area is larger than a few square feet, it's time to bring in an expert. Duct mold remediation requires specialized equipment and antimicrobial treatments. Trying to clean it yourself can release spores into the air, making things worse.
10. Use a Fogger or Sanitizer (Carefully)
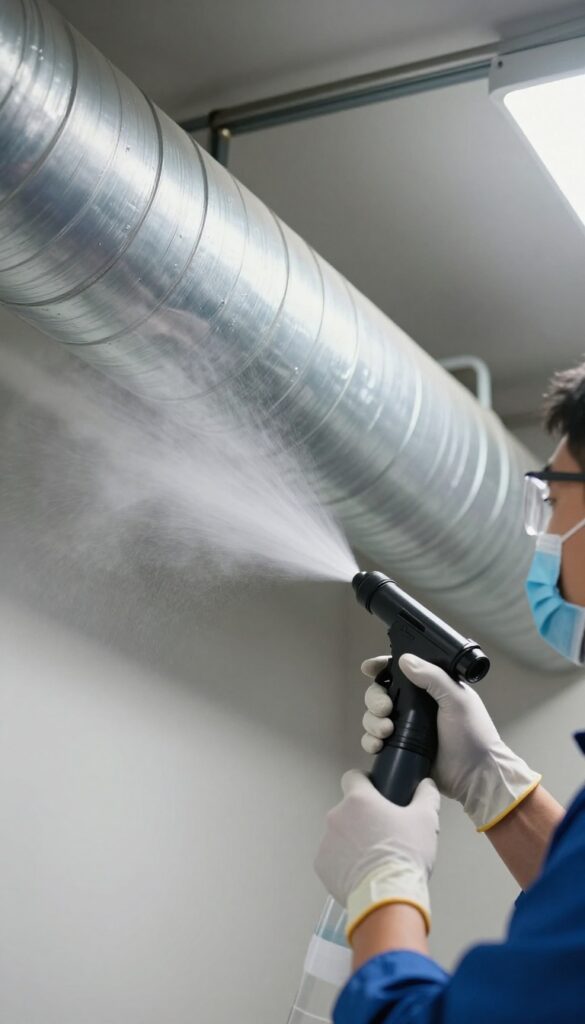
Sometimes a deep clean isn't enough, especially if you've dealt with mold, mildew, or persistent odors. That's where EPA-approved sanitizers come in. They can kill bacteria and mold spores hiding in your ductwork, but you need to use them the right way.
A fogger or spray sanitizer can reach spots your brush and vacuum can't. But misuse can lead to chemical residue or damage to your HVAC system. Follow the product instructions closely and prioritize safety.
Sanitizing your air ducts adds an extra layer of protection against allergens and microbes. It's not a daily task—only do it after a thorough cleaning or if you suspect contamination. Choose a product labeled for HVAC use and always wear gloves and a mask.
Pick The Right Sanitizer
Not all sanitizers are safe for air ducts. Look for EPA-registered products specifically designed for HVAC systems. Avoid bleach or harsh chemicals that can corrode metal or leave harmful fumes.
Many come in ready-to-use fogger cans or concentrate for a sprayer.
Apply Evenly And Sparingly
Too much sanitizer can create residue that attracts dust or damages components. Follow the coverage rate on the label. Use a low-pressure fogger to mist the interior of the ducts evenly.
Don't soak insulation or flexible ductwork.
Ventilate And Run The Fan
After applying, open windows and doors to let fresh air circulate. Run your HVAC fan on continuous mode for at least an hour to dry the ducts completely. This prevents moisture buildup and ensures the sanitizer works effectively.
11. Clean Dryer Vent Ducts Too
It's easy to overlook the dryer vent when you're focused on your main air ducts, but this separate ductwork plays a big role in your home's air quality and safety. Lint buildup in dryer ducts is one of the leading causes of household fires, and it also forces your dryer to work harder, using more energy and wearing out faster. Cleaning it annually (or more often if you do heavy laundry loads) is a simple, DIY-friendly task that pays off in safety and efficiency.
Cleaning your dryer vent isn't complicated, but it does require the right tools and a bit of patience. You'll need a dryer vent cleaning kit (usually a long flexible brush with attachments), a vacuum with a hose attachment, and possibly a screwdriver to disconnect the vent from the dryer. The goal is to remove all the accumulated lint from the entire length of the duct, from the dryer to the exterior vent hood.
Here's how to do it effectively and safely.
Disconnect And Prep
Start by unplugging the dryer and pulling it away from the wall. Disconnect the vent hose from the back of the dryer. If it's a flexible foil or plastic hose, check for any kinks or damage—replace it if needed.
Use your vacuum with a crevice tool to suck up loose lint from the dryer's exhaust port and the vent opening. This initial step clears the way for a deeper clean.
Brush The Full Duct
Attach the flexible brush from your cleaning kit to a drill (if included) or use it manually. Insert the brush into the vent opening and push it through the entire length of the duct, rotating as you go. This dislodges lint stuck to the walls.
Work from both ends if possible—start at the dryer end and then go from the exterior vent hood inward. Pull the brush back out and clean off the lint. Repeat until the brush comes out clean.
Vacuum Everything
After brushing, use your vacuum to suck up all the loosened lint from both ends of the duct. Don't forget to vacuum the area behind the dryer and the floor, as lint often accumulates there. Reattach the vent hose securely, making sure there are no sharp bends.
Push the dryer back into place, plug it in, and run a test cycle to ensure everything is working properly.
12. Inspect Insulation Around Ducts
Duct insulation often goes unnoticed until a problem arises. When it's damaged or missing, condensation can form on the duct surface, leading to moisture issues, mold growth, and reduced system efficiency. Taking a few minutes to inspect the insulation around your accessible ducts can save you from bigger headaches down the road.
Start by looking for any visible gaps, tears, or areas where the insulation has pulled away from the duct. Pay special attention to ducts in unconditioned spaces like attics, basements, and crawlspaces. If you spot damage, replace or repair the insulation using materials rated for HVAC use.
For fiberglass wrap, use foil tape to seal seams. For foam board, cut pieces to fit and seal edges with mastic or tape. Proper insulation keeps the air inside at the right temperature and prevents moisture from forming on the duct surface.
Where To Look First
Focus on ducts in attics, basements, and crawlspaces—areas where temperature swings are biggest. These spots are most prone to condensation and insulation damage. Also check around joints and connections where insulation can easily get bumped or torn.
How To Spot Trouble
Look for water stains, dampness, or visible mold on or near ducts. If you see rust on metal ducts or notice a musty smell, insulation failure could be the cause. Also check for insulation that's sagging, compressed, or missing entirely.
Simple Fixes You Can Do
For small tears or gaps, use foil tape to seal the insulation back in place. For larger damaged sections, cut a new piece of insulation to size and wrap it around the duct, securing it with tape or wire. Make sure the insulation is snug but not compressed, as compressed insulation loses its R-value.
13. Keep Ducts Dry
Moisture is one of the biggest enemies of clean ducts. When humidity gets trapped inside your HVAC system, it creates the perfect breeding ground for mold, mildew, and bacteria. Even a small amount of standing water or persistent dampness can turn your ducts into a health hazard.
Thankfully, keeping ducts dry is straightforward. A few preventive steps can stop moisture before it starts, saving you from expensive mold remediation and ensuring the air flowing through your home stays fresh and clean.
Fix Leaks Right Away
Any water leak in your HVAC system—whether from a condensate drain, a refrigerant line, or a loose joint—needs immediate attention. Even a slow drip can keep duct surfaces damp long enough for mold to take hold. Inspect visible ductwork and connections monthly, especially during humid months.
If you spot moisture, dry the area thoroughly and seal the leak with mastic tape or metal foil tape. For larger issues, call an HVAC pro.
Use A Dehumidifier In Damp Climates
If you live in a region with high humidity, your air conditioner alone might not be enough to keep ducts dry. A whole-house dehumidifier works with your HVAC system to remove excess moisture from the air before it enters the ductwork. Alternatively, a portable dehumidifier in the basement or crawlspace—where ducts often run—can make a big difference.
Aim to keep indoor humidity between 30% and 50%.
Check Insulation And Ventilation
Ducts in unconditioned spaces like attics, basements, or crawlspaces are prone to condensation. When cool duct surfaces meet warm, humid air, moisture forms. Make sure ducts in these areas are properly insulated with R-6 or higher insulation wrap.
Also, ensure crawlspaces and attics have adequate ventilation to reduce humidity buildup. Vapor barriers on the ground in crawlspaces can further help.
14. Use a Camera Inspection for Deep Issues
Sometimes you need to see what's really going on inside your ducts. A borescope camera lets you peek into those dark, narrow spaces without cutting into walls. You can rent one from a tool library or hardware store for a day, and it's a game-changer for diagnosing hidden problems.
A visual inspection reveals blockages, mold growth, or even small critters that might have made a home in your ductwork. It also helps you confirm whether a cleaning actually worked or if there's still buildup deep in the system. This tool turns guesswork into certainty.
What To Look For
Run the camera along the main trunk lines and at each register boot. Look for piles of debris, dark patches that could be mold, or damp spots indicating a leak. Pay special attention to bends and junctions where stuff tends to accumulate.
How To Use It Effectively
Insert the camera through a register opening or a small access hole you drill (patch it later). Move it slowly and use the built-in light to illuminate dark areas. Record video or take snapshots so you can review them later or show a professional if needed.
When To Call A Pro
If you spot extensive mold, standing water, or structural damage, it's time to bring in a certified duct cleaner. A camera inspection gives you concrete evidence to share, so they can plan the right remediation without unnecessary guesswork.
15. Schedule Professional Cleaning Every 3-5 Years
Even with regular DIY maintenance, your ducts eventually accumulate grime that only professional equipment can fully remove. Over time, dust, pollen, and even mold can build up deep inside the system, reducing airflow and spreading contaminants. That's why a thorough professional cleaning every three to five years is a smart investment for your home's air quality.
Hiring a certified professional ensures your entire duct system gets the deep clean it needs. NADCA-certified technicians follow strict standards and use powerful truck-mounted vacuums, rotary brushes, and air whips to dislodge and remove debris. This level of cleaning reaches areas you simply can't access on your own, like the main trunk lines and supply registers.
Plus, professionals can inspect for hidden issues like mold growth, pest infestations, or damaged insulation that might need attention.
What Nadca Certification Means
NADCA (National Air Duct Cleaners Association) certification is the gold standard for duct cleaning professionals. Certified technicians undergo training on proper cleaning methods, safety protocols, and industry best practices. When you hire a NADCA-certified company, you can trust they'll use the right tools and techniques to clean your entire system—not just the visible parts.
Always verify certification before booking, and ask for references or online reviews to ensure quality.
Signs You Need Professional Help Sooner
While every 3-5 years is a good general rule, certain situations call for earlier professional cleaning. If you notice visible mold growth inside ducts or on registers, persistent musty odors even after cleaning, or if household members experience unexplained allergy symptoms, it's time to call in the pros. Also, after a renovation or if you've had a pest infestation, a professional cleaning can remove construction dust, debris, and droppings that DIY methods can't handle.
What To Expect During A Professional Cleaning
A typical professional duct cleaning takes 2-4 hours, depending on the size of your home and the complexity of your system. The technician will start by inspecting your ducts with a camera, then seal off vents to create negative pressure. Using specialized tools, they'll agitate and vacuum out debris from every duct run.
Finally, they'll clean the blower motor, evaporator coil, and other components. You should receive a before-and-after report showing the improvement.
16. Ask About Negative Air Pressure Cleaning

Not all duct cleaning methods are created equal. Some techniques can actually stir up more dust than they remove, leaving your home messier than before. That's where negative air pressure cleaning comes in—it's the gold standard for keeping debris contained.
Negative air pressure cleaning relies on a powerful vacuum system that creates suction throughout your ductwork. As the technician agitates the ducts with brushes or air whips, the loosened particles are immediately pulled into the vacuum, preventing them from escaping into your living space. This method is especially effective for removing fine dust, mold spores, and pet dander that settle deep inside the ducts.
How It Works
The technician seals off all supply and return registers except one, where a high-efficiency particulate air (HEPA) vacuum connects. This creates negative pressure—meaning air flows into the duct system rather than out. Then, using compressed air or rotating brushes, they dislodge debris, which gets sucked directly into the vacuum.
No dust clouds, no mess.
Why It Matters For Your Home
Standard cleaning methods that don't use negative pressure can release contaminants into your rooms, aggravating allergies and coating furniture. Negative pressure cleaning ensures that the dirt leaves your home, not just your ducts. It's also the only method recommended by the National Air Duct Cleaners Association (NADCA) for thorough results.
What To Ask Your Pro
Before hiring, ask if they use a truck-mounted vacuum or a portable HEPA unit that maintains negative pressure throughout the job. Confirm that they seal all vents and that their equipment is powerful enough for your system's size. A reputable cleaner will be happy to explain their process.
17. Avoid Chemical Sealants Unless Necessary
It's tempting to reach for a spray-on sealant after cleaning your ducts, especially if you want to lock in that fresh feeling. But many chemical sealants release volatile organic compounds (VOCs) that can linger in your home and irritate your lungs. Unless a professional specifically recommends a sealant for a leak or repair, it's best to skip the chemicals.
Instead of relying on chemical sealants, focus on mechanical fixes like mastic tape or metal fasteners for leaks. If you do need a sealant, choose one labeled low-VOC or specifically designed for HVAC systems. Always apply it sparingly and allow plenty of ventilation before running your system again.
Your ducts will stay clean without adding unwanted fumes to your indoor air.
When Sealants Make Sense
There are rare cases where a sealant is the right call—for example, sealing a small gap in a hard-to-reach duct joint that can't be taped. In those situations, a professional might use a water-based, low-VOC product. Never use general-purpose spray foam or silicone caulk, as these can degrade duct materials or off-gas for weeks.
Safer Alternatives For Duct Sealing
For most DIY duct sealing, mastic tape or duct mastic (a sticky paste) is the gold standard. Both are water-based, low-odor, and create an airtight seal without harmful fumes. They're easy to apply with a brush or gloved hand and cost less than chemical sprays.
Stick with these and you'll avoid the risks of chemical sealants entirely.
18. Clean After Renovations
Renovations kick up a shocking amount of dust, even if you seal off doorways. That fine construction dust doesn't just settle on your floors—it gets pulled into your HVAC system and coats the inside of your ducts. If you skip a post-reno duct cleaning, that dust will circulate for months.
After any major renovation—whether it's a kitchen remodel, new flooring, or drywall work—schedule a duct cleaning before you turn the HVAC back on for regular use. This prevents construction debris from embedding deep into duct liners and being recirculated.
Why Renovation Dust Is Different
Regular household dust is mostly skin cells and fabric fibers. Construction dust contains drywall particles, sawdust, silica, and sometimes chemical residues. These particles are finer and more abrasive, and they can damage your HVAC system over time if left inside.
When To Schedule The Cleaning
Wait until all construction is completely finished and the home has been thoroughly vacuumed. Then call a professional duct cleaner to do a full inspection and cleaning. Doing it too early means they'll clean dust that's still being generated; doing it too late means the dust has already settled and bonded.
Preventive Measures During Reno
Temporarily seal off supply and return registers with plastic sheeting and painter's tape. Also turn off the HVAC system during dusty work. This minimizes the amount of debris that gets into the ducts in the first place, making the post-reno cleaning easier.
19. Keep Pets Groomed and Off Vents
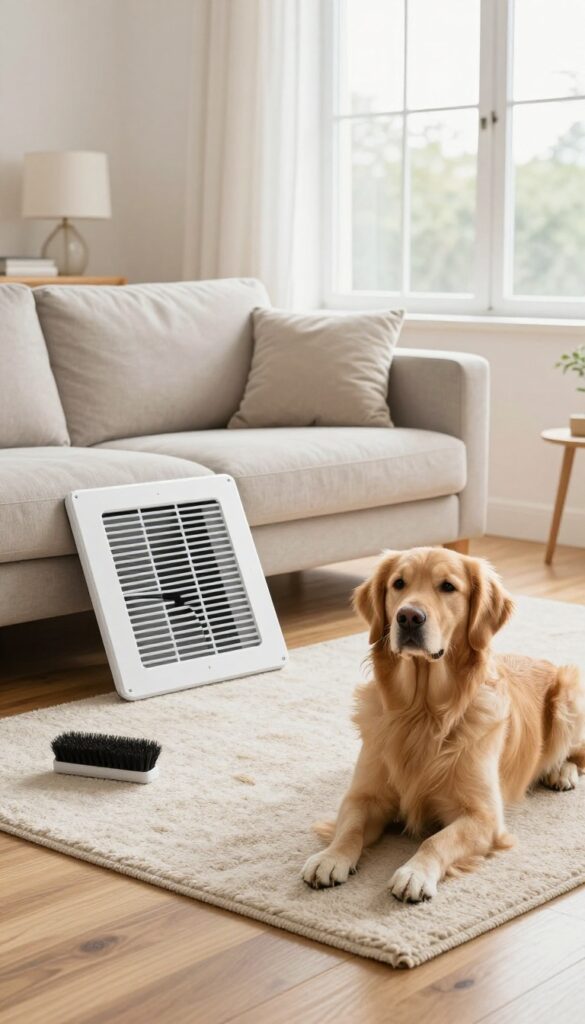
Pets bring joy, but they also bring dander, fur, and dust into your home. All that pet debris doesn't just settle on your floors—it gets pulled into your HVAC system and recirculated through your ducts. If you have furry friends, you've probably noticed how quickly dust bunnies appear near vents.
That's a sign your ducts are working overtime. Regular grooming and a few smart habits can dramatically reduce the amount of pet hair and dander entering your ductwork. Your air will feel cleaner, and your HVAC system won't have to work as hard.
Brush Before It Becomes Airborne
A quick daily brushing session removes loose fur before it can shed around the house. Do it outside or in a room you can easily vacuum. This simple habit cuts down on the hair that ends up in your air returns.
Even five minutes a day makes a noticeable difference.
Keep Vents Clear And Covered
Pets love lying on warm air vents in winter or cool ones in summer. But that blocks airflow and pushes hair and dander directly into the duct system. Use vent covers that are pet-proof or place furniture to discourage lounging.
Regularly vacuum the vent grilles to remove any fur that does collect.
Upgrade Your Air Filter
If you have pets, a standard fiberglass filter isn't enough. Switch to a high-efficiency filter with a MERV rating of 8 or higher. Change it every 30 to 60 days—more often if you have multiple pets.
A quality filter catches pet dander before it settles deep in your ducts.
20. Use High-Quality Air Filters
Your HVAC system works hard to keep your home comfortable, but it can only do so much if the filter is cheap or clogged. Upgrading to a high-quality air filter is one of the simplest ways to improve indoor air quality and reduce dust buildup in your ducts.
Standard fiberglass filters catch large particles but let smaller allergens and dust slip through. By switching to a filter with a MERV rating between 8 and 13, you capture more pollen, pet dander, mold spores, and even some bacteria. That means less debris circulating through your ducts and settling in your home.
What Merv Rating Means
MERV stands for Minimum Efficiency Reporting Value. The higher the number, the more particles the filter traps. For most homes, MERV 8 is a good baseline, while MERV 11 or 13 offers noticeably cleaner air.
Just make sure your HVAC system can handle the higher airflow resistance.
When To Change Your Filter
A dirty filter forces your system to work harder and recirculates dust. Check it monthly and replace it every 1 to 3 months, or more often if you have pets or allergies. A clean filter also helps keep your ducts cleaner longer.
Filter Fit Matters
Even the best filter won't work if air leaks around it. Make sure the filter is the correct size and fits snugly in its slot. Gaps let unfiltered air bypass the filter, carrying dust straight into your ductwork.
21. Consider UV Lights for Mold Prevention
Mold in air ducts is a persistent problem that cleaning alone may not fully solve. Even after a thorough cleaning, moisture and darkness can allow spores to regrow quickly. That's where ultraviolet (UV) lights come in as a powerful preventive tool.
Installing UV lights near the evaporator coil or inside the ductwork can kill mold, bacteria, and other microorganisms before they have a chance to spread. These lights work by disrupting the DNA of microbes, effectively sterilizing the air passing through. While they're not a replacement for regular duct cleaning, they add a layer of protection that keeps your system cleaner for longer.
How Uv Lights Work
UV-C light, the type used in HVAC systems, has a short wavelength that penetrates the cell walls of microorganisms. When installed near the coil, the light constantly bathes the surface in UV rays, preventing mold from colonizing. Some systems also use UV lights in the return air duct to treat moving air, though coil-focused lights are more common.
Installation Considerations
UV lights should be installed by a professional to ensure proper placement and safety. They need to be positioned so the light hits the coil directly without being blocked by ductwork. Also, UV lights degrade over time, so bulbs typically need replacement every 12 to 24 months.
Check your unit's specifications for the exact lifespan.
Cost Vs. Benefit
A UV light system can cost anywhere from $200 to $600 installed, depending on the size and complexity. For homes with persistent mold issues or residents with allergies or asthma, the investment often pays off in improved air quality and fewer cleaning cycles. Plus, it can help extend the life of your HVAC equipment by keeping coils clean.
22. Don't Overlook the Condensate Drain
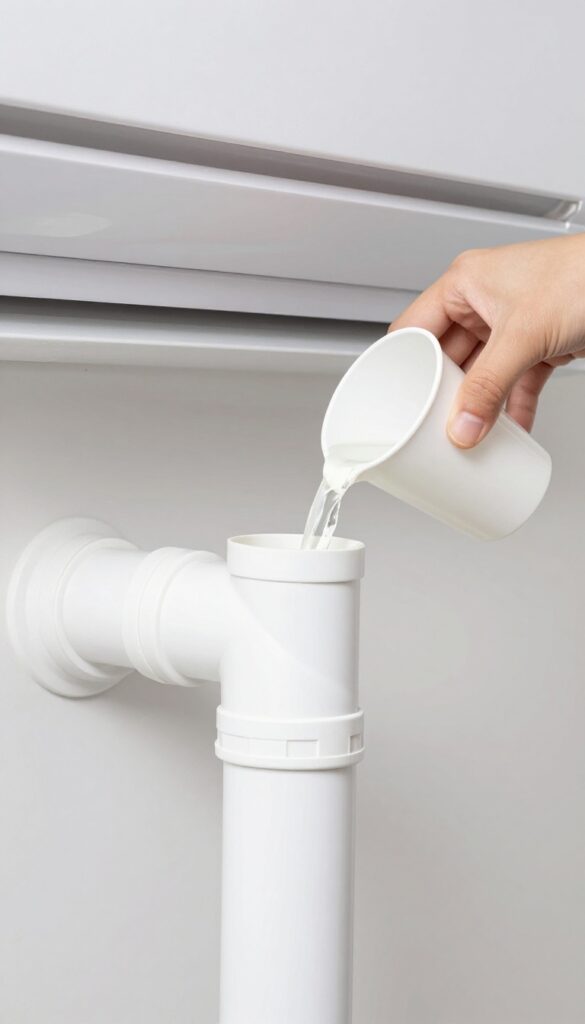
Your air conditioner's condensate drain is easy to forget, but a clog here can cause moisture to back up into your ductwork. That standing water becomes a breeding ground for mold, mildew, and bacteria, which then get blown right into your living spaces. A simple annual cleaning keeps things flowing and your air fresh.
The condensate drain line removes excess moisture from your AC system. When it gets clogged with algae, dust, or debris, water can overflow the drain pan and seep into ducts or even damage your ceiling. Cleaning it once a year is a quick, cheap way to prevent bigger problems.
Why It Matters
A blocked drain doesn't just stop water flow—it creates a humid environment inside your HVAC system. Mold can grow within days, and spores will travel through your ducts every time the fan runs. That musty smell you notice?
A clogged drain is often the culprit.
How To Clean It
Locate the drain line near your indoor AC unit—it's usually a PVC pipe with a T‑shaped vent. Remove the cap and pour in a cup of white vinegar or a diluted bleach solution (1 part bleach to 16 parts water). Let it sit for 30 minutes, then flush with water.
Repeat annually, ideally before summer.
Prevent Future Clogs
Install a condensate drain pan treatment tablet or a small algae‑killing device. These slowly release chemicals that keep slime from forming. Also, check the drain line for kinks or sagging sections where water can pool.
A straight, clear path is key.
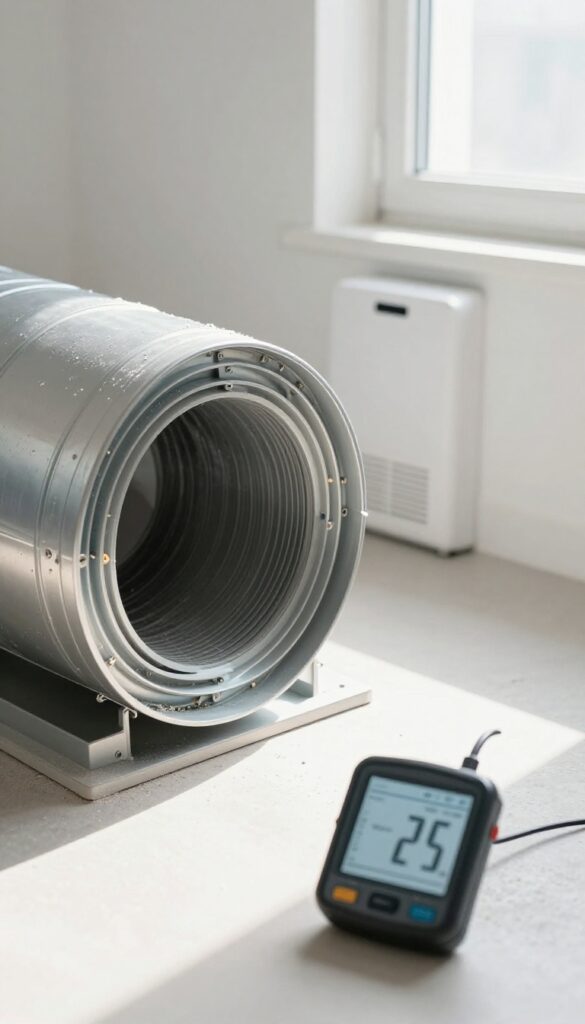
23. Test Indoor Air Quality After Cleaning
You've scrubbed vents, vacuumed ducts, and maybe even sanitized. But did it actually make a difference? Your nose can tell you a lot, but it can't measure invisible particles.
That's where an air quality monitor comes in handy. Testing after cleaning gives you hard data on what changed. It also helps you spot lingering issues you might have missed.
A simple check can confirm your efforts paid off or point you toward a deeper problem.
What To Look For
Grab a consumer-grade air quality monitor that tracks PM2. 5 (fine dust) and VOCs (volatile organic compounds). Run it in the room with the most ductwork for a few hours before and after cleaning.
You want to see PM2. 5 levels drop noticeably—ideally below 12 µg/m³. VOCs should trend toward zero, or at least stay under 500 ppb.
If numbers barely budge, your ducts may still be dirty or you have a hidden source like mold or off-gassing furniture.
When To Test
Test right after cleaning, then again a week later. The immediate test shows how much debris you removed. The follow-up reveals if new dust is being stirred up from deeper in the system or if your HVAC is recirculating particles.
Also test after running the fan for a few hours—sometimes the real problem shows up once air starts moving.
Interpreting The Results
A big drop in PM2. 5 means your duct cleaning was effective. If VOCs are still high, check for chemical residues from cleaning products or nearby paint/glue.
If both are low but the air still feels stuffy, your ducts might have a leak or your filter needs upgrading. Use the data to decide your next step—whether that's sealing leaks, changing filters more often, or calling a pro for a deeper inspection.
24. Create a Maintenance Schedule
Even the best duct cleaning won't last if you forget about it until the dust piles up again. A simple maintenance schedule keeps your system running efficiently and your air fresh year-round. Consistency is what turns a one-time fix into a long-term habit.
Set reminders for filter changes, inspections, and professional cleanings. Consistency is key.
Mark Your Calendar For Filter Changes
Your filter is the first line of defense. Check it monthly and replace it every 1–3 months, depending on usage and pets. A clogged filter forces your system to work harder and recirculates dust.
Schedule Seasonal Inspections
Twice a year—spring and fall—do a quick visual check of your vents and registers. Look for dust buildup, mold spots, or signs of pests. Catching issues early saves you from bigger problems later.
Book Professional Cleanings Every 3–5 Years
Even with regular DIY care, ducts accumulate debris over time. A professional cleaning every few years removes deep buildup and ensures your system is truly clean. Mark it on your calendar so you don't forget.
Use Digital Reminders
Set phone alerts or use a home maintenance app to remind you of each task. This takes the guesswork out of remembering and keeps your schedule on track without effort.
25. Know When to Replace Ducts
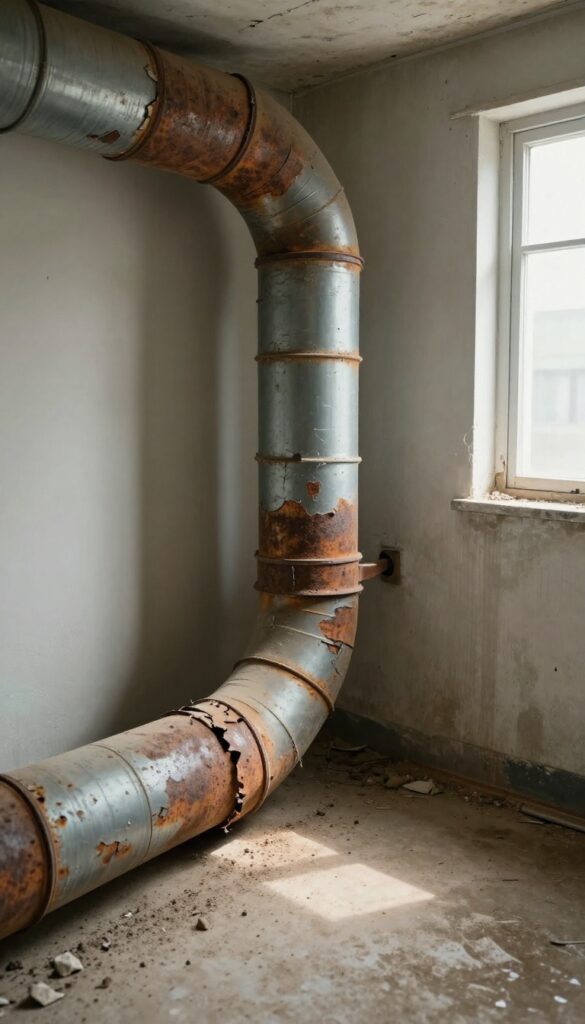
Cleaning and sealing only go so far. If your ductwork is old, damaged, or made from hazardous materials, replacement is the only safe option. Knowing the warning signs can prevent wasted effort and protect your indoor air quality.
Age And Wear
Ductwork typically lasts 10 to 15 years. If your home is older and the ducts have never been replaced, they may have accumulated decades of dust, debris, and even pest droppings that cleaning can't fully remove. Cracks, holes, and separated joints also become more common with age, leading to major air leaks.
Asbestos Or Vermiculite
Homes built before the 1980s may have duct insulation containing asbestos. Disturbing these materials during cleaning can release dangerous fibers into the air. If you suspect asbestos, do not attempt any DIY work.
Have a professional inspect and, if needed, arrange for safe removal and replacement.
Persistent Mold Or Rust
If mold keeps coming back despite thorough cleaning, the duct material itself may be porous or compromised. Rust on metal ducts indicates moisture problems that can worsen over time. In both cases, replacement is more effective than repeated remediation.
Poor Airflow After Repairs
Sometimes ducts are simply too small, too long, or poorly designed for your current HVAC system. If you've sealed leaks and cleaned everything but still have weak airflow in certain rooms, consult an HVAC pro. They can assess whether duct replacement or resizing is needed.
FAQ
How often should I clean my air ducts?
Every 3 to 5 years for most homes. Clean more often if you have pets, allergies, or after renovations.
Can I clean air ducts myself?
Yes, for light dust and debris. Use a HEPA vacuum and brush. For mold or heavy buildup, hire a professional.
Does duct cleaning improve air quality?
Yes, it can reduce dust, allergens, and mold spores, leading to fresher indoor air.
How much does professional duct cleaning cost?
Typically $300 to $500 for an average home. Prices vary by location and duct complexity.
What are signs that my ducts need cleaning?
Visible mold, excessive dust, musty odors, or unexplained allergy symptoms are common indicators.
Conclusion
Clean air ducts make a real difference in how your home feels. You don't have to tackle every tip at once.
Start with the step that addresses your biggest concern—whether it's dust buildup, musty smells, or uneven airflow. A few small changes today can lead to fresher air and a more comfortable home tomorrow.


